Material Nodes Addon

The Material Nodes addon is available on:
Blender Market: https://blendermarket.com/products/material-nodes-addon
Gumroad: https://gum.co/jahEa

What is the Material Nodes addon?
The Material Nodes is an addon that provides node groups you can easily plug in to your node tree. No need to append node groups, you only need to install the addon. Therefore you can easily speed up building a material that is an improved version of the default material in Blender. Or you can improve an already existing shader.

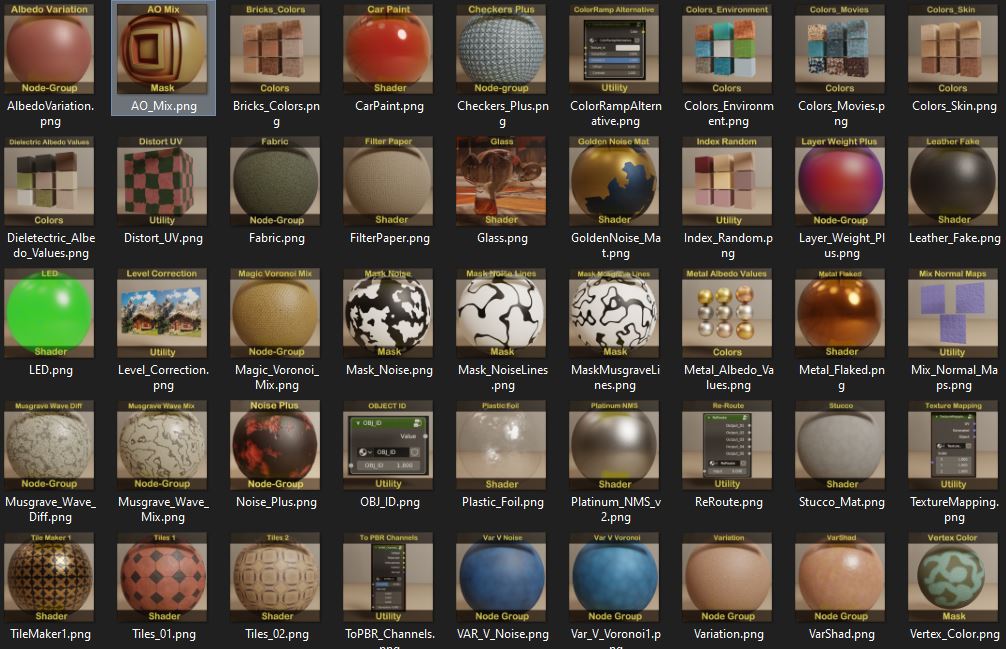
There are 19 useful node groups included. A few of these node groups are designed to make default shaders more natural. It is doing this by adding independent variations to the value, hue and saturation of the albedo color.

There is also an interesting node group for correcting the albedo value of textures. It is doing this not by contrast and brightness but its own unique and more correct way.
And other nodes like a set of color ramps, UV distortion, and procedural textures.
In the future there will be more nodes provided.

Note: All node-groups are compatible with EEVEE as well as with Cycles. For Blender 2.81, see notes below.

What is in it for me?

  • Material Nodes are always within reach because they are provided through an addon. No need to append, or load a scene. Just use the addon and click on the node group you need.
  • The provided node groups are easy to plug in your node tree.
  • The Material Node groups speeds up building up a material.
  • You can improve existing shaders. Use the LevelCorrector and / or the VarShad node group.
  • Make default materials way more natural. The default material in Blender is to perfect and to sterile. In real life materials have loads of variations.
  • In case you have a favorite node-group you want me to include, let me know. I will then review it and decide if I can add it.
  • Correct Textures you downloaded from the internet. Often they are way to bright or to saturated. Brightness/Contrast is not a very good way to correct textures. Take a look at the LevelCorrector instead.

For who is the Material Nodes addon?

  • For those who want to get rid quickly of the sterile look of standard materials.
  • For those who are downloading textures and want to correct the albedo values or bring some more variety to the textures.

Known issues.
For now, best is to use the Material Nodes addon with Blender 2.80.
At the moment there are some issues with bump nodes in Blender 2.81. This because the Blender developers are improving the bump node, but at the cost of performance. This means, at the moment, that once there is a nodegroup in the material the bump map stops working (bug). Also the calculation of bump maps are a bit longer. You can do a few things: a) await some bugs to be fixed. b) ungroup node groups. c) don’t use bumpmaps (but normal maps).

How to install the Material Nodes Addon?
Download the .zip file called Material_Nodes_V1-3.zip. Open Blender and go to Edit > Preferences > Addons. Click on Install and navigate to the .zip file you just downloaded. Click install, activate the addon, save preferences and refresh. You can find the addon in the shader editor (n-panel).

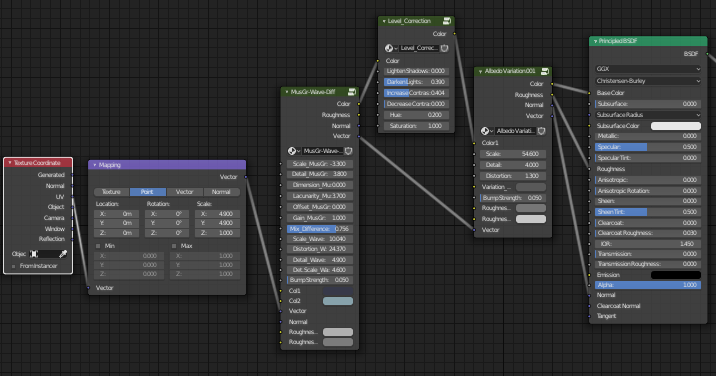
Explanation of the nodes provided
Most nodes you can plug in right before the color socket of a (principled) shader. For Example: Albedo Variation, AO_Mix, Layer Weight, LevelCorrector, Noise, Variation and Z.

Note: Updated the Material Nodes to version 1.3. More nodes added, see screenshot here below. Full documentation included in the download.

  • Albedo Variation . Will add (multiply) adjustable noise to the already existing albedo value.

  • AO_Mix. Will add (multiply) AO to the already existing albedo value. Depends also on the AO settings in the properties panel (in EEVEE, the render tab).

  • Checkers+. Contains two procedural checkers textures. The second one’s scale is multiplied by the first one. You can set the multiplication. Could also be used for making fabrics. Tip: try the UV distortion, and add the VarShad behind it.

  • Colorramps . A set of colorramps of which colorcombinations are derived from movies by Tim Burton and others. Best is to input a procedural texture (Musgrave/Wave for example). Then plug the ColorRamps into the Level Corrector.

  • Distort UV . Distort the UV, meaning that the texture got “deformed”. Plug this in after a mapping node.

  • Fabric . To create fabric material.

  • Index/Random. With this node group you can give each object in the scene with the same material each another variation of the material. More info in documentation that comes with the Material Nodes Addon.

  • Layer Weight+ . An artistic way to change the look of a material by changing the hue, saturation or value of a material at grazing angle. Sometimes it’s nice to use with metals. But keep in mind it’s artistic.

  • LevelCorrector . Often the texture you find on the internet are way to bright. The albedo value of white snow is like 80% white, (And pure black material doesn’t exist. Well, VantaBlack is really really dark. It’s like a black hole). So this levelCorrector brings downs the highs. There are two curves for that. One increase the contrast while lowering the highs, and the other one decrease the contrast while lowering the highs. First put the mix open then play with LC/HC slider. Then if need, lower the mix.

  • Magic-Voronoi. A node-group with two procedural textures inside. Suitable for making fabrics

  • Mix Normal Maps . Inside the Mix Normal-Maps there are two textures. From there you can load any normal map. In that case, be sure to set the color-space to Non-color. This node-group does two things. First thing is that it will mix the two normal maps. And second is that you can convert the difference of these to normal maps to diffuse color. The benefit is, that we can now scale the two textures differently. The result is that tilling is getting less obvious. If you put on top of that the VarShad node-group, it’s getting hard to find any tiling. To go inside the node-group, select it and press TAB.

  • Musgrave-Wave-Diff . A procedural texture. Just experiment with the sliders. You can plug this into a ColorRamp.

  • Musgrave-Wave-Mix . A variation of the previous procedural texture.

  • Noise. This is a simplified version of the VarShad and often this is enough. I suppose this node is also faster because there is only one procedural noise texture inside. You can change the albedo/color/diffuse and bump. But of course you can plug it in nearly anything, like roughness, etc.

  • Variation . Als a simplified version of the VarShad. Instead of three procedural noise textures, this has one. It doesn’t change hue and saturation. It’s lighter as well.

  • Z. To make changes on the Z normals. For example for dust.

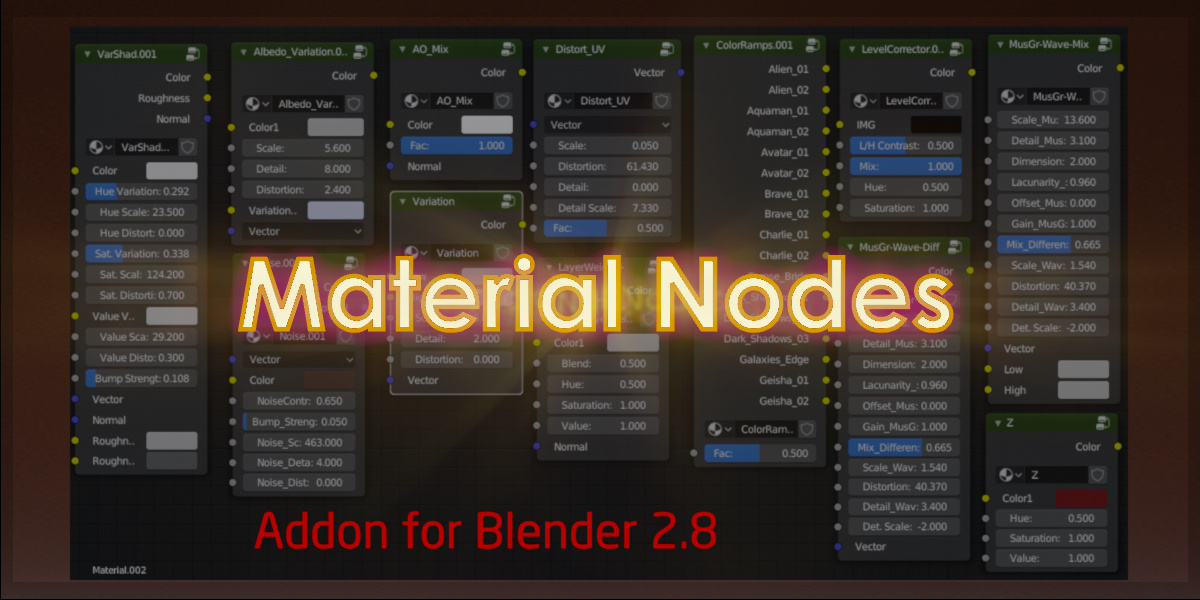
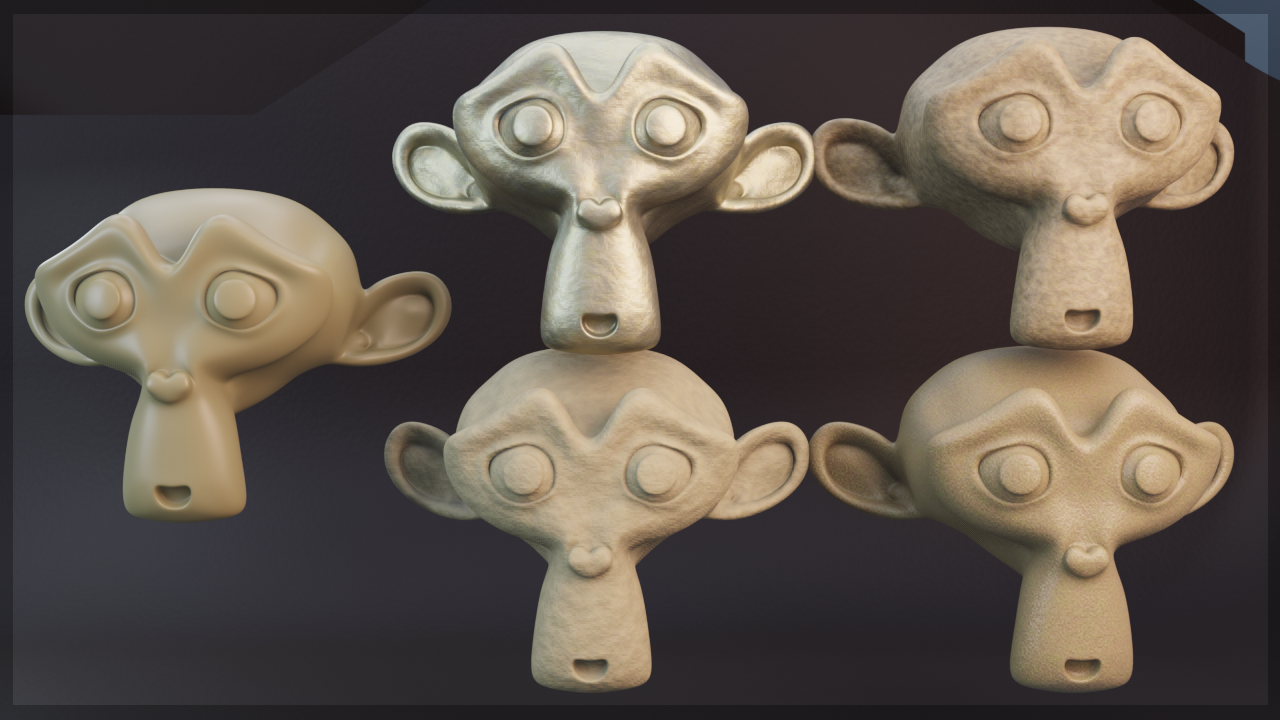
One Example: Below the VarShad group-node with different levels at work. On the left you see the default principled shader. And on the right the same shader but with the VarShad node-group plugged in.

You can submit your favorite node-group and I will check if it’s suitable to include that in future updates. This way we can help eachother.

2 Likes

Good news, the Material Nodes Addon is already available. (I skipped half a night).
Here it is: https://blender-addons.org/product/material-nodes-addon/
And later elsewhere as well. (Hmm, no preview of the link?)

I think it’s a great add-on :slight_smile:

But … I felt it was a little inconvenient that I couldn’t buy in the existing market :frowning:

1 Like

Update: Material Nodes V 1.2 is now available on Gumroad. See first link in first post.

Done, see first link in first post.

I was able to buy it safely!
Thank you :smile:

1 Like

Hi, Thanks for your interest in the Material Nodes addon.
At the moment I am working on an update.

  • Add node-group called Mix Normal Maps. With this you can load two normal maps. Base color (diffuse/albedo) will be derived from mixing the two normal maps. You can define two colors for that. Because you have now to normal maps, you can scale one differently than the other one. So the tiling of texture is not that obvious. If you add on top of that the VarShad then you can get easily materials where you barely see any tiling. And if need, you can also distort the UV. I make also a better version of the UV distortion node-group.

  • Fabric. Suitable for making fabric.

  • More details in documentation.

In case you have a favorite nodegroup you would like to include me let me know. If that is designed by someone else, I can ask approval to include it, and give credits.

Updated the Material Nodes Addon.

Added the node-groups:

  • Mix Normal Maps
  • Fabric

Added full documentation in the download.

Improved:

  • Voronoi Wave Diff. Naming of sockets, and added options to set roughness.
  • Magic Voronoi. Naming of sockets, added the sockets: bump strength and roughness
  • MusGr-Wave-Mix. Naming of sockets, better connection of roughness,
  • MusGr-Wave-Diff. Adding col1 and col2 sockets. Better roughness control
  • Noise+. Better Roughness control
  • Albedo Variation. Better Roughness Control.
  • Distort UV. More user-friendly control.

Good News:
The Material Nodes Addon is also available on Blender Market.

Here an example of a scene with only procedural textures. Benefits: no tiling, low RAM usage, everything is animatable, full control. Who said that procedural textures doesn’t look good?

Tada!! New Teaser for the Material Nodes Addon:

Update to version 1.4.

Update per 19/09/2019 - Version 1.4:

Added:

  • Colors Bricks. (Bucksin, Cambridge, Chateau, Dover, L200, Normandy, Orleans, Regency). So that is 8 colorramps inside the node-group. You can, for example, use this with a brick procedural texture. Tip: Use two times a UV distortion node. One for bigger distortion and the other one for fine. Use also the VarShad node-group to give the final texture more variety.
  • Colors Environment (Soil, Coral colors, Fire, Sky, Clouds, Grass, Street Colors, Beach). Also colorramps inside.
  • Dielectric Albedo Values Unity. (Coal, Rubber, Mud, Grass, Brick, Wood, Concrete). For calibration or just use the color-presets.
  • Metal Albedo Values Unity (Gold, Brass, Copper, Iron, Platinum, Aluminium, Silver). These are color-presets.
  • Skin Colors. These are colorramps of skin colors.
  • A way better Level Correction node-groups. It’s now very intuitive to adjust the levels: Lighten shadows, Darken lights, Increase Contrast, Descrease contrast.
1 Like

Good news! There is an update of the Material Nodes addon to 1.5:

  • Option to add the shaders by using Shift+A
  • AO Mix : added distance
  • Albedo Variation: Vector throughput (output socket connected to the Vector input)
  • Checkers Plus: Vector throughput.
  • Index Random: Added: Location X, Y and Z sockets, XYZ range and XYZ Offset.
  • Level Correction: Fixed default values. Added Hue and Saturation.
  • Magic-Voronoi-Mix: Fix naming, Vector throughput
  • Musgrave-Wave-Diff: Vector Throughput
  • Musgrave-Wave-Mix: Vector Throughput
  • Noise Plus: Vector Throughput
  • Variation: Vector Throughput
  • VarShad: Vector Throughput
  • Voronoi-Wave-Diff: Vector Throughput

In case you wonder what is the Vector throughput for; it is to have a cleaner layout. Instead of connecting vector input sockets to the same Mapping node, you can now connect the Vectors throught. Here an example:


You see that we just need to connect one time the mapping node. If other textures or nodes need the mapping node, you just connect it through.

3 Likes

Hi. I have a question. Will this add-on be developed in the future for Volume Material?

1 Like

Hi,

Indeed I have plans for that. This is the road map:

Bumpmaps in Blender 2.8x are have now a bit better quality but they are to slow now. (Especially if you have a slow processer like me: i3. )

  • So first I will add nodes with a semi procedural workflow. Meaning: a bunch of seamless normal maps you can mix and scale to get your procedural bumps/normals. Normalmaps are way better and faster.

  • I will keep the workflow with the bumpmaps but add a workflow with normal maps.

  • Nodegroups for volumetrics will be added.

  • Nodegroups for displacement. (Not sure yet what is possible now with vector displacement, have to dive into it).

  • The so called var-shader will be split up in: Hue-variation, Value-variation, Saturation-variation (modular approach).

Because quite some nodes will be added, I need to make categories. Like: bumpmap workflow, semi-procedural workflow with normal maps, UV (coordination, mapping and distortion), Volumetrics, Variations (to make materials look less sterile and repetitive), etc. For technical reasons that could mean (temporally) that several addons need to be installed, but that doesn’t do much harm; they don’t occupy the N-Panel for example.

Above is a short term roadmap, a few weeks but less than a month.

1 Like

Wow, I’m looking forward to future updates.

Recently, I was thinking that it would be very difficult to look at complex nodes such as Nodevember and make them only by mathematical formation like eevee’s volume.
I wanted a simple shape, so I wanted to try something other than a cube … :sweat_smile:

1 Like

Working on a huge update for the Material Nodes Addon to version 2.0.
The Material Nodes addon provides a modular system making your own shaders.

In the update:

  • Thumbnails (icon previews) of presets.
  • Better roughness control.
  • More presets. Each preset is highly adjustable.
    Here the library:

Update: finished with the update, but working on some demo’s and documentation.
Upload this weekend.

3 Likes

Updated the markets: Material Nodes to 2.0!

Main features:

  • More presets (47 now).
  • Big thumbnails: look in the N-Panel of the shader editor.
  • Better roughness control
  • Pre Output

Here a short documentation:
Albedo variation :

Simple nodegroup to some noise. Bump, roughness and albedo can be affected.It’s just a bit more pleasing to look at when modelling than the sterile basic shaders.

AO-Mix:

Is a mask, so you need this in combination with other nodegroups. I added more parameters so you can adjust AO values. Tip: plug it in Colors from Movies.

Bricks Colors:

Contains several color-ramps with colors from bricks. There is a lot you can do with such color presets like these. Tip: plug in an Index Random and duplicate (Shift+x) your object.

Car Paint:

This is a shader. It has some metal flakes, but still looks more like regular car paint. If you look for a more metallic look, try the Metal Flaked nodegroup. Or you can go in the nodegroup and adjust the colorramp that goes into the Metalic socket.

Checkers Plus.

Quite fun to work with. It is using two checker textures and a un-distorted voronoi (which are also squares). You can combine this to get al kinds of patterns.

Color Ramp Alternative

Color Ramps are great, but we cannot plug it’s settings into a node-group socket. That’s why I designed this node group. By surprise it seems even easier to use than a colorramp.

Colors Environment:

Colors From Movies:

Colors Skin:

Same as the Bricks Colors, but then with colors from the environment like soil, Fire, Sky, Clouds, etc. Plug them into a Level Correction because you will want to adjust the levels of the colors.

Dielectric Albedo Values:

Metal Albedo Values:

This is to ensure that we use plausible albedo values. It’s just for reference to see if our colors (albedo values) are not way to bright or way to dark.

Distort UV:

To distort the UV if we want some imperfections in the straight looking tiles, lines or patterns. It looks likes it distorts the texture but in fact, in the background, it distorts the UV.

Fabric:

Fabric shader. Highly adjustable.

Filter Paper:

Like the brown coffee filter paper.

Glass:

Lot’s of options to make glass look the way you want. Like roughness variation, slight bumpy, adjust colors and reflections on facing and grazing angle. Mind that in EEVEE, you need to bake first (after every change, even after changing other materials, objects and lights). Also in the properties panel, screen space reflections turn on Refraction. And in the material settings (properties panel), set Blend Mode on Alpha Blend.

Golden Noise Mat.

By default as the name says, but this node-group is very adjustable. Main thing is that is has two noise textures inside (substracted) to get another variety of noise. You can adjust the colors. Tip: plug this into a ToBPR_Channels node-group.

Index Random.

Very handy to give each object a variety of the shader. So, instead of making several similar materials for each object, you can use 1 material for all objects. Has Object Index, Material Index, and locations x, y and z.

Layer Weight Plus:

To give a material another look on grazing angle qua hue, saturation or value. Used sometimes for metals. Artistic look.

Leather Fake:

Sky leather shader. Not in a node-group, but nodes. In future update it will be a node-group.

LED:

LED shader. Highly adjustable.

Level Correction:

One of my favorite node-groups. I designed this nodegroup because I was not happy with the brightness and contrast node. This is a safer way to adjust levels.

Magic Voronoi Mix:

Nodegroup gives some noise but with structure.

Could be a base for textile, paper, etc.

Mask Noise:

To mask or mix two colors or shaders. You can clamp the levels.

Mask Noise Lines:

A mask that produces those lines like you see in marble. Use it to mix colors or shaders.

Mask Musgrave Lines:

Same as previous but different look (manmade, alien, mathematical?)

Metal Albedo Values:

This is to ensure that we use plausible albedo values. It’s just for reference to see if our colors (albedo values) are not way to bright or way to dark.

Metal Flaked.

With this node-group you can make metallic looking paint. Tip: you can type higher values in FlakeScale, like: 4000. Very pleasant to use.

Mix Normal Maps.

Mix to normal Texture. For that you need to open the node-group and get other normal maps if need. (There are already two). Then by surprise, these normal maps can generate a color out of the two normal maps. Inside the node-group, you can scale each normal map. That way tiling is less obvious. And if you, on top of that, use the VarShad nodegroup and also UV distortion, most likely no-one will see any tiling effect.

Musgrave Wave Diff

Has the two procedural textures Musgrave and Wave. Most likely to be usefull when making material for stones or marble. Has outputs: Color, Roughness and Normal which are all adjustable. (Vector output is just a throughput to reduce clutter of noodles.

Musgrave Wave Mix.

Same as previous. Now mixing instead of difference of textures.

Noise Plus.

By default, handy to make lava-like materials, but can use it for loads of other things.

OBJ_ID.

Quite powerfull. You can use this to to give each object a variation of the material. You can also make animated leds with this. Documentation or tutorial will follow later.

Plastic foil.

Transparant plastic. Highly adjustable. In the properties panel, under material settings, set the Blend Mode on Alpha Blend. It’s like glass without refractions.

Platinum NMS v2

A lovely, ready to use shader. Very nice to use while modeling in Blender.

ReRoute,

Nothing special, it is just for re-routing. It’s a bit cleaner than the build in reroute in some cases.

Stucco Mat

Procedural Stucco material. You need to go inside the node, and turn on randomness. Will fix in future update. Simple shader, good for quick solution. Not suitable for close-up.

Texture Mapping.

Simple, but very handy and much cleaner than the build in solution in Blender.

TileMaker1.

Fun to play with creating patterns.

Tiles 01:

Tiles 02:

To make tiles with help of normal map and mask/diffuse map.

Loads of parameters to make material look more natural.

To PBR Channels.

With this you can have one texture (diffuse) instead of a specular, roughness, metalic map, etc. Plug in a texture and inside the nodegroup you adjust the colorramps. Looks way cleaner than having loads of colorramps in view.

Var V Noise, Var V Voronoi1, Variation, VarShad"

Give variety to the basic sterile looking basic shaders. VarShad is the most advanced one which never let me down. Quite CPU intensive though.

Vertex Col

Paint something in Vertex Paint on the material, (Or use the addon tissue with curvature in Weight paint and convert it to Vertex Colors). Be sure the Vertex Colors (Col by default) has the same name as Col in the node group. You can mix colors and shaders with the vertex Colors.

Voronoi Wave Diff

Another node group with two procedural textures. Good for organic materials. Tip: don’t use it standalone, but in combination with other building blocks.

Z:

Variety in Z axis.

4 Likes

Long time no see! I have good news. A huge overhaul of the Material Nodes system.
Most nodegroups are now multifunctional: you can use them as shader or as mask.

I finally found the time to work on the Material Nodes. Thanks to a report by Mhmdnopy, I fixed a bug (a bit late), but also worked hard on all the nodes. You can now use most nodes as shader, as well as mask. I give an example here below. (And I added quite some shaders).

Above is a shader, a Metal Grid, but you see there is a Mask output. So if you want to make your own shader and only use the mask (black and white or greyscale) then that is possible now. For example you plug the Mask output into the fac of a shader mix, or color mix node. I think this is very convenient to build your own shader. Or you can just use the shader if that is what you want.

I must say it is getting a hell of a job to manage more than 40 nodegroups now. For each simple change, it has to be done 40 times most of the time, and its start to look like production work, but it’s here now. Everything seems to work, except the Foil shader. Not sure if I am going to solve it in short term because there are loads of things to the coming day:

  • A video explaining the idea or the system of the nodes. Show some examples. I am not going to explain every single slide, but the overall idea. Some nodes need some explanation though, like the utilities. But is pretty consistent now and straight forward.
  • Provide a .blend file with materials, so you can add the materials to your favourite Asset Manager.

Some notes;

  • The Metal Grid shaders are awesome. They work on UV level, so they distort the UV instead of distorting texture.
  • Carpaint is a simple shader, just a basic but easy to use.
  • Skin shader is a good basic skin shader. But it lacks a texture of course, so don’t expect it will look good on an MB lab character for example. It’s for EEVEE.
  • For Tile_01 and Tiles_02, you can go inside the nodegroup and load your own textures. There are already textures provided, but if you want something else then you can do that.
  • For Mixing Normals (Mix Normal map) there are also Normal maps inside the nodegroup and you can load your own.
  • Toon-shader is highly experimental. It’s a matter of slide and see what happens. Even the colorpicker doesn’t do what you expect, but you will get a toon effect. Every toon shader is different, and it’s possible that this is what you are looking for.

Let me know how it goes, or if you have questions you can contact me here.

Regards,
Robert (aka Peetie, New Media Supply)

2 Likes

Update: Fixed the Tiles in the Material Libry (the textures were not loading).
Today I am going to record some videos.

1 Like

Updates:

  • Uploaded the documentation of Material Nodes Addon v5
  • Uploaded a Scene (lighting provided by EV Express) with all the building blocks, so you can get familiar the the building blocks and their names.