Hey Guys,
I normally just render out products into a PNG. i want to expand to some animations of some of the products that we make.
ive spent today looking through youtube, about rigging.
i understand the principles. most of the tutorials ive found are based on characters,
i need to rig the following;
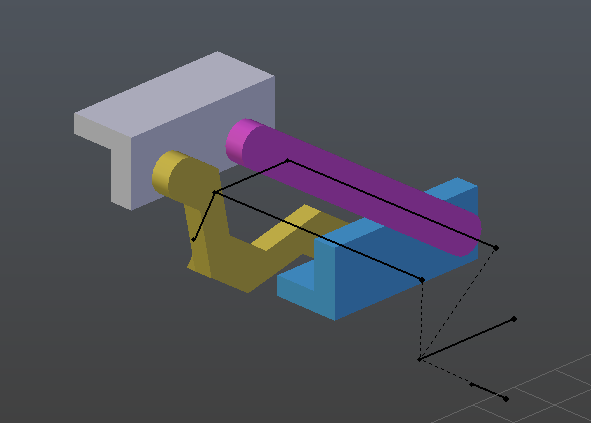
in this image you can see where i think i need the bones. i copied the part without the bones for clarity
this mount raises up, and the plate on the top needs to be parallel with the floor plane at all times.
there’s a little sliding element, as well as the rotations.
i’m just not sure where to start.
should rig both arms? or can i just rig one side?
how do i constrain that top plate (with the X slot pattern) to always be paralell with the floor plane?
will it be separate armatures? ( the two linked together then the single bone on its own?)
I don’t know man, you should probably upload the .blend file so it will make our jobs easier to help you. But seeing that you guys are a company I doubt that distribution of sensitive files to strangers is allowed.
hey guys, ive chopped up my model so at least im covering my butt!! so if you could take a look and tell me how to rig this id be extremely grateful. i desperate to learn this. it fascinates me!!
Actually, there is. It’s the best and least consuming method for the hardware. Less math takes in place when it’s implemented on mechanical/robotic moving parts.
And so what if the rest of the bones are controlled by a constrained Euler bone. Most finger rigs on hand use a Bone with an action constraint that rotates the fingers only on one axis and they’re still all set on Euler rotation.
Can you explain your point further? I’m always happy to learn new things.
I’ve never bothered changing any mechanism bones to anything other then the default quaternion rotation mode. On controls that an animator will actually use and animate with, I will use Eulers if the bone rotates on a single axis only or quaternions if the bone needs to rotate on all three axes. Two axes rotations are a toss up between quaternions and Eulers based on if I feel gimbal lock could be a problem.
Yes, please explain further. I have some questions:
Why would the default Blender bone setting be the most inefficient?
Why would the maths be more complex for a bone capable of W based rotations take more CPU power when it is rotating only about one of its primary axes?
Why would introducing an additional axis lock on the bones reduce the maths when the bone copies the rotation of the control bone and is therefore by default limited to only rotate about one axis?
Why would locking a bone’s transform axis reduce the maths required to rotate it, surely this introduces another check in the controlling programme code?
I too would be most interested to hear more on the topic, Incidentally, I tried changing all the bones as you suggested, then locking their transform axes and noted no change in CPU load on my Mac. Perhaps this is too small a model to show up the differences, I will try on a much more complex model and see if the CPU load changes.
As I did not write the code, I do not know the answers to my questions. This has become a fascinating topic for me!
Hah, I see you’ve got time to write ironic and rhetorical questions while you’ve criticized me for doing the same on my previous posted thread in this forum section. Not to mention that you’ve claimed that “you people are too busy” and that I was the inpatient and ungrateful one for writing such distasteful response towards community in my own thread just after a day without a response (even though it was actually 48 hours).
Almost forgot, locking the bones transforms are not for reducing math or some other stuff that you mentioned. It’s so that the user doesn’t accidentally move something or scale that he shouldn’t do at all. I don’t know where you’ve got those weird question/statement, but I’ve never claimed that locking some of the transforms would ease up on the hardware, you’ve just assumed wrong.