Hi @egtwobits ! I wanted to request a new feautre, to align meshes in bulk.
For example - I have a cube object right in the center XYZ 000. Let’s call it SOURCE.
Then I have 10 of this cube object moved around the scene and rotated. All transformations are applied, so now all these cubes have coords 000 too, but they are far from the center.
What I do now is to take SOURCE CUBE, use ALIGN PLANES mode to GRAB SOURCE, and then select one of the 10 cubes with transformations applied, use the GRAB DESTINATION, then click back on SOURCE CUBE and click APPLY TO OBJECT. Now I have the SOURCE CUBE in the same locations as the other CUBE, but with actual XYZ/rotation data. I would like to apply this to all 10 cubes, so I imagine the script making 10 duplicates of SOURCE CUBE and performing actions above with a ‘single’ click.
What I need is actually a very basic operation. I could explain it to you in more details, send you a sample .blend file if you are interested. Perhaps you have a Discord where we could chat more real time?
Looking forward to hear from you.
Hi all, I’m working on an easy-mode for all of the operators (which should be very fast and easy for many common workflows), trying to work out some things still, anyone have comments? GIF below:
What else???
@eobet Thanks! For “mesh piece”, the name is also trying to communicate that you have the option to apply to a mesh selection/selected verts (so not sure mesh face would capture all that…).
As for a separate island apply mode, maybe? You can do an island right now by just selecting and applying, so would what you suggest be different?
Thanks for the feedback and suggestions as always!
@Taros For clicking order at object-level, blender simply does not capture/store this information, so the distance-based ordering was the best I could do without that information being present
For the pie menu, it sounds good, if I can find time to add that at some point…
The “easy mode” I mentioned sounds similar to things in your examples, but I’m not fully grasping what you mean for those so would need some clarification on those.
@blenderartist I think I know what you’re saying: You want to bulk-set the origin of a bunch of selected objects. This is technically possible, but would require a good bit of work. Might consider something similar in a future update.
Hiya, I fully expect nobody to do this, and for the next post to be me, some time later, posting about the full release, but this is a pre-release of v1.0 with Easy Mode, and if y’all could run it and find any bugs, it would be much appreciated (this is the develop branch contents on github now). ALSO, new video below, it’s unlisted/not fully public yet: https://youtu.be/2wkWo512mew AND the wiki has been completely rewritten for v1.0 already.
Hello, I am relatively new to Blender. I downloaded your addon from the attached link.
It seems quite powerful for working with objects and I’m sure I will use it a fair amount. However, I am confused as to how (or if) it works on a single mesh (not between different objects).
For example, using Align Points, if I select (2) verts and click on Grab Source, I have now defined a hypothetical infinite line in 3D space. If I then select a 3rd vert and Click Grab Destination, then Apply To Mesh Piece (or Whole Mesh), I would expect the “Destination” vert to move to the nearest point on the line defined by the first two points, but instead it is doing something quite different. Am I doing something wrong or is this just not the intent of this add-on?
MAPlus tools work on both objects AND on mesh parts (AND MORE, like the object origin for instance). If you want to work on mesh pieces while modelling, use expert mode…easy mode is quicker and simpler but also lacks the options (and target types like mesh piece) provided by expert mode.
Align Points is for matching point locations (co-locating points), so this is not going to do what you expect:
The source and dest keys for Align Points are both point objects
MAPlus always allows you to grab/define a key (like a single point) when a more-than-needed number of verts is selected, so that you can, for instance, select and grab a polygon/Ngon to define a face (which may have more than the needed 3 verts)
I could make a tool that does this (I’ve been thinking of a similar tool called omni-align that would perform different operations based on what was selected for the source key and dest key). But right now that has not been implemented (wouldn’t rule it out for a future release though).
But I think a better way short term is for me to add an operator to the existing Calculate & Compose panel that allows you to obtain the closest point between a line and point. You could then just copy/paste that point from the Calc & Compose tool, to the Align Points tool (and make it the source or dest key). I’ll try to add this before releasing v1.0…
BTW, if you need clips of any operator, they’re on the wiki (GIFs for each tool), and there’s also the older “Core Concepts” video that describes how expert mode works on youtube (it wasn’t called expert mode back then as that video is from a prior version).
Thanks for the quick reply. As an engineer, the lack of precision in many aspects of Blender is an adjustment for me. There are some great add-on’s (yours is a good example) that really help, but at this stage, I seem to fight internal mesh alignment more than anything else. UV mapping has some very good alignment add-on’s and I think you are doing an excellent job with objects, just inside a mesh I think is missing (compared to CAD programs).
Alignment within a mesh feels like a collection of “hacks” more than anything else. If you are on an axis, scale to zero with an active element works reasonably well, but off axis it’s a crapshoot. Maybe a Local or View Orientation will work (sometimes), but I seem to be ending up with lots of custom vertex and face orientations, when I just think basic tools for alignment would be something useful for so many tasks and should be integral to the program.
If you add any features like this, I will definitely test them.
@dt126 I added a new feature for calculating the nearest position on a line to a given point, it’s now in the Calculate & Compose panel in the upcoming v1.0 (called “Nearest Point/Line”).
Also, just want to make sure I’m being extra clear that all the tools work inside a mesh while modeling (using what is now called expert mode in v1.0), this is what you’re looking for right? See below:
Thanks for spending the time to work on the intra-mesh alignment. It looks good from the video. I’ll try it once you make this version available for download (let me know if it already is).
The intra-mesh capabilities already exist in older versions, I’ve updated the wiki to communicate this a little more clearly (thanks for hinting about that). The latest in-development version with 3 new Calculate & Compose tools is here (new Nearest Point/Line, Nearest Line/Line, and Intersect Plane/Plane):
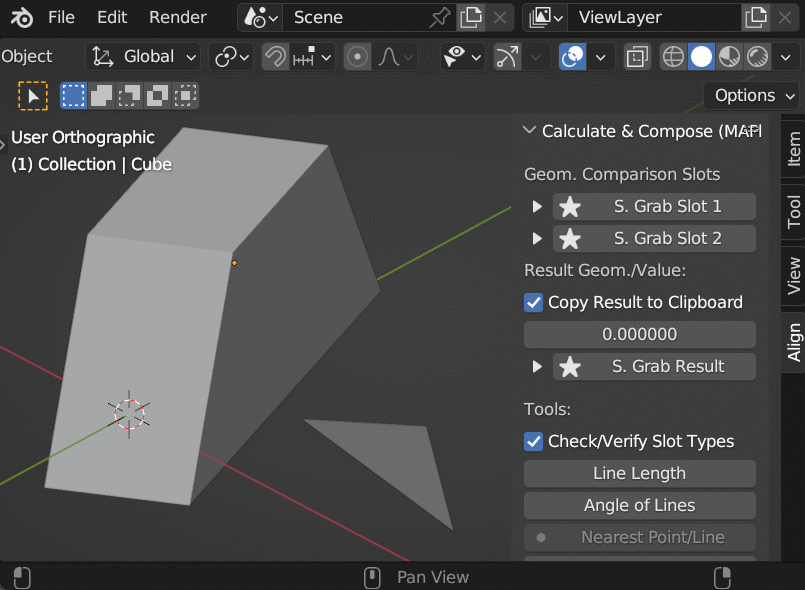
I set up this beta version. I had no problem getting the line angle calculation to work as shown in your video. However, I cannot seem to get the “Available Calc’s” to show Point options. Here is a screen shot. I made sure that Grab slots 1 and 2 are set to point (not sure if this is necessry) and you can see from the screenshot that Calc Result item type is also Point (and I’m in vertex mode). On your video, you had options such as “Nearest Point/Line” but I can’t get that to come up.
Is there a step I’m missing for the point functions? Other functions seemed to work correctly. I used intersect line/plane, then was able to send the cursor to the intersecting point. This brings up a second question, do any these functions actually add the geometry that is described or do they just provide the tools that you need in other to create the geometry? For example, is New Line from Origin meant to actually create a line?
The available stuff is based on what you load into/grab in the slots (hit grab with 1 vert for point, 2 for line, 3 for plane), which is set automatically behind the scenes based on the vert count when you grab (you shouldn’t have to manually set the types typically).
Indeed, these functions add the geometry described into the result slot, and also by default there’s an internal geometry clipboard that the result geometry is copied to, which you can paste into the alignment tools above by expanding the source/dest keys in expert mode and clicking paste (you can also copy into the geometry manager to save a key permanently if needed).
I noticed you are missing the updates from the last post version, can you try with that? And let me know how it goes. Thanks!
Thanks to @dt126 I found a bug with the auto-slot-type-setting, fixed here! The vert-grabbing functions were rewritten this time to support multi-object-editing, which is where this bug snuck in. Thanks for your testing Use this if you do any more testing:
Maybe I missed something again, but I would love a Quick Align Orientation.
And what I mean by that, is something like Rhino (and Siemens NX) method’s of aligning object by picking three points, which is extremely quick and flexible:
I also find that when two objects are placed in a hierarchy which has a certain transform, and the objects themselves have different transform orientations and origins, the various quick aligns don’t work as I expect?
Quick align planes already does this type of 3-point alignment, any 3 arbitrary locations or verts can be used (it’s not interactive as in your video though), and there are GIFs on the wiki. You can align point clouds to each other using any 3 points, for instance.
That’s why it’s called “Quick Align Planes” and not “Quick Align Faces”, because it’s an abstract planar-align transform: The operation uses alignment keys which don’t have to be faces, they can be anything (all main tools in MAPlus are like this, you can pick any two locations as a line key for Quick Align Lines, for instance).
This is a difficult concept to communicate, and I’ve tried very hard to do it effectively in the wiki (there are sections stressing that keys can be anything, and GIFs showing imaginary key usage and non-vert grabbing) and my other communications for years. Does this make sense?
Edit: About the objects-inside-parent structures, it would be nice to support this but I don’t have the bandwidth to do it in the foreseeable future…
Mesh Align Plus 1.0 has been released! The news post is included below:
New Easy Mode gives lightning fast and easy (~two click) workflows for common use cases/alignments.
Want to align surfaces? With Easy Mode, just select a face and hit “Start Alignment”, then select another face and hit “Apply to Active”. This simple ~two-click workflow is available for all main operators, in addition to the classic modes (now called expert mode).
A new geometry manager panel has reference planes (XY, XZ, YZ) and axis lines (X hat, Y hat, Z hat), for copying/pasting into expert mode alignments, plus it has persistent geometry storage for repeat workflows.
There’s also new support for multi-edit-grab-all (MEGA!) when you want to grab alignment keys from a selected-but-not-active-object in edit mode. Just beware of its quirks, described on the release notes page.
All of the operator panels have also been renamed, along with the tab name (now just “Align”).