I’ve got a character that was given to me that has its mesh in several different pieces (head, shirt, pants, etc…) and I’ve been trying to figure out how to get my mesh deformer working on him so that the parts all move together smoothly.
Notice that even though they’re affected by the same forces, the pants and the shirt appear to deform differently. I’m using a surface deform on the mesh deformer because thats the only one that appeared to work. Not sure if thats causing it. Any advice?
The problem could simply be that I don’t know what heck I’m doing:) That usually ends up having something to do with it…
Are both the meshdeformer and armature influencing the same part of the mesh? Is your character skinned to the armature in addition to the meshdeformer? If you want to use the meshdeformer in combination with the armature you’ll need a ‘mediator’ group (usually called ‘NoMDef’) which determines which areas are influenced by the armature and which are influenced by the meshdeformer. I wrote an article in issue #25 of blender art mag using this technique for santa that you may be interested in
To see what I mean try disabling the armature modifier in the 3D view. If only the meshdeformer is influencing the mesh, it should all move together nicely.
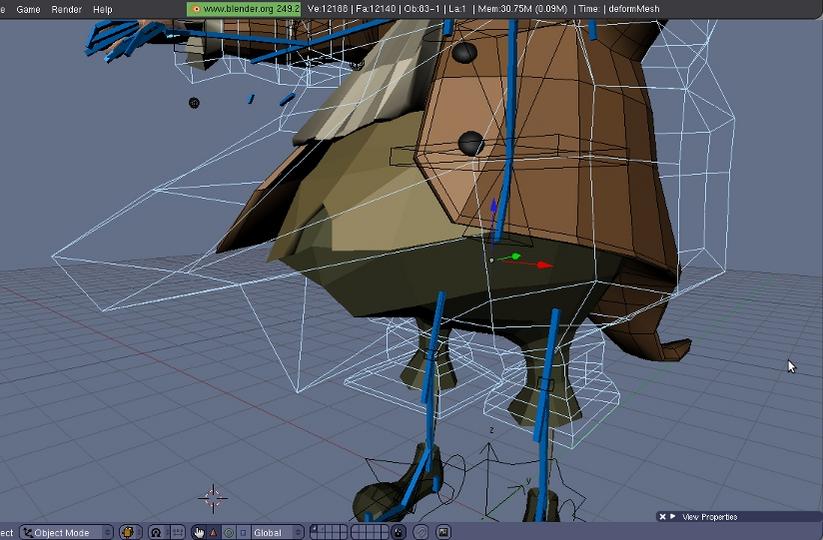
Thanks for the help, that santa tutorial for blender art is pretty instructive. It didn’t completely solve the problem, but I think it put me on the right path to tracking it down. I followed your advice and completely disabled the armature to see if that was causing my problem and even with the armature not effecting the deformMesh, or my character, wierd things happen. To check it, I went into edit mode on the cage and moved some points around, which gave me this result:
It seems like some points aren’t being affected like others. I’m fairly sure that I’m describing my problem incoherantly, so here’s my .blend file if you are curious.
The problem is most noticeable when you rotate the lowback bone which is represented by the pyramid. The area right at the front of the stomach doesn’t seem to move at all, even though its inclosed in the mesh and wierd things happen where the pants join the shirt. Thanks!
FWIW- mesh deform’s action is increadibly sensitive to the distance from the deforming to the deformed mesh so portions that are sightly closer to the deformer move much farther. ANother thought is that sometimes the deform modifier just spontaneously becomes broken! perhaps you could try unbinding and then binding again.
Ah right! You’re using 2.5… I’ve had no problems with using meshdeform in 2.4x but it looks like you may have found a bug I get the same result as you in the latest build of 2.5, but if I open your file into 2.49b and rebind the meshes it is resolved…
@Feelgoodcomics (or anyone else who has experience with volume preservation using the mesh deformer). Do you have any tips for maximizing volume preservation? I’ve got it working smoothly, but the effect doesn’t seem to be that much different than normal armatures deforming. I’d like him to get fatter when he bends forward and thiner when he bends backwards (like in Nathan’s Demo Reel demonstration of the Rabbit Rig).
Here are some pic demonstrations of what it looks like now:
Going backwards he gets thinner (although I’d like more?) but going forwards he gets thinner as well. Any ideas of what I should tweak? I’ve tried adjusting the shape of the mesh but that hasn’t seemed to help. Thanks for any help!
I am not great at this but I have found that volume preservation works best 1) when you resize the main deform mesh (in object mode) to be right at the surface level of the deformed object 2) best volume preservation is when there is ‘0’ weight from armature at that area.
You can also use submeshes like helper bones - the submesh must be joined to the main deform mesh but only 1 single vert of the submesh must be within the main mesh deform volume!
Somewhere there is a basic rigging vid tut on squash and stretch of a ball. Its very informative and includes the rigging setup you may want to do for an armature with a bone added to control the belly submesh
walshlg is correct about the meshdeformer… the meshdeformer really helps with preserving volume in contrast to achieving the same results with bones… but it is not magic Some additional work will still be required.
I still have not had much experience with creating obesity, so I took a look at what Nathan did on Big Buck Bunny. I always refer to the work of more advanced riggers to figure these things out It turns out he did this using a corrective action constraint. If you take a look at the bones ‘CTRL_ChestFat’ and ‘ChestFat’ on bone layers 4 and 16 you can see what’s going on. When the ‘CTRL_RibCage’ bone on layer 1 is rotated forwards, the chest bones follow the rotation halfway and after that the rotation is dampened. This is done by the ‘COR_BendForward’ action constraint on the ‘CTRL_ChestFat’ bone. If you connect the action to the rig using the action editor you can scrub through the timeline and see what the action is (and watch the fat fly, so to speak). There are 3 additional action constraints for the other axes as well (back, twist left, twist right).
It’s a really clever way to deal with the problem, so I thought I would point that out. To set this up would be a matter of configuring the constraints, then moving the rabbit into his most extreme pose and defining a ‘corrective shape’ by moving the bones into their desired positions and keyframing the action.
There is also a ‘bone_preserve_volume’ script on the rig (which requires you to enable script links before moving the bones or his chest will pinch up into a knot) for volume preservation. I’m not really familiar with what it does, I haven’t learned scripting for rigging yet. :o I plan to, but I’m waiting for 2.5 before doing so as the commands and syntax are different.
You’d probably be better at figuring out what that script does… if you can please let me know :eyebrowlift:
Thanks for both of the replies, I’ve finally got some results that I think look pretty good. I’ll post the .blend shortly.
The script in the rabbit file controls the scale of the bones based on the rotation of the control bones–causing the body to get fatter as it compresses and skinnier as it stretches. Combined with the action constraints it provides a fairly believable effect.


 I get the same result as you in the latest build of 2.5, but if I open your file into 2.49b and rebind the meshes it is resolved…