So i was following a tutorial on how to make a low poly character when i reached pose mode and started moving the bones, the problem is that the bones on the leg and fingers deform the leg next to it or the finger next to it
The tutorial i was following (i reached 8 minutes into the video)
There was another problem in the armature modifier on the mesh which is when i have only the vertex groups box ticked it doesn’t move the mesh with the bones but when i enable Bone Envelopes it moves the mesh with it but also deforms the nearby part
I’m a new user to this website so i can’t send attachments and I hope someone can reply quickly as I am on a time limit, thanks.
Each bone has a vertex-group that records how much each vertex follows each bone (0.0 = vertex totally ignores that bone, 1.0 = vertex follows that bone). A vertex can be influenced by more than one bone (ie; the vertex can have non-zero values in more than one vertex-group).
Use Weight Paint mode to manually zero out the influence of hand-bones to leg vertices.
for each bone | bone’s vertex-group:
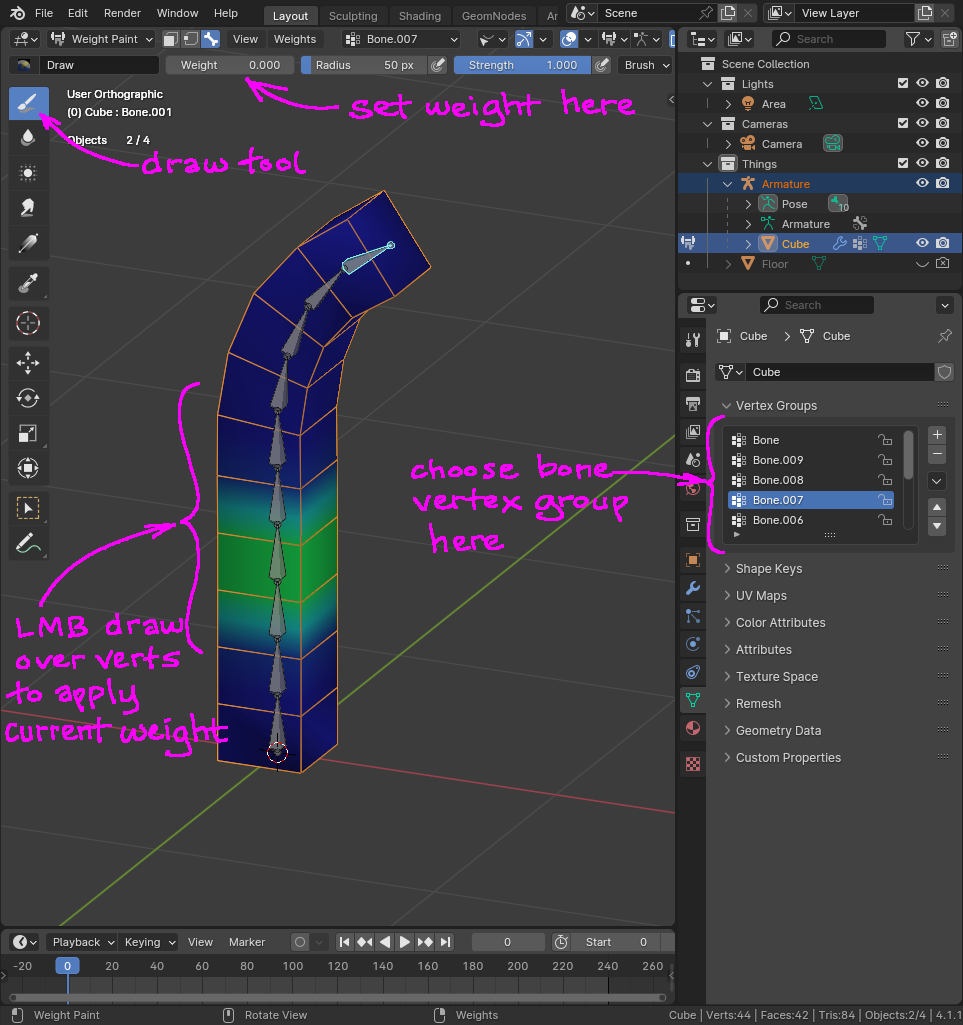
set weight in header to zero, then paint (with zero) all vertices that should NOT be influenced by the currently selected bone.
(the specifics have changed recently, so please refer to the manual page linked above.)
Characters are often developed in a default T pose (arms straight out to the sides). By getting the arm bones far away from the legs, there is less chance of “influence bleed” when using Automatic Weights.
If the mesh isn’t deforming with vertex groups only, then you might not have vertex groups, or they may not have any weight. The behavior you describe with bone envelopes is normal, bone envelopes are rarely used and you want to be using vertex groups.
Check for vertex groups in the Object Data Properties panel, icon is an upside down triangle. If you don’t have any, or they don’t have any weight, try un-parenting the mesh from the armature and re-parent it, selecting the armature deform with auto weights option.
@shannonz advice on weight painting is helpful.
Randy
@shannonz advice worked but i ran into another problem where i can’t remove the weight when i press ctrl + left click instead it adds weight, this problem is on the arm area and i can remove weight in front of it (like the forearm area) but i cant remove weight on or before it (like the chest area)
I’m not sure what Ctrl+LMB is supposed to do, but for me it draws full strength, independent of the weight you have set in the header.
Try just LMB (left-click and drag) over vertices to apply the weight value set in the header. (don’t use the Ctrl key modifier)
LMB-click select armature
Shift-LMB click select body to weight-paint
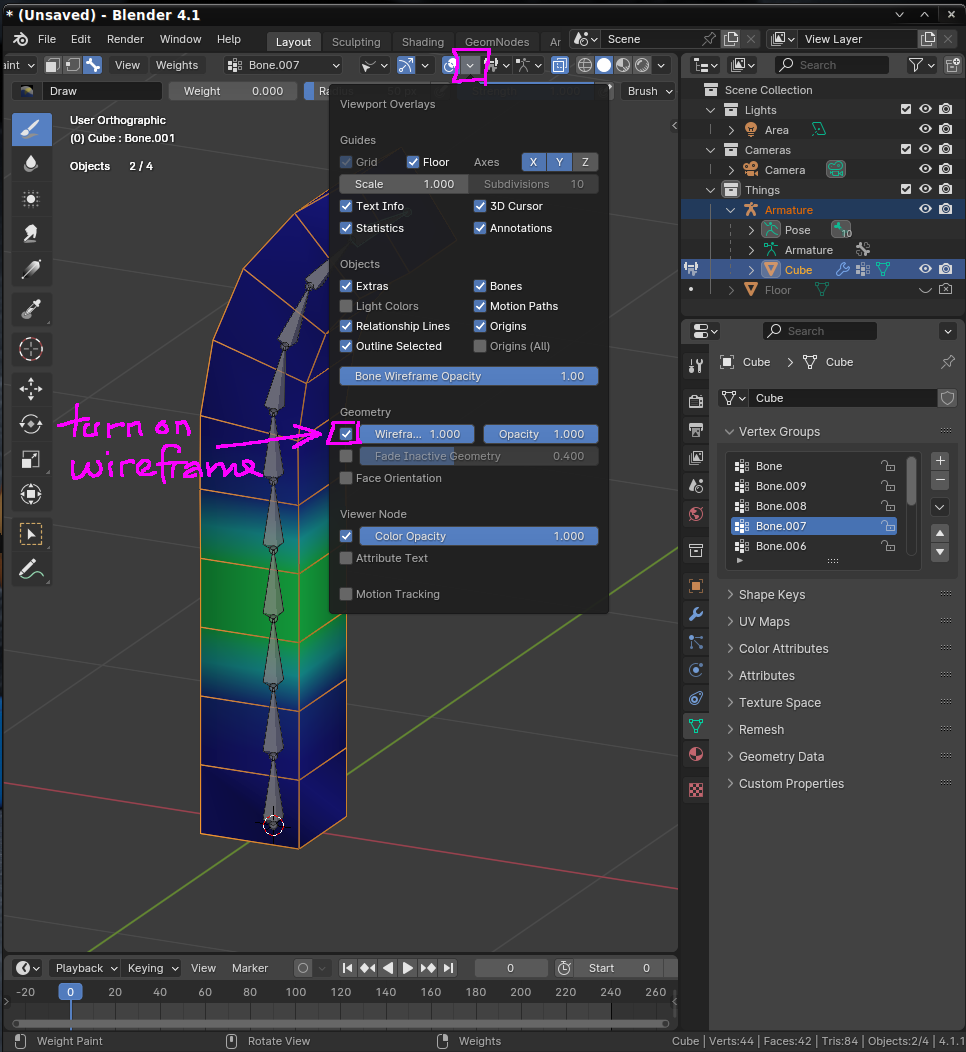
turn on “Wireframe” in the Viewport Overlays header menu.
Weight painting does nothing if not hitting the vertices, so it’s good to see where the vertices are.
This is a lot easier with even the cheapest of pen-tablets (like a wacom, but whatever brand you can afford).
If you only have a mouse, then just use LMB (Left-Mouse-Button) to draw.
I wish i could send videos but it still says i’m a new user but i need to know how to remove weight not just add it because currently even the subtract brush does nothing it does the exact thing i said above.
Two ways to get around the new user requirement.
Post the file on a file sharing site and post the link to it here.
Go to the Artwork section and post some constructive comments on works you like.
The new user requirement is an anti spam thing, so bots can’t just randomly post stuff here. It depends upon your post count. 5-10~ish posts and you should be past that.
I would think you should be at the point by now with the posts you made here so far.
Randy
unless I am extremely confused, there is no ADD or SUBTRACT brush in Weight-Paint mode. There is a DRAW brush, which overwrites the current weight(s) with the new value that you have set in the header WEIGHT field.
So if you set WEIGHT = 0.0, then drawing over vertices sets their weights to 0.0 in the currently selected vertex-group.
Here’s the video showing my current situation, in the first 30 seconds i was showing that there are more brushes, after 30 seconds i was showing how that pressing control with the mix brush does remove and after that i was showing how it was only removing the stuff Infront of it.
1 Like
Ok. My bad. I never looked in the Brush menu to see those other options. I just use the brushes on the Left-side of the Viewport { Draw, Blur, Average, Smear … }.
Since I am clueless about the Brush menu, I will not advise you further.
On the other hand, by not messing with the Advanced Brush settings, I am able to do everything I want to in Weight-Paint mode… whereas your explorations in Advanced settings have broken something.
And… those different brushes are for layering modes : https://docs.gimp.org/2.8/en/gimp-concepts-layer-modes.html … so are you sure you are understanding “subtract” here in the correct context?
I am sincerely sorry that I can’t help you more.
edit:
I am also confused why you keep pressing the Control key. I never press the control key for anything in Weight-Painting. Looking in User-Prefs keymaps, I see that there is a binding that includes the Control key, but I haven’t been able to find any further documentation of what the control key is supposed to do in this context. Why do you insist on pressing unnecessary keys to NOT get the results you were hoping for?! Good luck.
i solved the problem by deleting the arm bones and re painting them now it moves normally thanks for your help, goodbye.
1 Like