@pitiwazou: regarding ‘original’ bevelweights on ‘original’ cube: I can see something not updating correctly [needs to be looked at] but it should still work.
I assume you have “Store Edge Bevel Weight” turned on? Try going in and out of editmode [on the original, but more important: on the cutouts]. Does this help?
@cgstrive: same thing, multiple booleans [three or more] are working here, does “Store Edge Bevel Weight” and going in and out of editmode on everyone involved solve this? [still, this update problem needs to be looked at…]. Regarding dense meshes: seems like Ilya Rodinkovs thing (creating more geo like hardmesh - kind of cleverly solved ;)) might be better [not blenders regular bevel]
Oh my god just found out about this project. I’ve been doing a lot of hard poly stuff recently and totally need this. Love the how it is looking so far.
@DcVertice: not yet, I have to reserve a day without other work / distractions (not sure though when that will be…)
Thank You! Going to edit mode of each object solves it! However please kindly consider that this should implicitly work in most streamlined manner. Artists generally do not like running around UI to enable checkboxes and hunt booleans for manual edit mode toggle. This is just some subjective feedback as I hope when you do free up, can update this branch as it’s really amazing and promising.
Regarding Ilya Rodnikovs solution - even though his tool is designed with same concern as we express in this thread, the solution collapses the modifier stack which we are trying to combat here.
Did a test and I cannot have the bevel on my object when I add booleans with bevel settings.

Regarding modeling with nodes, doesn´t Sverchok have a more robust functionality than mesh fusion just as grasshopper?
@pitiwazou: like I said, I will have a look at this [soonish], but just to get an idea: did you go in/out of editmode on Cube.001/Cube.002 as well? (I was testing the exact same thing and it worked for me…) if something is not updating, try to go in/out of editmode of everyone involved (‘original’ plus all cutouts)
2d23d you should drop in irc from time to time
Indeed that works !
I tried only on the final mesh.
I know it’s not finish of course, like CGstrive said, this is really great, hope it can be added in blender !
Bevel modifier needs to support welding like hard-mesh does to avoid this kind of result.
And avoid this kind of result too.
That can be really great !
Maybe someone already wrote.
But it seems to me that HARDMESH works like this:
- At the intersection of objects, a curve is created
- Two more curves are created with offset from the first curve.
- Not sure, but most likely the points on the curves are distributed evenly with compaction on the bends, sharp edges …
- The mesh is cut by the last curves.
- The Mesh parts are connected using Blend.
In this video https://www.youtube.com/watch?v=HvpDjASPKxw, you can clearly see how Blend works. It aligns the number of vertices on the loops. - Split Ngon is done.
But I do not know how to do the offset. Because normal offset and Shrinkwrap work, not so well.
Original text:
Может быть, кто-то уже писал.
Но мне кажется, что HARDMESH работает примерно так:
- На пересечении объектов, создается кривая
- Создаются еще 2 кривые с offset’ом от первой кривой.
- Не уверен, но скорее всего точки на кривых распределяются равномерно с уплотнением на изгибах, острых гранях…
- Mesh режется последними кривыми.
- Части Mesh’а соединяются с помощью Blend’а.
На этом видео https://www.youtube.com/watch?v=HvpDjASPKxw, наглядно видно как работает Blend. Он выравнивает кол-во вершин на лупах. - Делается Split Ngon.
А вот как делается offset я не знаю. Потому что обычный offset и Shrinkwrap работают, не так хорошо.
In my add-on, I use a slightly different method:
- At the intersection of objects, a curve is created
- It is done by Relax
- A pipe is started along the curve
- It is done by boolean
- To have the same number of vertices on both parts of the cut, I do this:
Vertex_group has vertices after boolean without end vertices
At this stage all vertices are hidden, except for the intersection
bpy.ops.mesh.select_mode(type=‘VERT’)
bpy.ops.mesh.select_all(action=‘DESELECT’)
bpy.ops.object.vertex_group_select()
So I select the vertices that belong to the original object
bpy.ops.mesh.select_more(use_face_step=False)
bpy.ops.mesh.select_all(action=‘INVERT’)
And then just dissolve them
bpy.ops.mesh.dissolve_verts(use_face_split=True, use_boundary_tear=False)
bpy.ops.mesh.reveal()
bpy.ops.mesh.select_all(action=‘DESELECT’)
Here I highlight Ngon
bpy.ops.mesh.select_face_by_sides(number=4, type=‘GREATER’, extend=True)
bpy.ops.mesh.quads_convert_to_tris(quad_method=‘BEAUTY’, ngon_method=method)
Sometimes edges are selected, so you need to convert the resulting triangles back into squares
This can be avoided by dissolving vertices one at a time
bpy.ops.mesh.select_all(action=‘DESELECT’)
bpy.ops.object.vertex_group_select()
bpy.ops.mesh.select_more(use_face_step=True)
bpy.ops.mesh.tris_convert_to_quads()
bpy.ops.mesh.select_all(action=‘DESELECT’)
Then delete the triangles from the fillet
bpy.ops.mesh.select_mode(type=‘EDGE’)
bpy.ops.object.vertex_group_select()
bpy.ops.mesh.select_more(use_face_step=True)
bpy.ops.mesh.select_all(action=‘INVERT’)
bpy.ops.mesh.hide(unselected=False)
bpy.ops.mesh.select_face_by_sides(number=3, type=‘EQUAL’, extend=True)
bpy.ops.object.vertex_group_deselect()
bpy.ops.mesh.edge_collapse()
bpy.ops.mesh.reveal()
bpy.ops.mesh.select_all(action=‘DESELECT’)
After that, you can remove the remnants of the pipe and merge the parts of Mesh using bridge_edge_loops.
This method is sometimes used for NURBS modeling, for example, as here:
В моем add-on я использую немного другой метод:
- На пересечении объектов, создается кривая
- Делается Relax
- По кривой пускается труба
- Делается boolean
- Чтобы на обеих частях разреза было одинаковое число вершин, делаю вот это:
в vertex_group находятся вершины после boolean’а без крайних вершин
на данном этапе скрыты все вершины, кроме пересечениия
bpy.ops.mesh.select_mode(type=‘VERT’)
bpy.ops.mesh.select_all(action=‘DESELECT’)
bpy.ops.object.vertex_group_select()
так я выбираю вершины, которые принадлежат изначальному объекту
bpy.ops.mesh.select_more(use_face_step=False)
bpy.ops.mesh.select_all(action=‘INVERT’)
а потом просто растворяю их
bpy.ops.mesh.dissolve_verts(use_face_split=True, use_boundary_tear=False)
bpy.ops.mesh.reveal()
bpy.ops.mesh.select_all(action=‘DESELECT’)
здесь я выделяю Ngon
bpy.ops.mesh.select_face_by_sides(number=4, type=‘GREATER’, extend=True)
bpy.ops.mesh.quads_convert_to_tris(quad_method=‘BEAUTY’, ngon_method=method)
иногда выделяются ребра, поэтому нужно конвертировать получившиеся треугольники обратно в квадраты
этого можно избежать, если растворять вершины по одной
bpy.ops.mesh.select_all(action=‘DESELECT’)
bpy.ops.object.vertex_group_select()
bpy.ops.mesh.select_more(use_face_step=True)
bpy.ops.mesh.tris_convert_to_quads()
bpy.ops.mesh.select_all(action=‘DESELECT’)
после чего удаляю треугольники с fillet’а
bpy.ops.mesh.select_mode(type=‘EDGE’)
bpy.ops.object.vertex_group_select()
bpy.ops.mesh.select_more(use_face_step=True)
bpy.ops.mesh.select_all(action=‘INVERT’)
bpy.ops.mesh.hide(unselected=False)
bpy.ops.mesh.select_face_by_sides(number=3, type=‘EQUAL’, extend=True)
bpy.ops.object.vertex_group_deselect()
bpy.ops.mesh.edge_collapse()
bpy.ops.mesh.reveal()
bpy.ops.mesh.select_all(action=‘DESELECT’)
После можно удалить остатки трубы и соедить части Mesh’а используюя bridge_edge_loops.
Такой метод иногда используют при NURBS моделировании, например как сдесь:
Ilja, thank you for sharing your insight!
I’m trying this approach in Houdini. a) Extract Seam -> Create Tube -> Reapply it as boolean (to create ridge/bevel) -> Polygon bridge to connect the islands.

This is a bit crude for now, but prototype is very stable no matter what is thrown at it. My intent is to feed Houdini with Geometry from Blender and have the light Output seen in Orange sent back for Blender to be used in Boolean.
I am not sure though If i will conclude it, as a Blender only solution would be far more desired.
///
To do this in Blender with Modifier the following procedure shows a lot of promise:
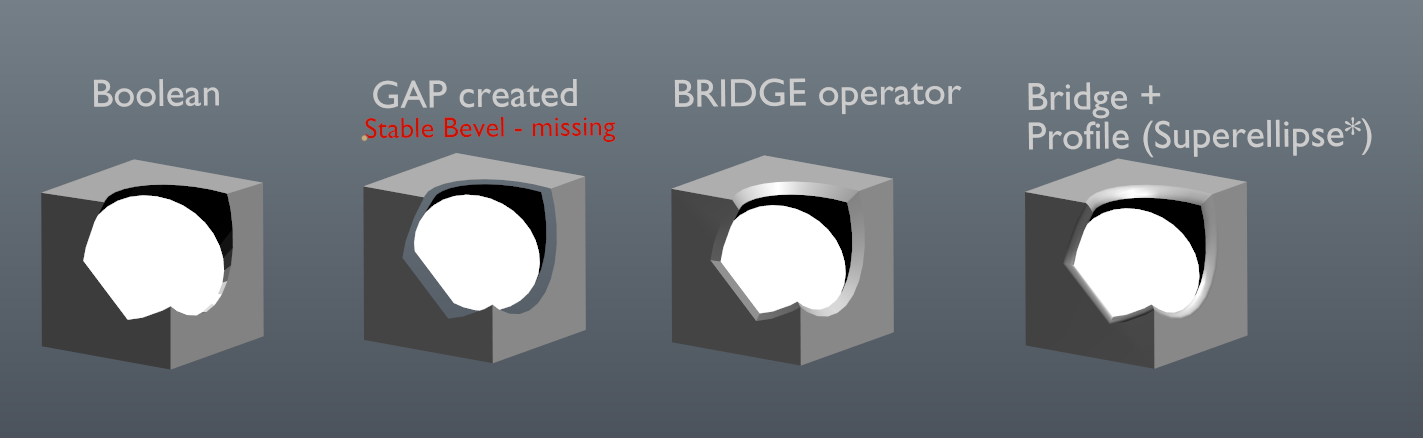
We have everything except the “STABLE BEVEL” part that would bulldoze any geometry a side creating a gap.

In code Bmesh boolean has handy “use_separate” variable. By flipping it on, geometry will be disconnected. It is not much use by its own, however all the important boundry Edges have been Tagged (similar to green line on top most screenshot). This can potentially be taken advantage of such as assigning bevel weight or more importantly finding a way to create a STABLE GAP/BEVEL as seen on second screenshot. If that criteria is achieved then Bridging operator could be called to create what is seen on second screenshot. Must also be noted that bridging is super stable in Blender (like maya Blend in Hard Mesh)! After that all there’s left is to calculate profile.
To put it really crudely, it would be possible to replicate workflow Ilya mentioned(and the Houdini prototype) in a Blender modifier by:
a) Retreiving boolean result+ tagged boundary edges
b) Applying Skin operator + smooth/subdivide on the tagged boundry edges
c) using the resulted thick curve/tube as Boolean to artificially create a gap/bevel.
d) use the Boundry edges of last Boolean pass and Connect them using BRIDGE operator.
e) Apply profile (e.g superellipse)
This would result in very stable boolean+bevel behavior regardless of mesh density.
The main question lies on how to produce an offset from the boolean seam. An offset that will not be hindered from the mesh structure of the two boolean-ed objects. A pair of offset lines (on the two sides of the boolean seam) which will be able to travel all along the surface of the boolean-ed meshes… something like the loop creation tool of Blender… but keeping the shape of the seam and moving without restriction on the surfaces… so that the user may ‘stamp’ (creating a new edge loop) it in any distance of the surfaces he wants.
cgstrive, Instead of the bridge, you can do this:
On the remainders of the pipe, use Shrinkwrap:
Mode: Nearest Vertex
Target: mesh points of intersection.
And then. Standart Bevel.
At the moment, I do just that. What I wrote above, I planned to implement later.
In this link, everything is done with screenshots (the very first version). You just need to open the last spoiler in the post (Спойлер)
http://www.3dmir.ru/forum/read/5483/1.html#261952
Maybe it will somehow help.
babysteps, but had to give this a try:
This is more of an excercise than anything serious, its unstable and misses a lot of the steps that have been mentioned here…
I hope to be able to spend more time on this, but time is really the stuff I have the least of 
1 Like
This is quite interresting ! Hope you will find the time you need 
1 Like
This is very exciting and promising! Thank You for doing this! I hope you develop it further, but at very least we have a proof of concept! I’m very impressed how it handles complex topology(@sphere), it’s exactly what’s needed.
Just a thought on on creating a profile (eventually). One very good potential way of doing this is by using Bridge operator between Outer Edge > Original Boolean edge -> Inner edge. Original Boolean Edge can then be assigned bevel weight and later extra Bevel modifier added (just as in Ilyas addon) or bypassed and directly called from your modifier:

1 Like
This really proofs it can be done, you gotta nail this for the blender community!
1 Like