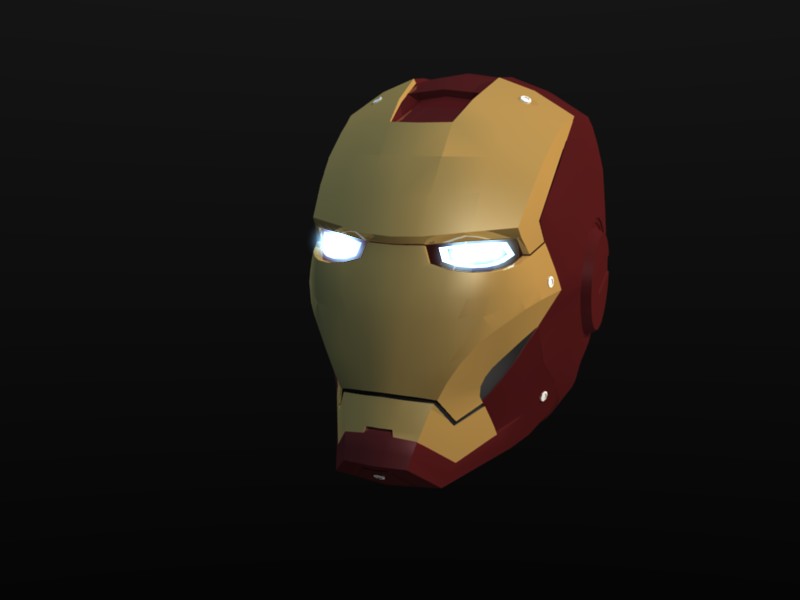
I am modeling an Iron Man http://blenderartists.org/forum/showthread.php?t=186653 , i have mostly finished the helmet and, applied some basic materials, but when i try to go beyond(materials), i can never get a good result.
I know the metal texture has reflectivity, but i do not want to use an hdri, just a gradient black/gray background.
I also need to make the materials look like metal instead of plain colors.
Also some scratches here and there would add realism.
So this is what i have in mind, but i have no idea how to achieve, i poked around on the internet with no luck, perhaps someone could point me in the right direction?
Here is what i have so far(left image) (more renderings on my modeling post)and a similar result i want to achieve(the other 2: movie poster and front/back image):
Any help is GREATLY appreciated!
Thank you in advance.
I don’t know exactly (but I need the solution too a little later), but I think you need to see about nodes.
nodes of the materials and nodes of the render.
for example you may take some materials here and see how its made. http://matrep.parastudios.de/index.php?p=7
Hmm, i went to that site already…it helped a little…but i am still lost, i might go there again and take another look.
I was hoping to do most of texturing through materials, and maybe use nodes like an after effects tool…
But I do not know to much about this stuff, so i will take advice…
A tutorial could also help. I found some dealing with ground texturing like dirt, rocks, grass, that kind of stuff but that doesn’t help with the metal b/c they focused on the displacement and bump maps.
try using the ‘minnaert’ shader with the ‘dark’ value turned down a bit for the diffuse shader, and maybe the blinn for the specular shader. combining materials with nodes could be good too here, but more importantly, you need additional texture channels with grayscale maps for spec, nor, etc. UV mapping is always a good option for precise placement of such textures. ( assuming they would be image textures ), but procedural textures can yield good results as well. another thing you might try playing with is the ramp shaders.
(edit) also, once he has something to reflect around him, give him a dose of ray mirror with the gloss value turned down a bit.
@rvngizswt I know i have to put the scratches an d such on, but i don’t exactly know how to.
@Modron I will try your values, and same as rvngizswti i am not sure how do to the stuff besides coloring, i know how to displase a mesh or use a bump map, or use a procedural texture to affect the color(ex:plain yellow, mixed with red clouds texture, or instead of col use nor), but that is pretty much it…
For the reflection, my question is how can i achieve the reflection without stuff around the dude? (my example is the “front/back” image above–>background is black with some smoke.(what i want right now i just a black background)
As far aas I know you need either an angular world map or stuff in the 3d view
Lastly, what do you mean combining materials with nodes?
Image Textures and Uv-Unwrapping are your friends.
6-steps to nice metal:
Make sure your lighting is nice. (see attached blend)
Get a nice metal texture (see attached blend) with raymirror.
Set an HDRI image mapped to angmap and horizon.
Render with RGBA, Ray, and Premul enabled and save as a lossless format that supports alpha. (like png) -the world will not show up.
Render or produce your background in gimp, and save it as a seperate file.
Combine the two layers in the gimp, or in Blender compositor.
You can also use render layers and compositing nodes to produce both images and layer them on top of each other in one fell swoop.
Nodes can also be used for materials. Nodes mix things together to achieve a combined result.
You need to Google and research these subjects: Blender Composite Nodes, Material Nodes, BSOD Materials,
Well shoot I couldn’t pack the textures and upload the blend, you will have to relink the image to see it, I’ve put it up seperately. I created the metal texture in gimp.
I see you are using Sathe’s model as reference eh?
Looking really good this far. One question though, in the other thread you showed some wireframe renders over the original materials, did you make it in 2.5? If so, how did you archive that?
Also sorry for the bump but this is not finished yet is it?


