I am currently working on a project which I created within 2.79 (yes…I still really really love working with 2.79 ) Since 2.81 provides all sorts of updates and new denoising options I thought I shall give it a try and render out my scene with the newest version because 2.79 (with active denoising, ao and other stuff) is a bit slow in regards of rendering. While working with 2.81 I recognised that the various camera profiles within the filmic log color management are all gone! I actually really liked to test out different color options/moods with those camera profiles which are still present in the old version. I know that they are wrong e.g. they don´t really represent the colors in an accurate way but deleting them all together is a bit of a drastic move in my opinion. So…what I would like to know is if there is a way to get them back working in 2.81? If so, how exactly one could do that? Any kind of help is appreciated!
The issue was, they didn’t work, and worse, because they had actual names of stocks, the assumption that many people made was that they worked. They amounted to nothing more than random Instagram filters with misleading titles.
What I’d strongly encourage you to do is develop your own toolbox of looks. This is very easy to do with what are known as CDL files. They are quite easy to build up a library, and use and reuse them. This whole thread is likely quite useful. You can also use CDL files that are simple text files, and include them in your looks library.
I am looking for info on how to create those CDL files for blender. I see something here: 3D LUT Creator Does that give an entry?
Should we put those CDL files somewhere in 2.81\datafiles\colormanagement ?
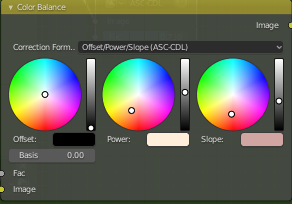
And such a CDL file, does that have the same info/data as we have here in the ASC/CDL node:
First, there are two ways to implement CDL instructions:
Via a CDL stanza.
Via an external file .cc, .cdl, and .ccc. Each has their particular syntax, and can be loaded into an OCIO configuration via the FileTransform transform.
The second answer regarding whether it corresponds to the CDL node, is yes. And no!
Transforms are very non-commutative. This means that the strict order they are applied will yield radically different results. This is nicely highlighted via this post over in the previously reference thread. There is some excellent information there that others have mined. The TL;DR is that yes you can set up your transform chain and use a CDL node to derive values, implement them as a look, and reuse them exactly as they appear in the output. You can also leverage some of the thread information to yield choices that cannot be achieve via the compositor. In particular, the linked post is extremely relevant.
Thanks for your inputs regarding this matter @troy_s and @anon72338821! I will have to learn more about it before I manage to develop my own film response database with dozens of different camera filters. I hope it won´t take me too long to create this!
Don’t consider it “film response”. Consider them what they are; looks. “Film responses” should be a label applied to actual colour science based responses. Otherwise, they are just canned looks, and if they are canned looks, it makes good sense to make them your own looks. It is your work, after all.
Thanks for some clarifications.
That transforms are non-commutative is something I understand I believe. Same as with sound: reverb after distortion in the chain is different than distortion after reverb.
It looks like I have to study the Colour Science thread (again) as soon as I have more time.
update: I believe I see the exact steps in post 5 of the Colour Science Thread:
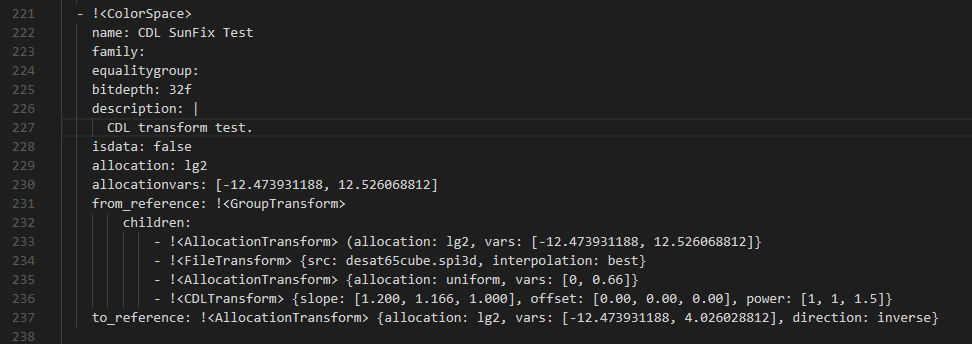
Open up the config.ocio file and duplicate the Filmic Log Encoding Base stanza from Filmic. The “stanza” is the entire indented definition. Rename the name to “TestingCDL”.
Find the proper syntax for a CDL transform via the OCIO documentation. Add the line as the first[/] entry in the children of the “from_reference” definition. Insert your own values.
Watch your whitespace as OCIO is [i]extremely fussy, and save it.
And once you master it via values in the configuration, you can migrate your custom looks to one of the dot files listed above. It will make migrating and maintaining them far easier.
But what kind of values are those in slope, offset and power? How can I read values from my CDL node in the compositor and convert that to what is expected here?
Update1: awh, yes, found it. Under the “RGB” values.
Update2: Oopps, that looks as if I am using the wrong view transform / colorspace or something.
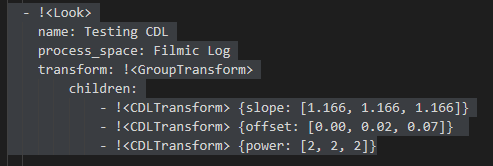
In my code I see: process_space: Filmic Log, Shouldn’t be that just Filmic?
Update3: Ahh: process_space has to be linear
 ) Since 2.81 provides all sorts of updates and new denoising options I thought I shall give it a try and render out my scene with the newest version because 2.79 (with active denoising, ao and other stuff) is a bit slow in regards of rendering. While working with 2.81 I recognised that the various camera profiles within the filmic log color management are all gone! I actually really liked to test out different color options/moods with those camera profiles which are still present in the old version. I know that they are wrong e.g. they don´t really represent the colors in an accurate way but deleting them all together is a bit of a drastic move in my opinion. So…what I would like to know is if there is a way to get them back working in 2.81? If so, how exactly one could do that? Any kind of help is appreciated!