modeling the 3D wikipedia puzzle ball

Hello blenderers!

I am attempting to learn blender, and picked a project of modeling the puzzle ball logo for Wikipedia:

http://meta.wikimedia.org/wiki/Logo_history

This doesn’t seem too ambitious, considering some of what I’ve seen people doing with blender. But my goal is for the model to have the flexibility and modularity that anyone can show the globe from various rotations…and (at minimum) be able to selectively include or exclude puzzle pieces…while properly revealing the remainder of the structure on the other side.

The current logo was done with a texture warp of an ordinary 2D jigsaw puzzle pattern on a sphere. I’d like to see a model which (if constructed in reality) would yield individual pieces of a uniform curvature…like the real jigsaw puzzle globes that you can buy. Here’s a link to one of those that shows the construction I would like to build:

http://www.adcomarketing.com/images/Executive%20Gifts/puzzle-globe-plegPLA-669.jpg

I’ve done some 2D art but as a complete beginner in 3D modeling I do not know where to start. I am working through tutorials just to get the basics of the interface down…but I’d like to make a beeline to the features that are most important to this particular task. I’d appreciate any guidance from experienced readers of this forum who can size up this problem.

I’m fairly convinced that I do not wish the jigsaw pattern to be implemented with a texture. One obvious reason is because I’d like it to be possible to physically pull the pieces out of the model on an individual basis, or leave them all in (the logo as it is currently known has several pieces wiped out).

It seems important to not duplicate nodes in the model which are common for constructing edges between the puzzle pieces. I saw that it is possible to tag parts of a single mesh and texture them differently, such as in this mushroom:

http://www.blender3d.com/forum/viewtopic.php?t=8699&sid=b5109be2ccf63f9d646b9a81a7ddf136

But I gather what I want is to actually have the pieces as separate meshes.

One very key aspect of this model is that it is a hollow shelled sphere. I’d like it to be possible to give the pieces a thickness and then to allow users to easily modify that thickness. I’m concerned about commands like “spin” for generating shells because it seems that after you’ve finished the spin, you can’t easily go back and re-run the spin if you change your contour.

I’ve looked at tutorials for making hollow objects and I was unable to get the boolean operation to work in order to subtract a smaller sphere from a larger one. (“Modifier is disabled or returned error, skipping apply.”) Of course, I have no idea what I am doing so this is not too surprising. I was just surveying ways for producing hollow things.

I’ll keep following tutorials and building basic competence with the system…but it would be great to hear ideas from experienced modelers. I’m more interested in having the ball to work with than being the person solely responsible for making it, so if anyone else thinks this is a worthy goal and wants to just hack it out as a tutorial that’s also fine in my book! :slight_smile:

Thank you…!

Interesting… I just tried a technique and it works sort of. Might be a start?
I started with a sphere with allot of verts I subdivided a cube a few times and set to sphere. I used the subsurf modifier.
Then in face select mode I selected faces with the select circle (hit the B key twice). I drew a piece of the puzzle.
Then hit P to make the selected faces a new object.
In object mode select the new object
In edit mode select all faces and E-key region and imeditly hit enter then alt-s to shrink fatten move the mouse and give the piece some thickness. Repeat.
Its hard to make all the pieces the same thickness try holding the ctrl-key as you shrink fatten? I have an idea I have not tried. follow the steps above but don’t shrink fatten any of the pieces. after you have a bunch of objects all with subsurf on join them back together. now do the extrude shrink fatten thing.
If this makes no sense let me know I will try to make a little tut with some pictures tomorrow.

I’d be interested in your perspective on drawing the pieces. There’s clearly some potential for exploiting symmetry. If you look at the picture of the real puzzle globe I attached above, it has bands of the same pieces repeated longitudinally 7 times. It also looks like there’s a line of symmetry around the equator.

This means one only needs to draw 1/14th of the total globe, perhaps?

I’m most interested in just having people throw in their ideas for how to make the most useful/versatile artifact right now. But definitely anything to get the ball rolling (no pun intended) would help…! :slight_smile:

Just an idea: Create a jigsaw puzzle (no thickness yet) in cube-shape [1] and them do a ‘To Sphere’ on all the vertices. From there you can extrude, texture, (maybe split them again), etc…

This way you can do the single pieces in a flat shape and the transforming is done more or less automatically.
EDIT: The only backdraw is that the jigsaw gets distorted quite a bit.

EDIT: concerning the symmetry you might want to model only one (tileable) piece and then place it (manually or dulivert-ed) to fit the globe. Finally then join them… but that’s only one way of doing this of course :wink:

Werner

[1] i.e some of the single pieces do have corners that warp to another side of the cube.

For what it’s worth, booleans seem to be vastly improved in 2.42. So before, using Booleans was something I usually thought of as out of the question in Blender, now it might be doable. I’m thinking of something like making the hollow sphere first (make a sphere, extrude the whole surface and scale up slighlly), then it would be possible to make puzzle piece outlines with curves, and then extrude them out and making them wedge shaped depthwise merging all the verts on one end. By placing that point on the center of your sphere and using a boolean intersection you could get yourself a curved surface puzzle piece which would have the appropriate angle depthwise to fit with other pieces.

The trick I haven’t fully worked out is how to make sure they all tile nicely. This might take a little actual planning in advance. If you study the shapes of the actual puzzle pieces in such a puzzle you might be able to get an idea for what will work.

That is the exact point where it mostly falls apart. There is no geometry i know of (high-polygon count that is … see also Wikipedia: Regular polyhedron) that has an even distibution of only squares/rectangles … and jig-saw pieces basically are rectangles/squares. This is also a reason there are no other views (perspectives) of the Wikipedia globe since there wouldl be a lot of distortion for sure :-/

And mapping a jig-saw puzzle texture on a sphere will give you distrortion as well.

On the other hand … who said jigsaw pieces have to be rectangles? :wink:

Werner

and jig-saw pieces basically are rectangles/squares. This is also a reason there are no other views (perspectives) of the Wikipedia globe since there wouldl be a lot of distortion for sure :-/

Unless it was made like the model metaeducation posted (second image). The top piece is a different shape.

Yes, that is one trick to make it work, but i did mention “even distribution” with a reason … I just wanted to state that it is kinda hard to pull of without warping/distortion (and in this case scaling) of the single pieces. … and in the image you also see that there is plenty of that :wink:

Werner

If what you are saying here is that you can’t have uniform pieces on a sphere, I accept that…I think the model I posted would be fine despite it having a “different” top. The view would generally have the top piece missing and the bottom piece turned away from the camera anyway. But I’d like there to be a sane overall story, so that if one were going to animate the pieces all coming together and being built as a complete sphere then it would not require someone to start over from scratch.

Speaking of which–is my goal here misguided, in that such reusability/versatility to a model is rarely achieved in Blender? Would I be better off writing a programmatic script that produces the model with certain parameters? Are scripts the way such objects should be delivered?

Speaking of which–is my goal here misguided, in that such reusability/versatility to a model is rarely achieved in Blender?

I don’t think that’s the problem. I think the problem is that you’ve chosen a tricky item to model. Not impossible, but something that requires a little bit of figuring out. Generally, you should certainly be able to expect that you can create an animatable model of something.

Would I be better off writing a programmatic script that produces the model with certain parameters? Are scripts the way such objects should be delivered?

This is an option. If you have in mind what kind of algorithm you would use, this might be helpful in thinking up a way to model the globe by hand. I don’t think there’s any set correct way items should be delivered. By all means if you had a clear idea of what the program would look like to create this, it might be easiest simply to learn how to implement that program in Python. I don’t, offhand.

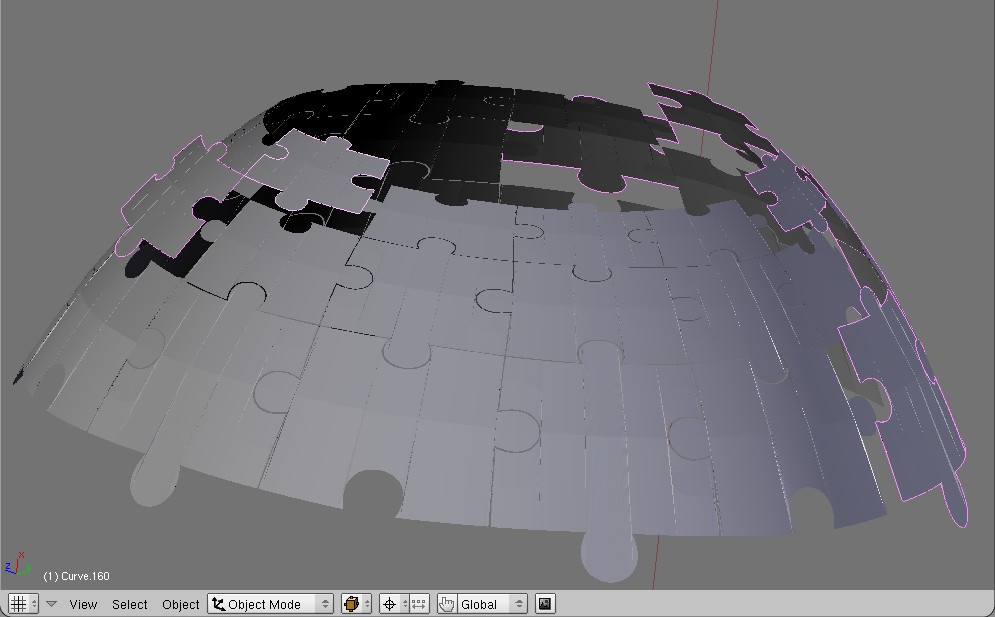
I made a puzzle piece with bezier curve, then duplicated it, then moved the dup to all 4 sides to make the tabs and holes match up.

Then I moved the dup to the side, then started dup’ing both pieces to make a 12 piece row of puzzle pieces.

Under ‘curve tools’ I converted the points to nurbs because it seem to convert to mesh better(smoother).

I then convert (alt c) to mesh, then in edit mode I use shift-w to wrap the row around into a ring.

I dup the ring, raise the dup, rotate it so the tabs/holes line up, then did it one more time.

Take that and ctrl-j them together, then in edit mode use ‘to sphere’

That gave me one half of the puzzle globe minus the cap that would be different shape, I am guessing making a shape from curves, converting to mesh, and with a little patient ‘to sphere’ work, you could get the caps made.

Oh, since this was made from one original piece, selecting all in edit mode, and seperate all loose parts works like a charm. As you can see from my picture below this is only a rough draft, it would require a bunch more work, but looks like a possible way to go.

P.S. I have not experimented very much converting curve objects to meshes, but notice the resulting meshes end up being a gazillion tri’s which cause the shading to look like crap, are there any tricks out there you guru’s know of, or is the trick to just make the object from a mesh to begin with so you can control the mesh?

Attachments


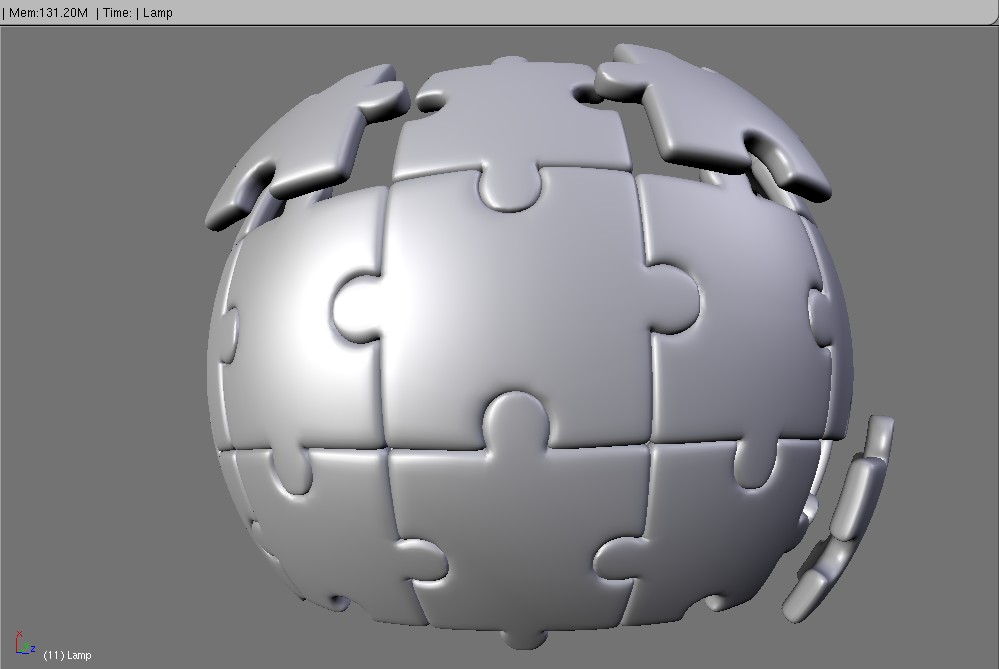
I started with mesh, looks much better :slight_smile:

BTW for this I used a mesh plane so I ended up with a flat puzzle piece, the I dup’d, warped, and sphered it to this near globe shape, then with it all one mesh I used extrude-scale to get the thickness, then alt-s to fatten it up and tighten the joints between pieces, subsurfed-1, and seperated loose parts.

Attachments


LOL… wow that turned out awesome.
That would make a cool tutorial.

Hazard, you da man.

Oh wow, Hazard! This one looks great! I am way too new at this to understand the subtleties of how you got this model vs. the previous attachment, but it looks like something went very right with this approach. I’m excited because I’m sure that once the model is figured out, it would open the floor for tons of people to do amazing renders of it…

The level of detail you posted is not enough for me (at my present level of knowledge) to be able to reproduce the result. A tutorial would make a fantastic item on the wikibooks site that would be of interest to a large number of people (or at least, so I imagine):

http://en.wikibooks.org/wiki/Blender_3D:_Noob_to_Pro

If you don’t want to go into painstaking detail of how you did this but merely gloss it in a language that could be expanded upon by those with a layman’s knowledge of blender, maybe laying out a draft in the wikibook would be the right approach? That way it could be hammered out further through a revision process for anything you didn’t feel like writing…

(But certainly if you think there’s still a fuzzy area to evaluate the approaches, continued discussion in this forum might be good way to bring some more ideas to the table before a tutorial is constructed.)

hmmm… that does sound like it would make a great tutorial to have on wiki books… :slight_smile:

tonight I will finish the model, I already started making the upper ring that each piece connects to two pieces below it, but had to sleep :frowning:

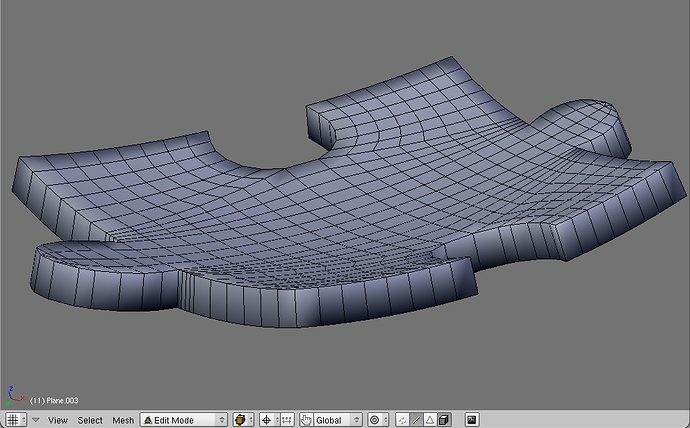
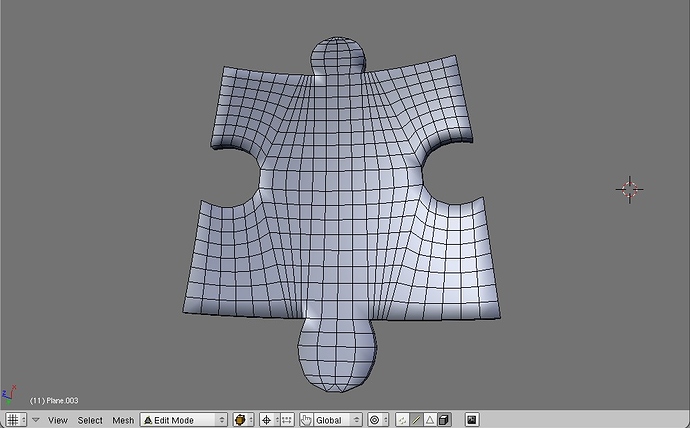
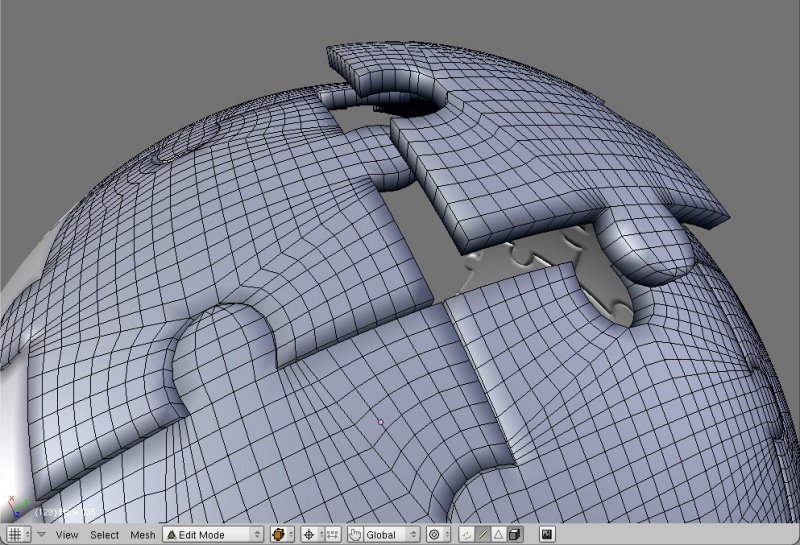
In the meantime, can you at least post us a wireframe so we can get a clearer idea of the mesh. Even just a wire of one or two pieces would be good :slight_smile:

I was working pretty quick on this last night, and would like to avoid the tri’s at the tips of the tabs.

To keep them a nice smooth shape while being warped they need to be pretty dense.

to keep them more uniform I am going to start over with a dense square mesh and cut the shapes to keep the mesh edges as uniform as possible.

Attachments


Very exciting pictures (to me)!

It definitely does seem like it uses a lot of points in the mesh…are you saying this is necessary in order to have enough points to keep the exterior/interior surfaces of the ball at an appropriately smooth curvature?

I know that when doing vector illustration in 2D one does curves using endpoints and control points…as opposed to approximations with an ever increasing # of straight line segments. But it seems like often in blender the answer for curvature is to make a finer mesh and manage a lot of individual points. But a spherical shell seems like it could be made out of “simple” curved triangles via a mathematical shortcut. Are “Nurbs” the moral equivalent of a Bezier Curve or B-Spline in 3D?

(Pardon me mixing my from-ground-zero blender education in with this!)

Looking very good and I only want to second the wish for a tutorial. It seems like a very neat technique to achieve very interesting results, so, if you’re willing to share it with us - please do so :slight_smile: