I’m mostly using Houdini these days. But since modeling in Houdini is such a pain in the butt, I was thinking I could use Blender for that part of the process.
So one of the things I ran into right away is how does one quickly move or rotate the pivot to rotate a selection in Edit mode without jumping through all kinds of hoops ? In Houdini I can use “insert”, and in SI it was the the “Alt” to quickly adjust the pivot.
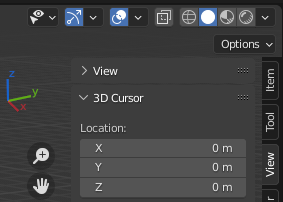
The best way to do this in edit mode is by using the 3D cursor. https://imgur.com/a/wnVVgGb Here is where you are able to change what Blender is currently using as its pivot point. Change it to 3D Cursor, afterwards there will be two methods depending on use case. If you just want it in a general location just Shift - Left Click to place your cursor where your mouse is pointing. If you want it to be accurate, add a vertex or select an existing vertex at the intended pivot point, then press Shift - S and click on Cursor to Selected. Your pivot point while in Edit mode AND Object mode is now your 3D Cursor, this can be changed any time. When changing back to a default pivot mode I normally use bounding box so that it automatically keeps the pivot in the center of the object even if the objects origin isn’t centered. Also while in object mode, there is an option in the N-Panel to only move an objects origin, which can be useful for changing a pivot point while only in object mode.
.
Literally, the Period is the hotkey to the dropdown in the top of the 3d window.
I use Active Element a lot. Whatever Vertex is selected is the pivot point. Double Click a selected vertex to make it the active one.
If you press the hotkey (period) and twitch the mouse in the direction of the option you want it gets selected. Once you learn where the options are on that popup menu its super fast
I was kind of hoping I could prevent using this 3D Cursor to setup a “pivot” before rotating or scaling something, it’s very clumsy compared to simply adjusting the pivot while rotate or scale is still active. But I suppose that’s not possible in Blender ?
Also I was looking for something like “sticky keys” in Blender, where one could press and hold a key to temporarily activate a function while another one is still active, so you don’t have to switch between “select”…“translate”…“select”…etc. all the time.
I agree that it can be clumsy, It’s a shame you can’t move around the 3D cursor and you have to place it every time you use it. The other way to do with how you are explaining ( I think ) is by using the N-Panel. (Edit: first video was wrong I just pulled the first off google, this one is what im talking about) https://www.youtube.com/watch?v=Je7B0hpwpaE
I’m not sure what you mean in your second paragraph though. You can select your object and then press G to translate, similarly you can use S for scale and R for rotate.
You can move the cursor any time you wish…several ways…in Object mode, you can simply hold shift and right-click where you want in ( you can also turn on snapping and snap precisely)
Another way is to use the Cursor TOOL…second one down in the T-Panel tools…also works well with snapping…
If you set Origin to Cursor on your quick favorites it is available with Q at any time, and you can set your cursor with only a couple of clicks…
In case you’re wondering if you’re missing something obvious, it’s really just a PITA to deal with pivot placement in blender.
Want to select affect pivot only, and then set the coordinates numerically? You can’t, apparently… At least I’ve never managed to figure that out. You have to put the cursor where you want it, and then snap the pivot to the cursor. Or snap it to something else that is located exactly where you want it to be.
However, you cant directly translate the 3D Cursor like how you would any other object. It’s projected from your screen to the nearest surface, so if you’re trying to place your origin in blank 3D space its impossible to make it accurate. This can be done however with the method that I mentioned above and this can be done anywhere in 3D space accurately like with coordinates. By using the N-Panel → Tool → Options → Effect only → Origin, this switches Blender from translating your object to translating the origin. From there you place your origin at world center (0,0,0) and then translate it to where you need it to be precisely. By using quick favorites like you mentioned this could be a very simple way to manipulate your origin.
Sure but that’s only accurate to the grid. What if you wanted it a quarter of the way between one, or a third, or any other fraction you might want? You also cant use the Z axis with absolute grid, it only moves the cursor along the X and Y. Don’t get me wrong though, I only use the 3D cursor when manipulating an objects pivot point.
Go to object mode, ctrl-a → location. From there you can grab the origin and do g → x, y, or z and then whatever numerical input you want. Whenever you apply location it will always sync your objects origin with world origin. From there you have only one chance to set the origin to coords, otherwise you would need to remember where it is in world space and then add onto that to change its coordinates.
Correct, I think there may be a misunderstanding what I’m saying only emulates something like a coordinate input but blender doesn’t work that way. When you move something using G you are only adding onto where the location currently is, so if you type 0 then it will not move. You can however “reset” the origin by pressing ctrl-A → location and this will sync the objects origin with the world origin (0,0,0). From there, say if you wanted your origin at (3,4,0), you would tick affect origin only and then do g → x → 3 → enter, and then g → y → 4 → enter. It’s definitely not pretty, but that’s how it can be done manually in blender. A script could definitely refine this method by remembering where you origin is in world space, and then adding or subtracting the difference of the new coordinates you input. That way you could actually have a coordinate system in blender, but that’s for the smart people to make.
Shift+C to put 3d cursor to 0,0,0. Then select object and Ctrl+Alt+Shift+C → Origin to 3d Cursor.
For inputting the coordinate, input it in the N toolbar then do same ‘Origin to 3d Cursor’ hotkey as above:
Alternatively, maybe you want to put the origin to a specific vertex. Select the vertex, Shift+S → Cursor to Selected. Then Ctrl+Alt+Shift+C → Origin to 3d Cursor.
So I guess there’s no way around using the 3D Cursor.
I’ve been trying the suggestions here, and it’s not so bad.
Though I really miss something like “sticky keys” as I mentioned before. That way it’s much faster to switch between placing the 3D Cursor and transforming geometry or an object.
While modeling I currently have to press “c” to place the cursor, click somewhere to actually place it, press “q” to make my selection, select some geometry, press “e” to rotate, rinse and repeat…
With sticky keys I could have Rotate active, press and hold “q” to adjust my selection, release and rotate the selection… mucho rapido.