I decided to revise portions of my muscle mesh before moving on to the male figure adaptation, to save having to do it twice, as the male model will require substantial editing in the adaptation process as it is. Changes were made to the neck, shoulder and back region as well as the upper portion of the thighs, plus more careful attention to vertex weights & shape finessing in the shoulder and armpit region. This last effort in particular improved the overall portrayal of the mastoids, the clavicle, traps, deltoids, and lats regions. The anterior aspect of the thigh/hip joint also looks more natural.
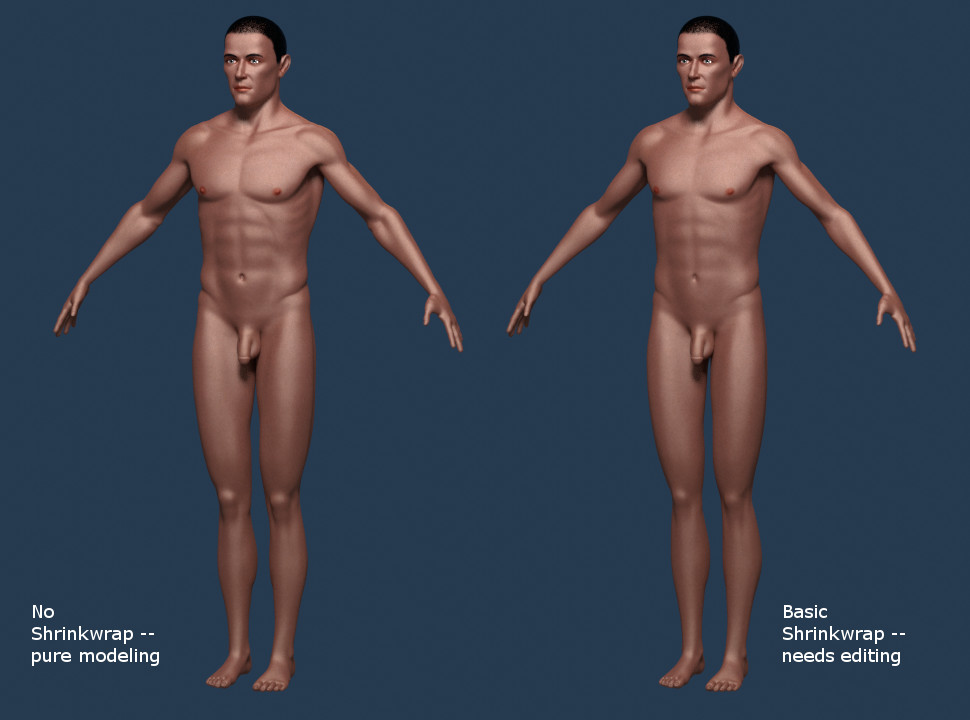
Currently the Shrinkwrap modifier with the muscle mesh layer as its target tends to slim the figure, reducing apparent muscle bulk. This will change somewhat as I progress through this portion of the project. I’ll be experimenting with more extremes of body shape in the male version, trying for highly pronounced muscularity as well as near-emaciation, all from the same basic rig/muscle layer/shrinkwrap combination, in keeping with my Universal Figures concept.
Very very interesting!!! I follow this with a lot of expectation!!!
Are you planing in make some kind of tutorial, showing the basics in how to replicate this (for beginners hehehe)? Are you planing in adding fat tissue?
Yes, and yes, in a way. I plan on doing breakdowns of the process (now that I’ve got it well in hand) with possibly some example .blends to take apart (no, not the full rig & muscle & skin layers, I think everyone should work on those themselves) and to illustrate the principles. I’m happy to share ideas but not necessarily all the specific work, though like with the hair systems & shaders, some things are useful as straight giveaways.
A fat layer is not really feasible as a physical part of this system. However, there are steps that can be taken to imitate that aspect of human physiology; mesh editing using the Shrink/Fatten tool (and others of course) and adjustment of the Shrinkwrap Offset Distance parameter are important methods, and coupled with application of Soft Body physics to more of the muscle layer meshes, the impression of fat can be introduced. I’ve been concentrating on lean forms for now because that best reveals the interaction between muscle layer and skin mesh. Same goes for height adjustments, different muscle mass ratios, as much of the gamut of human physical variety I can effectively incorporate. After all, it is a Universal Figures project
Yes! Wow that could be great! I’m interested in replicate it, do all the steps with my own anatomical knowledge, I’m fare for having the skills of blender right now, but that is changing.
The work that you are doing here is just fantastic! I think I understand what you mean about the fat tissue, but I don’t know how you can do specific deposits.
Also I see that you have the breasts reacting to the movement but the rest of the big masses like the abdomen or even the fat of the face are not, is there a plan to just a play the same principle that do the breasts efect, to the rest of the body?
I mean haha this is so exciting! I can’t wait!
I’ve given this some thought, and while a “global” fat layer isn’t feasible, there’s no reason why certain regions of the various parts of the muscle layer can’t be given Soft Body physics in the same manner as the buttocks. In addition, it’s completely possible to hang “bags of fat” on the muscle layer (shaped appropriately, of course) for a more pronounced effect. That is how the breasts are done.
Soft body physics isn’t a very subtle effect, though, and a mesh’s reaction is closely tied to its geometry and topology, not just shape. This makes using it over the entire body a very time-intensive process, and the question is, will it add anything to an animation to be so thorough in applying it?
You are probably right, but in a slow motion shoot it is absolutely important for realistic results, or of course in fat people.
But also the muscles need to be also soft bodies in order to go for complete realism. But hey I never try to made that, so I don’t know what can be done or not.
I’ll wait to the tutorial!
Do you have a relish date? So I can clear my calendar
I’m sort of winging it. Plus I have an animation in mind I’m working on, you know, fun stuff, also field trials of a sort. Just keep watching this space
Don’t know how I missed this thread before, but subscribed now to keep tabs on it. This is very interesting for a project, and I like the results you are getting.
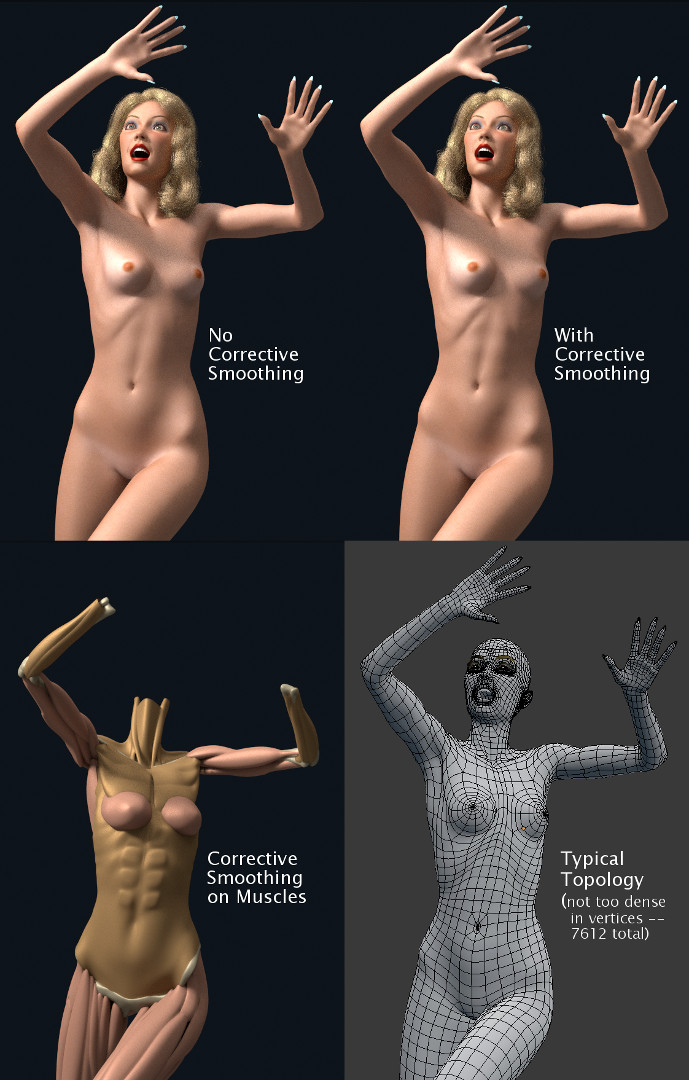
A Super Big THANK YOU to Hadriscus for cluing me into the Corrective Smoothing modifier in the Theoretical Muscle System thread, what a great tool for my non-theoretical muscle system. I apply it to both the underlying muscle meshes and the skin mesh, and it can be tweaked to very fine performance. Makes for a real improvement especially in the shoulder region.
By setting its parameters, this modifier can also enhance detail from the underlying muscle layer – all the musculature visible in the skin layer is generated by the muscle system, no additional sculpting or normal mapping, AND it’s totally dynamic to whatever degree of movement is built into the muscle layer, either by deformation or physics. The faint contours of the ribcage is a displacement effect in the skin shader (because the model topology isn’t great for modeling it), which can also be made dynamic by keyframing the displacement parameters – much easier than animating a normal map, I think.
In the example above the Corrective Smoothing was applied gently, only about 30% of its possible influence, so for other models, say a very muscular male, it should be very handy to help define the musculature without resorting to static methods like normal mapping.
I’ll be testing “production-level” animation with my system with a new project begun in collaboration with other BA.org members, revisiting some scenes from the finale of King Kong. The model above is my Ann Darrow. She will be wearing more in the KK scenes
Wow… Really loved the results of the system… The skin shaders also look great. Would really like to see how the complete system works. Thanks for sharing. Blenjoy…
Thanks, catch-, comments much appreciated. I’ll be posting more about “how” as work proceeds on the male mesh.
One thing I have discovered, though, that is not altogether positive. It turns out that Soft Body physics is VERY sequence-specific in terms of its response to animated motion. I’m doing a quick animation of my Ann Darrow model, and she has some very fast moves. The SB settings that sufficed for a walk cycle, as in the above videos, is completely inadequate for faster & more vigorous action – Ann’s boobs fly out all over the place like warm taffy! Gross. And, in seeking a new set of parameters, it turns out that mimicking various kinds of human tissue is a lot more complex than it seemed at first. But, what else is new lol. I’ll keep experimenting, as it’s an important part of this project to be able to use physics as part of the muscle emulation.
Kong was made by adapting the Univ. Fig. male mesh, muscle system & rig, a pretty drastic revision given the anatomical demands of a silverback mountain gorilla. The pilots have no muscle system, as they don’t require motions that would need it, but will be animated for their roles in the planned short.
The hair & cloth systems used so far have generated many more problems than the muscle system, so I guess that says something about its reliability.
Wow !!! impressive work , i need to read the thread in depth ! but the workflow is amazing , i do very little rigging/animation , and i suck at using corective shapKey.! respect amigo !!
see u around
Muscle system adjustments – the easiest to accomplish, mainly Edit Mode scaling & some sculpting to fine tune
Basic workflow: I used some off-the-web refs of mountain gorilla skeletons to revise the male skeleton (the model, not the rig, and not shown here) as a start, giving me a basis for revising the proportions of the body mesh. Then I re-proportioned the rig, working from both the standing rest pose (unnatural for the gorillas, btw) and the primary “four-legged” stance. I had to make a few small compromises in “perfect” gorilla physiology but my refs show there is a wide variation among various populations, and Kong is one-of-a kind anyway. Once the primary pose looked good on the mesh, I fitted the muscles “inside” it. So far it’s all working well but I’m sure some small adjustments will be required by the animation I plan, that’s the usual case.