I’m just curious how close (or far) I am to industry standard or professional modelling standards. The main thing that I question is the green that criss-crosses and seems to spiral a bit. But it is fully quad and I manage to go from low detail in the leg to high detail in the paw pretty well I think. It also has several “patches” for deformation. Subdivision looks good as well.
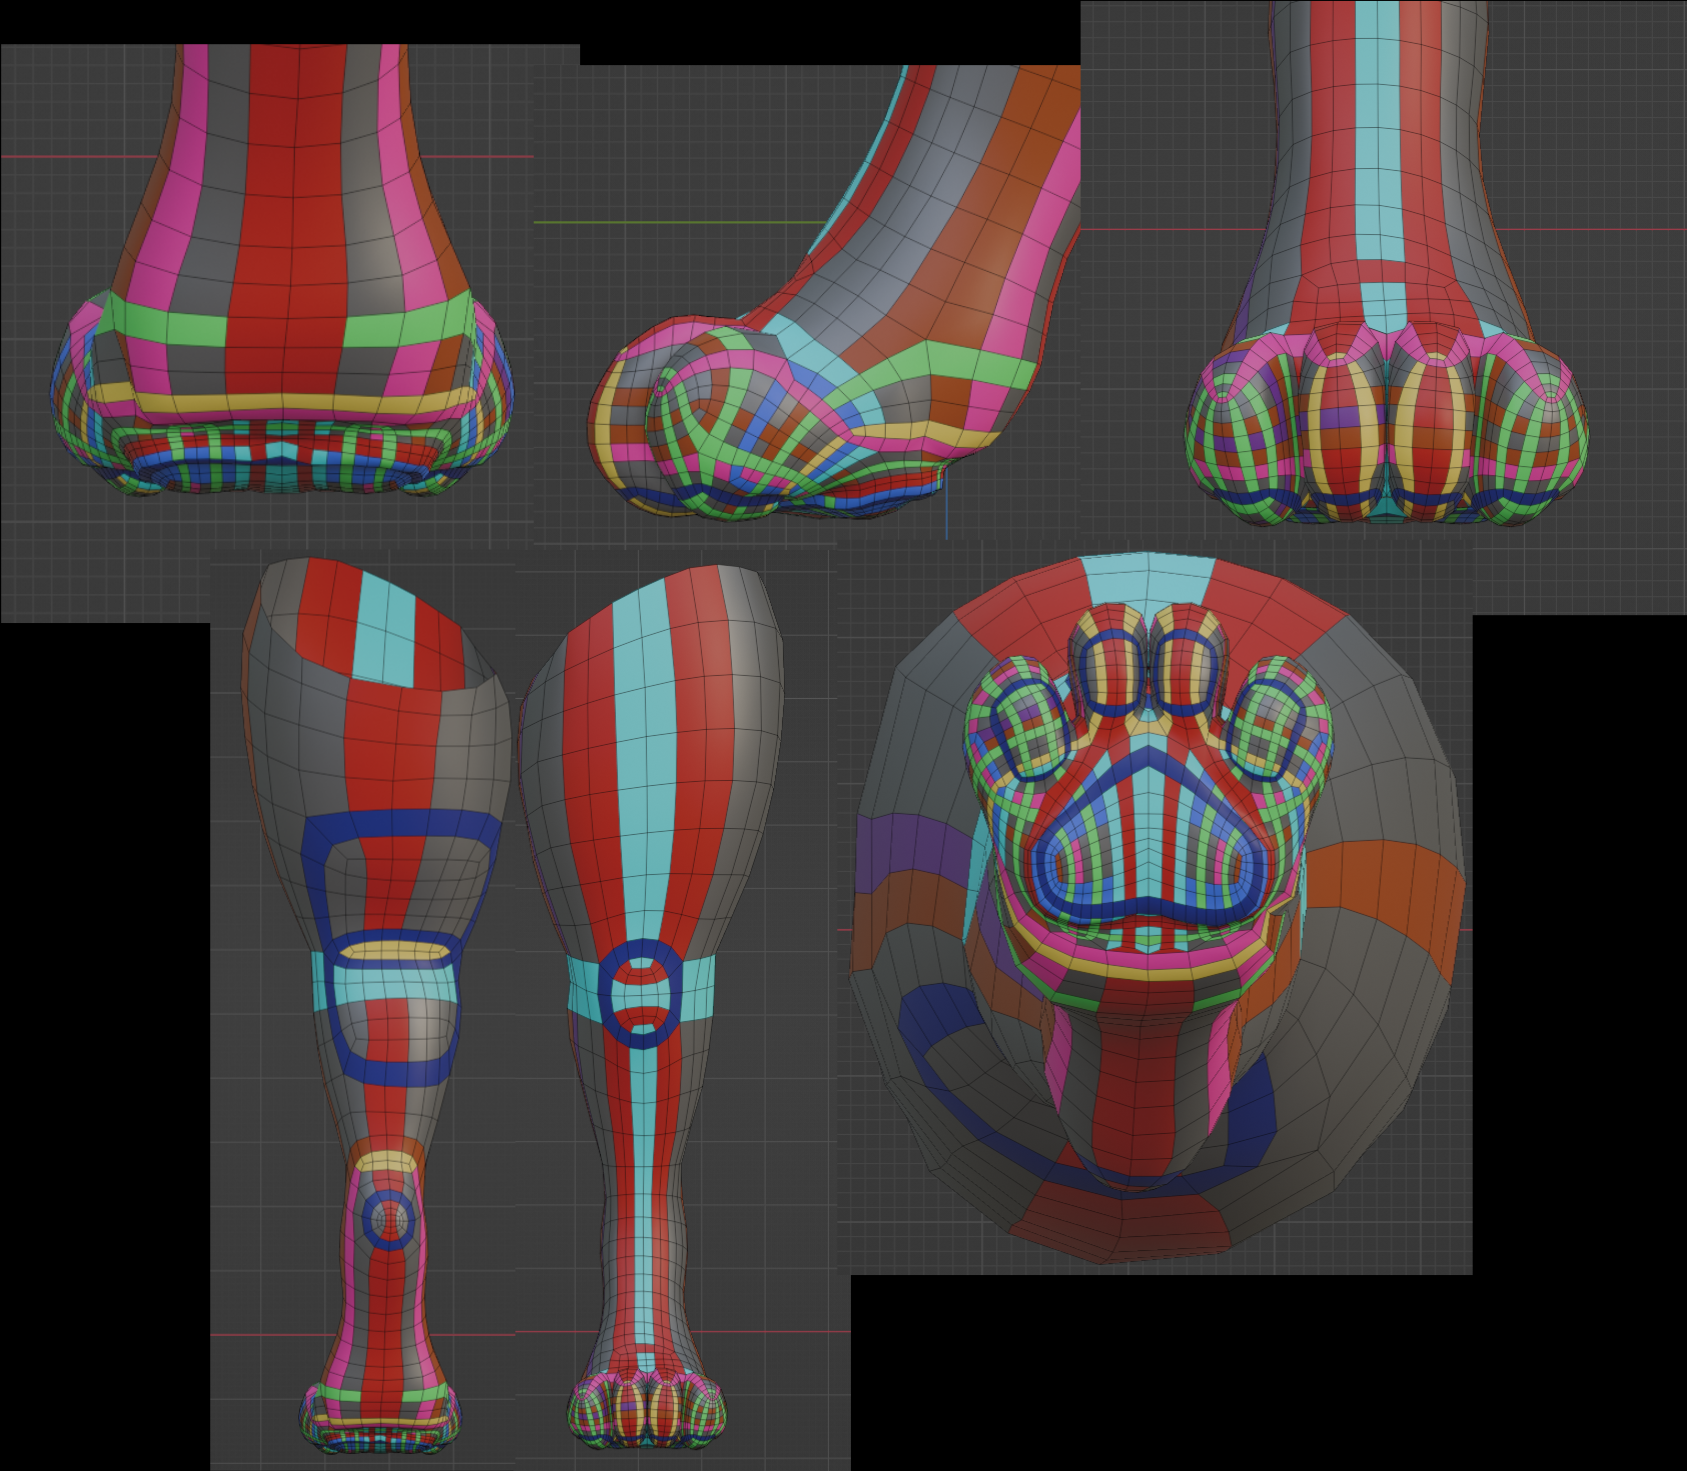
Those spirals are going to be trouble down the road. Your quads are also nowhere near consistent in size. You should be using terminating edge loops, not spirals, square faces, and even-sized quads to get “industry standard” or “professional modelling” standard
1 Like
You should be using terminating edge loops, not spirals
fair
square faces
I don’t see square faces being a standard for every quad, there are other shaped quads to create needed edge flow and high to low detail transitions
even-sized quads
no? even-sized quads would force more polys that are unecessary
1 Like
Or you could use less detail in the more complex areas.
I would say your paw is more detailed than necessary, the polygons don’t need to be that fine to get the shape correct, especially if the model is going to be subdivided at render. Also, the sheer amount of faces on the foot makes it hard to control the edge flow, causing those wild edge loops.
Having uneven sized faces will also cause a specific problem, which may or may not be an issue depending on what you intend to do with the model. If you intend to sculpt fine details for a normal or bump map, the amount of detail you get will be inconsistent across the model. Similarly, it would then be difficult to bake and use a displacement, as the detail would be displaced more finely in some parts than others.
In my opinion, your faces are square enough here, I am not seeing long, thin strips which could cause shading issues.
1 Like
You know what would be really helpful as you are making those claims is an example. I’ve watched hours of blender videos over years and I’ve never heard the “square faces and even-sized quads” as a definition of good topology. Yes, those are good things, but those are conveniences that are not always affordable for the application. My application is a game-ready medium-poly asset that is not to be subdivided or unsubdivided.
This is a helpful review. Yes, I may have too much detail in the paw, and I can definitely say it’s due to my inexperience as I am afraid of not having enough detail in future steps. The bigger reason for the high detail is I want to have rises and falls in the major paw pad, essentially sculpting some medium level detail.
And I had no idea about issues with normal baking and I wasn’t thinking about the inconsistency of detail with a multires.
1 Like
Well, I don’t mean the baking process itself will fail, but rather the high-res sculpt will have issues that will be visible in the bake.
Let’s say you are trying to model a character with finely sculpted detail, like skin pores. If you have areas with 5x more detail than others, your normal map will have some areas with super crisp pores and other areas where they couldn’t even be sculpted at all. Even worse would be if the model had long, narrow faces, as those would create detail that looks visibly stretched on a sculpt.
Such a model would still be useable, but it closes some doors as you couldn’t detail it by sculpting directly on it. You would either have to make a remeshed copy for the high-res sculpt or use an other texturing method, like texture painting.
1 Like
Yes, makes sense.
Just to clarify, my definition of mid or medium poly is a model where at some required distance the individual polys and poly corners are difficult to see / not distracting (where the model is curved). My required distance is close-up, so perhaps leaning more on the high poly side of medium poly. I hope this is a pretty good definition of medium poly.
1 Like
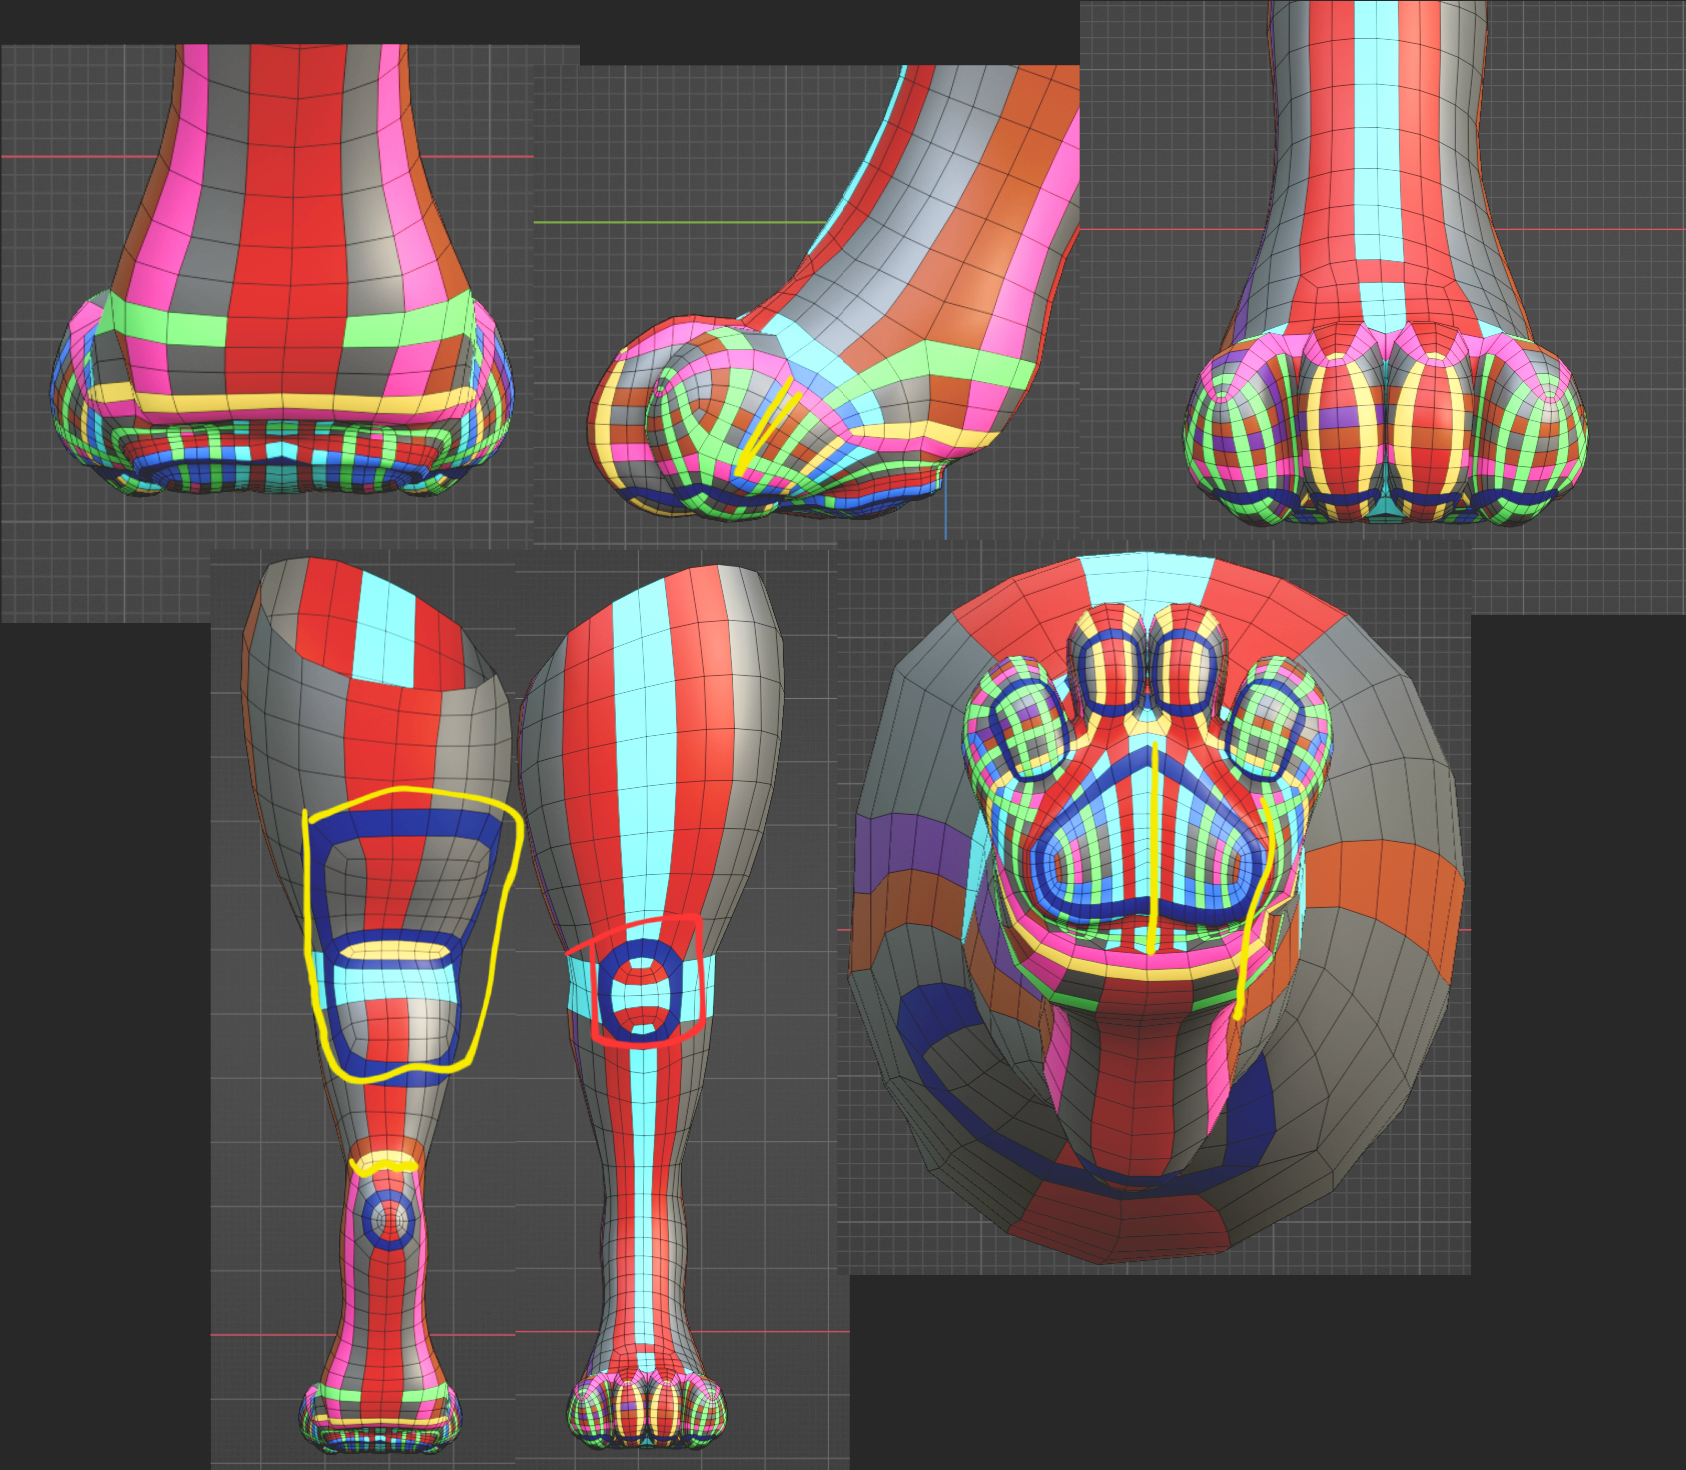
Hello, what is highlighted or closed in yellow is areas you can optimize/remove to have a simpler edgeflow, and the middle in the bottom of the paw there is a notable sharpness in which you can use the slide relax brush in sculpt mode for that and after tweaking the rest of the topology. and red area I think is better to remove that and add grid fill and do 1 or 2 insets and smooth that and the surroundings or use slide relax brush to not lose volume as much.
1 Like
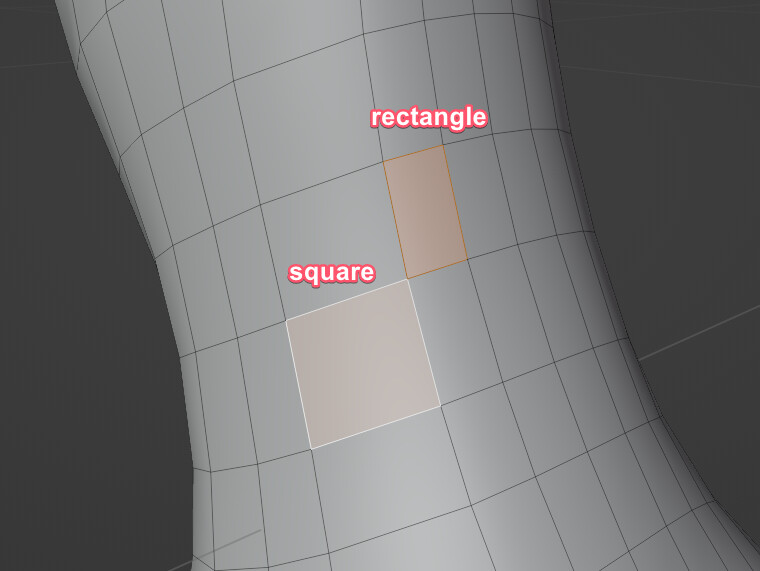
It took me until now to realize what you meant by square. You’re saying that squares as opposed to rectangles are preferable. That makes way more sense. In order to do that I would have probably had to use triangles and stop some of the edges going up the leg. I’ll keep that in mind for my next project.
Edit: Well, I could still use triangles where the leg doesn’t bend to get more sqauare topolgy. I’ll keep that in mind.
This is what you meant, right? Remember, I’m a noob, there’s gaps in my knowledge, you gotta explain these things.
ok, i removed one loop to reduce the rectangleness a little bit, but ultimately I’d have to start over to really implement your ideas. I’ll improve for the next time I attempt it.
I second the use of this tool. It won’t fix poorly designed topology, but I find it very useful for evening out faces where the flow is solid but the spacing is off.
1 Like
Yep, this is just a demonstration of topology, the final modelling process is still in the works and it will be very smooth when I’m done. I’m trying to recreate the paw on the right. The problem with the paw on the right (and why I’m making it from scratch) is because the toes aren’t seperated enough and the pads are pasted on instead of modelled into the foot.
Does anyone else do this? I am coloring the parts of the foot in order to keep track of topology as I adjust the model, where the pads are and where the “sidewalks” are (sidewalks are what surrounds something topology-wise to create seperation)
Blue: Paw pads and circular areas
Red: Sidewalks
Yellow: Toe separation

1 Like
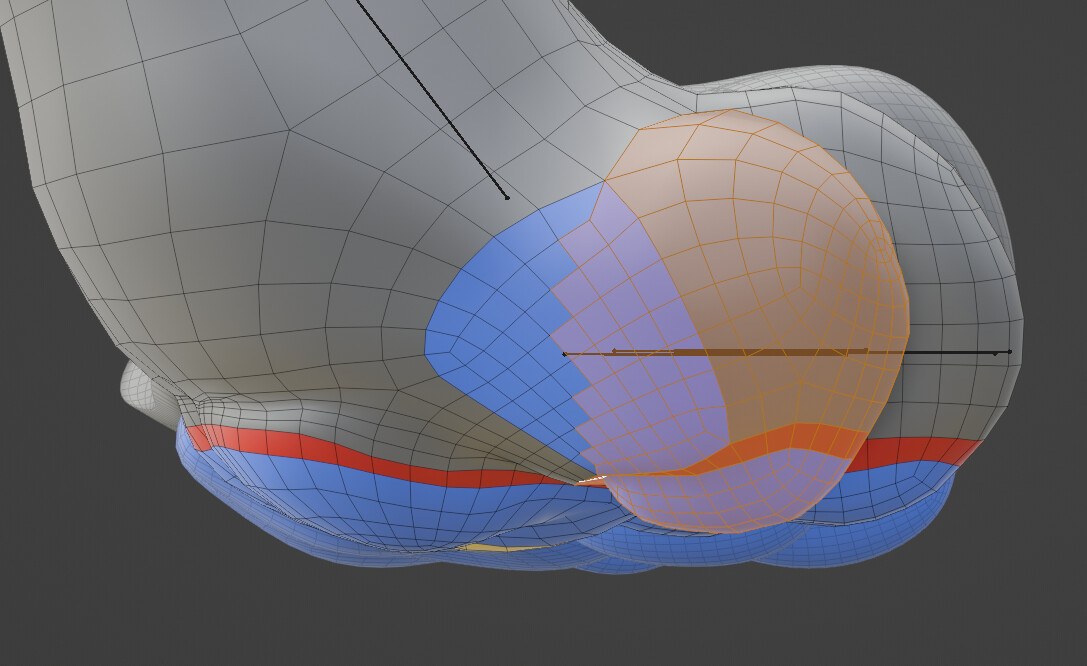
You gotta model the toes as if they were separated and then join the topology in where they intersect and smooth the crevice there…
In the case of the right is the same, you had to model that separately and join or boolean it (if this was a sculpt like from voxel remesher), but also is a lot better to have a copy of the separate toes in the case of retopology, because you gonna have a hard time shrinkwraping the mesh to very tight crevices of the sculpt.
yeah, I could seperate the toes, model each one (there might be intersecting geometry in the end).
another way is to weight paint it to bones, move the toes apart to be easier to work with
another way is to use shape keys that move the toes apart like the armature would
I was going to also try using this: https://blendermarket.com/products/geometry-nodes-push-modeling-tools
1 Like
alright, looks like I can’t isolate a toe, there should be a sidewalk for this and the topology is a bit iffy for creating the ridges on the pads. I’ll continue with what I have as these issues won’t be noticed by the time it’s done and in use, but definitely want to do better next time and gained a chunk of knowledge from this thread and the modelling process.

the pad looks decent despite the issues

EDIT: Near final result

2 Likes