I just finished my first human head using Jonathan Williamson’s tutorial. But now, as I start the second one, I find myself scrolling back through all the videos again and again just to see the face loops.
I took a screenshot of another tutorial as shown below and that’s what I’m using right now as a reference while modeling, but would like to know if there’re any ready references available that I can use as a guide.
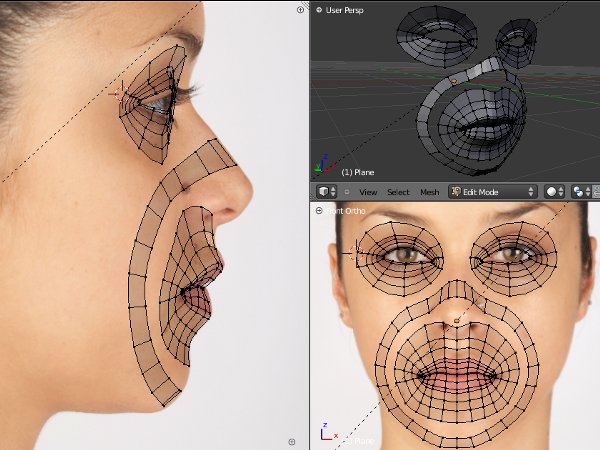
The one you have there is pretty good. Facial loops are a principle, not a copy-by-steps guide. Mouth and eyes should be concentric circles. You should normally have a band going around the mouth loops and crossing over the top of the nose (blue in your screenie). After this, it’s a matter of connecting them together with quads. Follow these guidelines and you should have fairly consistent results.
@Lancer: Thanks. I suppose I can get accustomed to the coloured ones with some practice, but I’m not sure about all the others. For example, if you see in the screenie attached there’s one loop which goes around the eye, cuts itself and then head towards the back of the head (between the red and green loops). I’ve looked at a couple of meshes and that one is missing in them. Normally there’s a loop which flows down from the back of the head, the side of the nose and then downwards towards the neck.
Additionally, there’s one particular loop which is used to accentuate the muscle along the lower jaw and that’s not shown in this one. My problem is in visualising the flows along the head.
I suppose you are trying to say that as long as I can get the main loops, I should be able to go with the flow and model everything else. But as a noob to all kinds of art, let alone 3d, it’s difficult for me to grasp.
Thanks for the pic. So I guess it just boils down to getting more practice.
It’s a weird feeling while modeling heads. I just completed my second head and there’s something about it that doesn’t look right. I can’t say what it is, but it just isn’t there :|.
ok thanks
theses free video seems to be for a male model
any idea if any free video are available for female model?
i guess that it’s better for loop to keep quad faces
but i could not see well the corners where it’s not clear if there are tri’s or not
but i’ll check the videos to make certain i get it right!
Hi RickyBlender. The eye in that pic was being done with 11 verts but it could have been 10, 11, 12 or anything. There are no triangles and I hadn’t tucked corner eyelids in; it’s very simple in that regard but shows one way of quickly roughing out general edgeflow over a couple of side and front photo references.
The work you did over this is accurate (although in my own modeling the mesh is being mirrored from the other eye. I could, and usually should, make the eyes unsymmetrical later on) but I was not meaning to give this as a traceover example. Rather, I was trying to demonstrate a workflow with which to approach the general edgeflow of a head without religiously copying a mesh on edge-to-edge basis.
I’ve attached the example for you to show that I’m not copying any edgeflow reference other than modeling straight over the photo of the model. Notice the eye does not line up in side view; for the purpose of making a simple head, it’s as accurate as it needs to be. Also note that I usually turn the subsurf off when modeling (it is on here, as I switch between them).
i like the loop concept easier to work with afterwaard if modification are needed!
always wonder something here !
now is there a design concept behind the number of loops that you include on the face
i mean is is function of the rig to be added later on?
like to have enough loops or vertices so you can change the vertices weight to have a smoother change in the mesh
when you move some bones in armature may be !
and is there some sort of wiki page for this or tut available ?
i guess that around holes for subsurf you need more loop to have smooth transition!
Don’t worry about the proportions, just go by whatever reference you have. As far as number of loops go, best keep the number as low as you can, but think of bezier curves. Where there is a bump or a dip, you will need a loop along the summit to form the shape. Other than that, stick to quads, and it’s better to have squares than rectangles as this minimises texture distortions.
I signed-up to post a reference set from the polycount wiki, but I’m new and can’t post links yet! Ha! However, if you go to that site, then go into their wiki, choose the “character” category, then “character modeling,” then “character topology,” then “face topology” you’ll find it along with reference sets for the rest of the body.
I think it’s based on a reference set from another site, but I can’t remember which one.
As everyone here said, different faces will probably require different topology depending on dominant features. I’m finding that the more I practice, the better handle I get on it - much like all things in art.
The page looks quite exhaustive and even shows the eye mesh from up close. But many of the meshes have tris and diamond shaped quads in weird locations. Not sure if it can help as a guide for topology.
I can say you hit it on the nose. There are 3 things that will help you OK, 4 things.
Knowing anatomy from some other practice, drawing perhaps. (A dedicated study here is needed of each part to the point you almost know it by heart. Drawing over and over again)
As mentioned, knowing where to put the loops.
Doing numerous heads. I mean many many many to get to the point that you can look at it and knowing your anatomy, can isolate what is wrong. That feeling of it “just not looking right” is something I experienced many times and still do every now and again.
Good references -preferably in the background to model from directly to insure the things are lined up correctly.
Repeat 1-4 over and over and over again till you are no longer on this Earth.