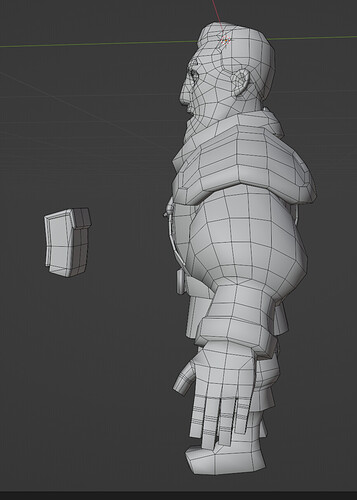
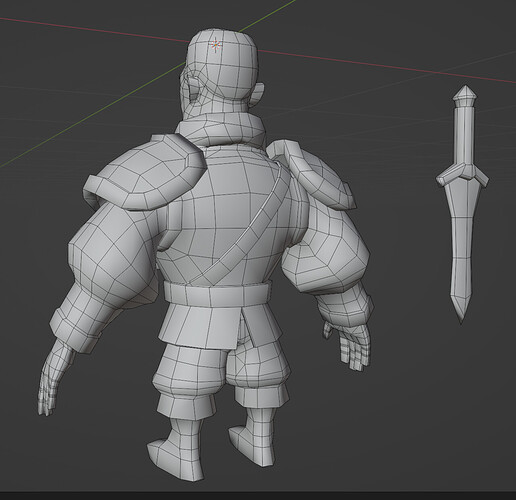
Also now that I look closely, how exactly is the sword handle connected to the guard (is that the word)? There seems to be something odd about it, but I can’t quite see.
Guys, let me first start off by expressing my enormous gratitude. It may sound banal but I highly appreciate your time to share your knowledge. Now, let me show you how I cleaned up the model. Managed to save up quite a bit budget and thanks to you the low poly has a total of 5838 tris. ![]()
Please, check out the screens below.
Meanwhile, what concerns me now is the baking process. I did a quick test with the head only and there were some nasty errors around the corner of the hair, close to the ears.
Even when I blow up the cage some areas are having issues and I’m not sure what would be better - adding more geometry or fixing those issues in Photoshop (which I’m not sure if that is acceptable in a game dev pipeline)?
PS: @JoeW that’s not an N-gon. It’s a quad but the belt covers it cause it’s not integrated with the armor.
@stray the guard is not connected to the handle. Frankly, I had a struggle with this and decided to leave those as separate objects at least for now.
I would also remove 2 or maybe even 3 edge loops from the belt strip on the back of the character.
Are you using a hand made cage or just the default distance value?
Sometimes, baking with a higher distance can cause some errors to appear that are not present with lower distance. If this is the case, you can do 2 bakes, one with low distance and an other with high distance. Then, you combine them, using one bake to patch the errors of the other.
Also, the character is made from multiple pieces, which can be a problem during baking. If you can, try separating the parts for the baking process, so they don’t risk leaking on each other.
@etn249 that’s an interesting idea to combine the bakes. When it comes to separating parts for the baking process, after I am done with it should I re-attach them? This method is foreign to me.
If I may, you could do the bake on a copies of the original mesh and separate them into whatever parts you need - the UVs, materials and images will be shared anyway.
Always seems like a safer option to work on duplicates when learning and experimenting.
Make sure you don’t have some folded UV’s in you UVmap and you might have to “stretch” some UV’s (give them more texel space) to get good results. Check that your low-poly mesh doesn’t dip in and out of the high-poly model excessively - especially polygons that starts outside and ends inside the model (not a guaranteed problem, but sometimes …). You might want to use a “special” version of your low-poly model to bake UV’s - one that has geometry optimized for baking. Also like etn249 wrote, you may have to use different baking settings to create multiple maps and then patch them together in an image editor, and/or, break the model up and pull maps individually and combine them manually. I don’t think I’ve EVER baked out a map that was perfect with one set of variables (and yes, it’s OK to “fix” a map in an image editor - just realize that normal maps can be fuuuuunky to edit “by hand” ![]() If you have access to Substance Painter, it’s normal map extraction seems to be a bit more reliable than Blender (in my experience).
If you have access to Substance Painter, it’s normal map extraction seems to be a bit more reliable than Blender (in my experience).
Oh - and one more thing: Make SURE that all of your polygons have the correct normals orientation. Blender can flip a polygon on you here and there sometimes - especially when you’re doing some aggressive editing.
Could you please elaborate on the special version of the model for UV’s? How does that work?
I would make a temporary copy of the character for baking (copy both the high and low poly versions). Make sure both versions are in the same spot and ready for baking. Then simply select one piece of the character (select both versions of that one part) and translate them away to a random spot that doesn’t touch the rest of the character. Then, do the same for each detached piece, moving them away so they don’t touch each other, but making sure each piece has both its high and low versions layered together.
Now, the different parts no longer touch each other and each will bake on its own, without risking having leaks between objects. At that point, you can bake the entire character at once. After baking, you can delete (or backup and hide) the separated version of the character and the texture can immediately be assigned to the regular character, as they have the same UVs.
Ah, I get it now. Don’t Substance Painter and Marmoset Toolbag have bakers based on naming conventions to avoid the leaks in that regard, though?
It’s possible, Blender’s baking system is rather old and in great need of some redesign, so a lot of other software have better baking systems with more features.
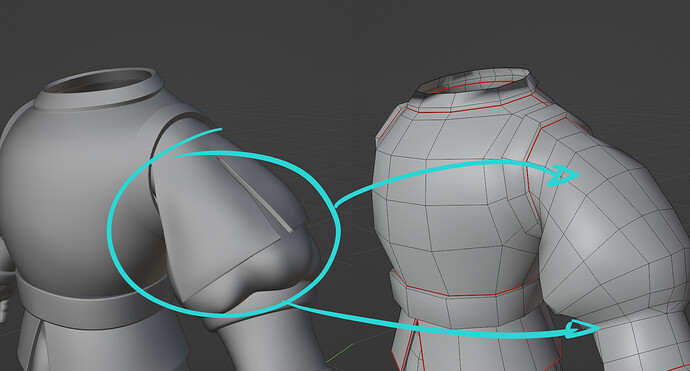
While inspecting the low-poly body, I realized that I may have made a ‘critical’ mistake and I need you guys to share what you think. Instead of actually modeling this upper part of the sleeve, I decided to leave it for the normal map to bake for the sake of a more animation-friendly topology. Do you think this was a smart decision or I sacrified a lot?
Also, will that triangle on the top part of the bracelet be problematic upon deformation?
Again, sorry for the noob questions. I want to learn from this project as much as possible.
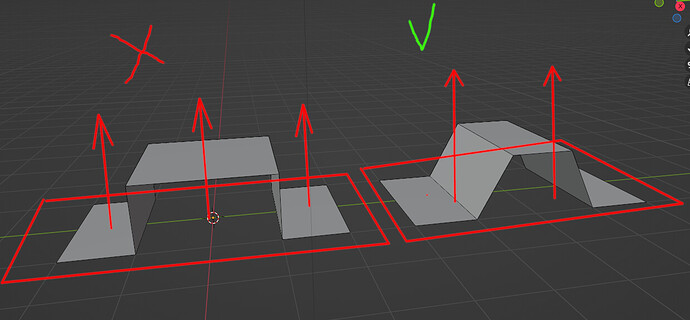
The sleeve’s only problem is that it may not bake properly if there are faces which are perpendicular to the lowpoly’s surface. Limitation of the normal map which only stores direction, not depth. Give such surfaces a slope.
Cant say for sure about those triangles. Only when you rig the mesh to the skeleton, you’ll be able to see if it works or not. Assuming there will be sharp bend anyway (elbow joint) it should be OK
Thanks for your response. Can you give an illustrative example of what you mean about the slope, though? Not sure I get you across.
I kind of get it on the example image but not really sure how to apply it to my topology, though. Sorry for being so newbie ![]()
You could go into edit mode and push these edges back a bit using the edge slide tool (double tap G). Alternatively, you could bevel them to ensure the normal map will see them.
Something else that will help in such a case is to bake the ambient occlusion on your model and mix into your color texture in multiply mode. Any detail that’s entirely texture based has the problem of lacking shadows. By including the ambient occlusion in your color texture, you ensure the details that lack real geometry have a little bit of shadowing and this will make them much more visible.


