This will be my first post on this forum since I’m all new and started using Blender for the first time ever yesterday. I also haven’t been doing any animation/modelling before so it’s pretty tough but a lot of fun! I started out thinking that I wanna do some cool short video. But a video wouldn’t be cool without some animations so thats why I ended up with Blender.
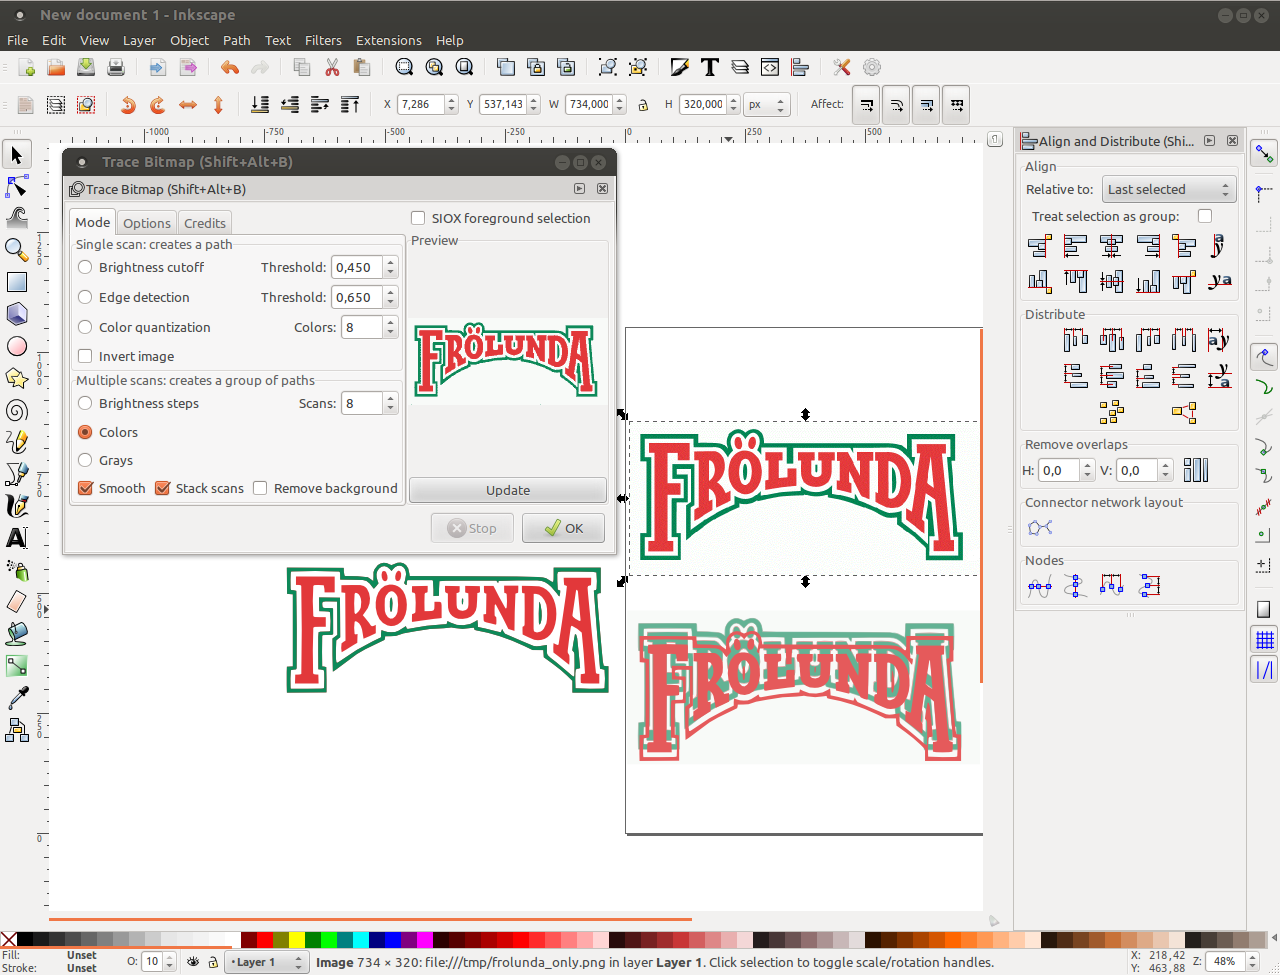
I live in Sweden and I am a big fan of a hockey team here so I was thinking about doing something cool with their logo. I only have the logo in a jpeg-format so I started researching and found out that it’s possible to transform a jpeg into a vector picture. After that I can import it into Blender. I have done this and the result seems pretty good if you don’t look too close, which I do… Also, when adding a vector it becomes one single object, but this is a problem for me because I want it in may different layers when animating.
To the question(s):
Is there anyone who can tell me what the best way is to get this picture (now its in PNG) into Blender without getting tons of segments on every straight line? I just want one segment in each “corner”.
My goal is to have the same setup as in the logo, with colours and everything (but in 3D). I also wanna be able to animate so each letter could “pop-up” after one and another!
Thanks a lot for your help.
Any small idea/advice is appreciated!
Best Regards
Freand
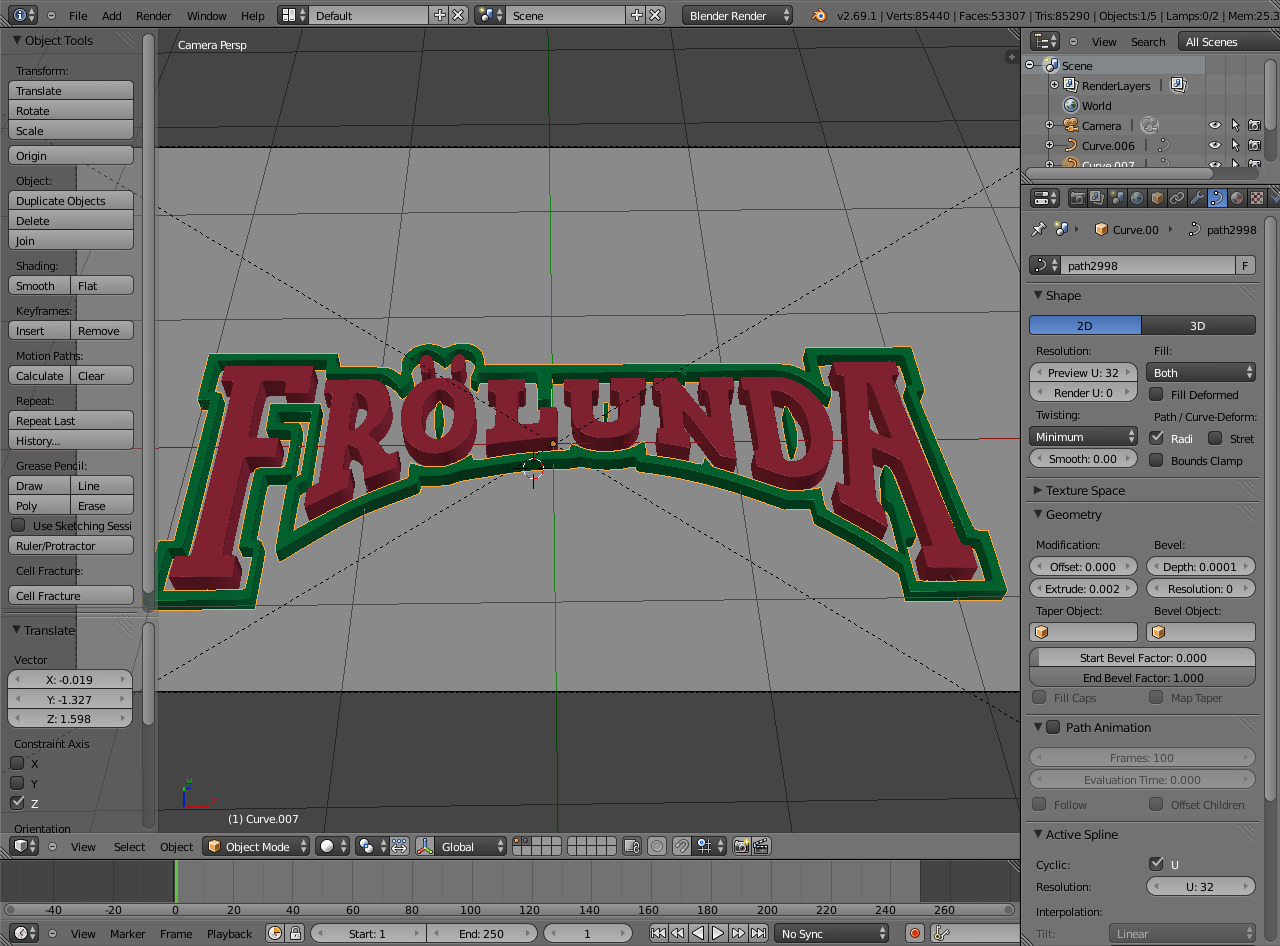
vector file imported into blender (.blend): frolunda.blend (532 KB)
As you might have noticed, in Blender the curves that are inside another makes a hole. That’s why you need to separate the solid parts and import those. Those import with materials that can be then adjusted for rendering.
Did a trace in Inkscape, ungrouped the result and put only needed components back to group
Imported in Blender, scaled up, applied scale (ctrl+a -> scale), adjusted materials, put some thickness to them by adjusting the extrude value in curve (object data) properties. Also gave a bit of bevel.
Here’s the file. You could separate the letters to their own objects if you want to animate their visibility. Edit mode, select some part, ctrl+L to select the rest and then press P to separate. frölunda_ja12.blend (469 KB)
Greetings from Finland o/
Edit: forgot to mention that there is addon in Blender called “simplify curves” which does what the name says, in case your curves have too many handles when imported and need to edit them afterwards.
Welcome on forum!
JA12 beat me on this again, but since i have it here…
I usually work a bit more on image itself and convert to b/w version. That simplifies work in Inkscape and gives less vector points there. Inkscape also does simplify curves - that can be exploited before bringing result into Blender.
Triangles on top faces in Blender (after curve extrusion and beveling) can be converted into flat n-gon faces by selecting them and Delete - Limited Dissolve. If you plan on some letter bending - i’d say rather not. Then you need to mostly manually convert all into nicely squared mesh which takes a lot.
Wow thanks a lot for your help. I didn’t expect this much help
I was trying to follow your advice:
…But I fail on the last sentence. How do I ungroup the result? (How do I seperate the solid parts with inkscape?, How do I get the red letters only? seperated from the green line around them, and inside some letters) I did somehow get the green lines seperated from the text but that was after just trying tons of things and I didn’t really know what I was doing. But I never got the red letters, I always got the green line aswell but as coloured red. (Same result as in our picture)
Inkscape: object menu -> ungroup. It has several layers to get the colors, including background, which is not wanted. Just drag with mouse and take a look at them on the side. Only one layer of each color is enough, just check that nothing is missing and that the edges are good.
After getting the two colors, put them on top of each other (I grouped them again also) and delete the rest.
Blender: There were overlapping curves. I deleted those in edit mode from the object that had the wrong color (which doesn’t matter because could make adjustments in materials but this saved another step).
But I need to get the red letters in a .svg and then the green line in another one right? And import them seperately? Otherwise Blender will create even more curves? Or am I wrong?
I imported them seperatly. I guess I will learn with time!
I have problems with shadows though and I have no idea what is wrong. I have set up a white background with the logo stuck on the white background. Still it looks like the logo is not on the white background. It looks more like it’s a distance between them. How come?
You’re using buffer shadows with the spotlight. Use ray shadows, crank up the samples (8 for example, more if there is visible noise in the shadows).
To have lighter shadows you could enable environment lighting with low energy (0.25 for example) from the world properties and increase gather samples. You could use low energy hemi light instead which is faster but it’s easier to understand that shadows are lighter because of environment (ambient) light.
Could also tweak materials while at it. Perhaps decrease specular intensity to 0.2 and decrease/increase hardness around 15-20 (clay) or 100-150 (shiny materials). Also apply object scale for every object (select all, ctrl+a -> scale).
Two examples of what lamp ray shadow soft size does:
There is a percentage under the render dimensions that is set to 50% by default. FullHD resolution @ 50% and you get 960x540 resolution.
If you want the head to have some depth like with the letters, then it might be best to have the head part as one curve (the outline without feathers), and put the face as image texture on it in Blender. Could then make a simple shape (mesh) for one feather, duplicate it, and then map one of each feather color to them. Outline is black for both everything so that should make it easy enough to intersect feather objects with the face object.
Do you have any good tip on how to seperate the head from the feathers this so it doesn’t look too bad?
And all I do is import it as .svg into blender? Without doing anything with inkscape (except changing format from .PNG to :SVG). No mixing with colours or something like that? I think i tried importing another picture of the head in blender and ended up with a curve in blender which had lost a lot of details.
Ok, I this might be something I need to learn. Making simple shapes by hand
I just want you to know that I really appreciate you taking your time to answer my questions!
This is what I mean. Quick edit in Gimp to get the head outline and the color version of it, then put that to inkscape and converted to curve, then that to blender. Imported curve already had a material again, had to add a texture.
The thing is that curves are kinda hard to texture. Could convert that curve to mesh (alt+c in object mode), do cleanup and then UV unwrap to have absolute control over the texture mapping. I didn’t want to go through that only to show what I mean so I used empty object to help map the texture on the curve. It doesn’t show up in textured viewport shading so I used render border (ctrl+B, ctrl+alt+B to clear) in the viewport and rendered shading to view the texture and position it.
Looks really really good and I guess thats the easiest way aswell! I won’t use your files since I wanna learn to do this myself, but its good to have something to look at, a goal
When using GIMP, did you do the headoutline by hand or does it exist some great tool that I dont know about?
I selected the black part with color select tool and then deselected the feathers with lasso select. Then I added rest of the face to the selection and filled a new layer with foregroung color (ctrl+comma). There might be a better way to select but I didn’t stop to think about it too much.