I cant make the weigthed hooks to work, How are they suposed to work, is there a weigth group name antry somewere? thanks in advance
For the weighted hooks (last time I tried):
Create a mesh with loads of vertices.
Go into edit mode and assign a vertex group.
Weightpaint to your heart content.
Back in edit mode press CTRL + H (WITH NO VERTS SELECTED)
Add a hook with a new empty from that menu.
Go to object mode and play with the empty.
Very cool. Just wish you could use an image map to assign weights. Then I could use this as an alternative to displacement mapping (ie with more control)
Koba
can someone create a tutorial on the fuzzy caterpillar;
and does that mean you could render fireballs over a pond without enviroment maps?
Oh I see, tha thing is adding a hook with no vertices selected, strange implementation by the way… but it works very cool and fast! :o
Thanks!
Here’s my furball. I used buffer shadows because they are much faster.

And here is my first one (that I got right),
http://img.photobucket.com/albums/v186/Howitzer/f2f694fb.jpg
Here is my particle test, applyed to a WIP.
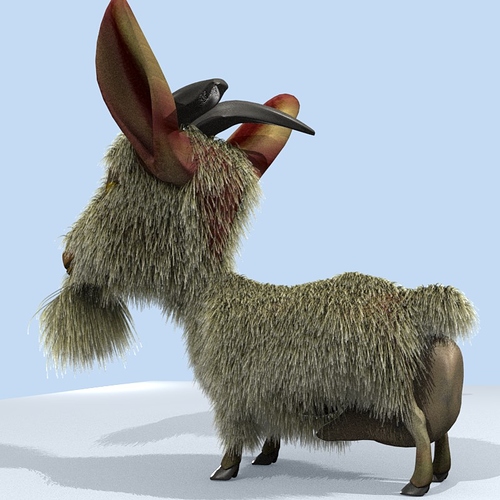
My goat for a contest on blender.it
I’ve decided to use different meshes to have different lenghts.
Is it possible to use weight paint to have different lenghts of fur?
I’ve tried but blender slowered (nearly stopped).
Im not sure if you are accepting C&Cs but:
-
The fur under the goats chin is not attached to the chin.
-
The neck area also seems to be a bit like plastic: maybe some more fur or a texture?
-
The interface between the fur and the base of the neck also seems to be a bit to abrupt.
Good:
I like the fur on the body, it is well done and looks ‘frizzy’ - good stuff!
Kind Regards
Simon Harvey
WHOOPS!! Just realised that it was a WIP, so these issues are probably going to be addressed… (!)
I’ve already corrected these errors, and made a caricature according to contest requirements. The offset of fur from the chin is due to a different level of subsurf between the two meshes.
The caricature is still rendering, but i’ll post it here as soon as possible, since it’s nearly a finished project (regarding modelling).
The fur will have a non realistic appearance, very different from last render.
and here is the final image.
Attachments
One way to get different fur lengths in different areas would be to use more then one particle system/weight group pair. Add a weight group for each fur type on your model, then create a partcle system for each with the settings needed.
Unfortunatly only the first particle system emits in the current CVS. I’ve already complained to the guy that has been making the particle patches, so maybe in the next CVS build…
i don’t get how to get a build effect on a text…
Create a text object, write what you want and then exit edit mode. Then, press Alt-C in order to make the text object in a mesh object (you may have to press Alt-C twice in order to acheive this), then just apply the build effect.
How do I get the fading effect on the hair? I’ve tried using blends set to strand like people have said, but it doesn’t work… Please help!
Don’t forget to turn on Z-Transp if you’re not using raytraced transparency.
OMG! It works if I turn on ztransp! Please excuse me whilst I go bang my head against the nearest wall.
EDIT: Actually, no it doesn’t… :<
thank roffey, i knew i had to convert it into an object, i just didn’t knew how. again, thanks.
Seeing I’m using linux at the moment, I can’t wait till someone posts some animations of the new explosion modifier (windows build) in DivX format. 
Koba
With the fur make sure you use the new ‘strand’ button in the texture map input tab. IMHO it would be better if there were a way to control the width manually, but Ton is busy doubling the usefulness of the animation systems so…
I am using strand! Can someone post how they do it and end this elitism? [rant] Just because I’m not a blender genius, doesn’t mean that I shouldn’t be able to add this cool effect to my fur, which I might add, looks perfectly fine. [/rant]
I had writen a bunch of stuff about the cool new animation features but… new feature guides
Here is an image of a three joint ‘finger’ with x and z rotation limits for each joint (y rotation is twist):

And here is an animation showing how the limits effect the IK solver:
video ~ 1M Xvid
just a quick grass test. looks nice imho.
i know the dirt is a little bad, and the grass near the camera doesnt look too good, but i jsut wanted to test the capability of the new system, and i like it. (too bad you can only have 100,000 particles per effect…)
if only it rendered faster…
(thanks to madcow for the sky image. i was too lazy to make my own.)
ps.
With the fur make sure you use the new ‘strand’ button in the texture map input tab. IMHO it would be better if there were a way to control the width manually, but Ton is busy doubling the usefulness of the animation systems so…
seconded ![]()

