Here is the first attempt at an addon to do an ‘inset polygon’ operation, optionally raising or lowering the inset polygon at the same time. It can operate either on individual polygons or groups of polygons treated as a single region (holes allowed). Insetting continues even after edges meet, in an intelligent way, using the straight skeleton algorithm.
Some example pictures are attached.
Please try it out and see what you think.
To install this, download the attached mesh_inset_01.zip.blend file and rename it to mesh_inset_01.zip, and then extract it in your addons directory (2.57/scripts/addons in the place where Blender is installed). Enable it (Mesh: Inset Polygon) in the User Preferences Addon panel.
To use it, go into edit mode and select some faces and then hit the ‘Inset’ button that is in the Tool panel. There will then be amount, height, and region properties that you can change. If ‘region’ is checked, it will inset the whole region - this will only work if the selected region is approximately flat.
Sorry, I forgot to add to the installation instructions: in the User Preferences, enable ‘Mesh: Inset Polygon’ in the Addons panel. I hope you will then see the Inset button when you enter Mesh Edit mode.
There needs to be a folder called ‘mesh_inset’ inside 2.57/scripts/addons, and the .py files all need to go in there. Can you explain what you mean by ‘add contrib’ - is that another folder somewhere? If so, where?
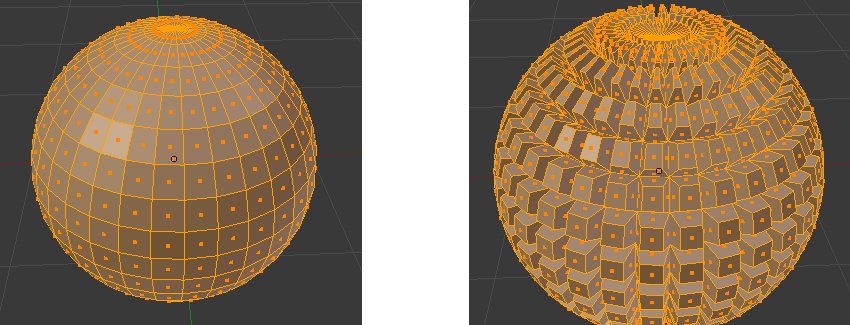
The sphere won’t work with ‘region’ selected. The example shown unchecked that box so that each selected polygon is inset separately. If only a few connected polygons are selected on the sphere, the ‘region’ option would work (the selection doesn’t have to be perfectly flat, only reasonably so).
now when you increase the inset it does a negative inset is there a way to change the direction of the inset like + / -?
also i get a triangle inset instead of a square inset is that normal ?
the contrib is another folder that should exist under script folder
these are other scripts that can be added which are more personnel things i guess and then youc an copy this folder form one version to another new built version - also faster to copy whole folder then one script at a time and try to remember which ones !
i mean if you add script in the addons folder you have to make a list of theses and copy to the new built version manually!
Hm, it seems to merge some vertices in undesired way, so there are many places in the inset region that we should expect quads since the area that is insetted is mad by all quads!
For instance from four quads selection not in line, but in quad like region (so every selected face touches two other selected faces) the output is two quads and two tris! When the “region” checkbox is unchecked it produces all quads like it was expected! dont know if this is actually a bug or it is how the algorithm should work! The other issue that bothers me is that it seems to not respect the set smooth operator for the mesh - the input polygons are in flat shaded mode even if my mesh is already in smooth shade mode.
And yes, it does not respect rounded surfaces like sphere! other than that it is really great! Thank you very much for this addon, hope you can send it to a next level! Cheers!
@RickyBlender: I hadn’t thought of insetting in the other direction (by which I think you mean growing outward instead of inward). I guess that could be useful if the polygon or region doesn’t already have something attached to those edges, though it might make kind of a mess if there were polygons there already. I’m not sure what you mean by a triangle inset instead of a square one, sorry. Maybe you’ll have to post a picture.
@Meta-Androcto: I put an entry for this in the Uploads section of the bf-extensions project (and also one for my AI/PDF/SVG importer, which shares some code with this one). I guess I just await people to put feedback there?
@spirit: I’m not sure I know exactly what you’re talking about when you say things happen in an undesired way. Maybe a picture would help. But I suspect that part of the complaint is that whenever I find that an inset edge shrinks to a point, I make an entire inset polygon at that point, and then continue insetting from there. Similarly if an advancing concave corner hits the other side - this forms two internal polygons that now have to be inset. One advantage of this method is that the intermediate inset polygons all have the same height (when the “height” parameter is nonzero). I could imagine another algorithm that tries to minimize the number of added faces inside by joining points at different heights, but I haven’t thought about how to do that. And yes, the fact that it doesn’t respect smooth shade mode is a bug. There’s other stuff too that I know I need to fix (preserving materials, doing something about UVs, maybe doing something about modifiers like mirror or shape keys). I wanted to get this out there early to see if there was enough interest to continue doing all that other work.
The inset is supposed to move in the direction of the face normal if “height” is positive, or the opposite direction if it is negative. Was your height positive and were the normals facing up? If so, I have a bug to track down. I’ve been assuming that vertices in Blender faces always go counterclockwise when looking down the normal, but maybe that’s a bad assumption.
The triangles you see are actually the sides of the inset quads - but the inset amount was so large that the quads shrank to the points at the tips of those pyramids.
After you press the Inset button, there should be some “Inset Properties” that appear at the bottom of the tool panel - you may have to scroll it down to see them. The default inset amount is 0, so no inset appears until you make it something > 0 (maybe the default should be something like .05 … hmm).
I hadn’t thought of insetting in the other direction (by which I think you mean growing outward instead of inward). I guess that could be useful if the polygon or region doesn’t already have something attached to those edges, though it might make kind of a mess if there were polygons there already.
“outset” i.e. inset growing out will be very useful for architecture modelling e.g. mouldings
@aidyfuzz: I have to make it do something when the selection goes around a corner. The easiest thing would be to just make those separate regions and inset them independently, but I know you want better than that - probably you want the effect of beveling the edge that is the hinge of the two faces. This is indeed harder, but I will think about it.
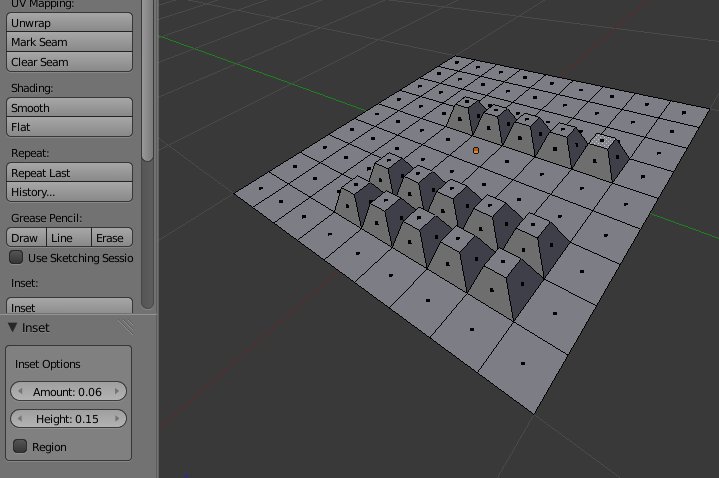
@RickeyBlender: You get quads if you just make the ‘Amount’ parameter smaller. See the attached picture, where I used Amount=0.06 and Height=0.15. I think my sliders probably have too big a (soft) range, so that it is hard to not move the slider so much that the top quads turn into points and the side quads turn into triangles.
I have only posted one version, so the one you have should be able to do that with a small enough ‘Amount’ setting. If you find it too hard to adjust the slider, you can click on the number itself and then type any value you like.
By the way, something I wondered about and would like users’ opinion on. There are two ways one could specify how the inset polygon moves perpendicularly to the inset plane. The way I did it here was just to give the ‘height’ - the distance that the inset plane is to move in the perpendicular direction. Another way (the way I did it in my Import Adobe Illustrator addon, which shares code with this one) is to let the user specify the ‘angle’ that the side quads make with the plane (e.g., one could say that they should rise at a 45 degree angle). You can achieve the same end results either way, so I guess the difference is if the height is important to you then the first way is better and if the angle is important then the second way is better (and in either case, trigonometry might be necessary if some exact value is required for the other way). In practical terms, the advantage of the angle way is that by playing with the ‘amount’, you get the effect of raising roofs with some constant pitch, while with height approach, playing with the amount changes the size of the inset polygon but at the same height from the plane.
Of course I could add both options, but I’d rather not clutter up the interface (and I’d have to figure out how to make properties that are mutually exclusive to set).