Hi all, I am modeling some simple shapes that will make up the level in a student game project.
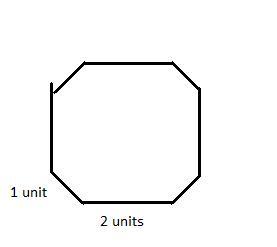
I am starting with the “hardest” part, which is the hallway, it is 8-sided but the diagonal sides aren’t as big as the left/right and top/bottom sides, as you’ll see in my quick paint mock-up.
In Blender, I’ve started with a cylinder with 8 vertices, and deleted the end faces, so I’m off to a good start, but I can’t figure out how to resize the faces the way I need to. When I try to drag the faces they just move around in space, I need to just keep the whole model the same but with some of the faces elongated.
Should I use a cube primitive and then somehow chamfer the corners?
You’ve started out right.
Enter side-view (Numpad 1):
Now, in face-select mode (Ctrl-tab-3) select the faces you want to resize.
Enter top-view (Numpad 7):
Resize til the side length is correct and you’re good to go.
Edit: Forgot to mention the resize-factor: Resize by 0.6311
I would start in front view(Numpad 1) so that you see an octagonal outline.
Then, use box select(B) to select all the vertices on one side.
Finally, use scale(S) in conjunction with the middle mouse button to make it change size only in one direction. Look up the scale function if you’re not sure what I’m talking about.
remove 2 vertices (with the same y-coordinate), so that you are left with a single edge, and the length of this edge will be 2 bu
go to front view (Numpad 1) and select one of your vertices and press ‘shift + s’ and select ‘cursor to selection’
while having the same vertice selected press ‘e’ to extrude, then press ‘x’ and enter the number ‘1’ (or ‘-1’ depending on which vertice you have selected.
now you should have a new edge, and the new vertice should be selected, change the pivot point from ‘Median Point’ to ‘3D Cursor’
press ‘r’ to rotate and enter the number ‘45’ (or ‘-45’ again depending on which side you’re on)
press ‘e’ again and and press ‘y’ and enter the number ‘2’.
repeat steps 1-7 until you have the outline of the hallway.
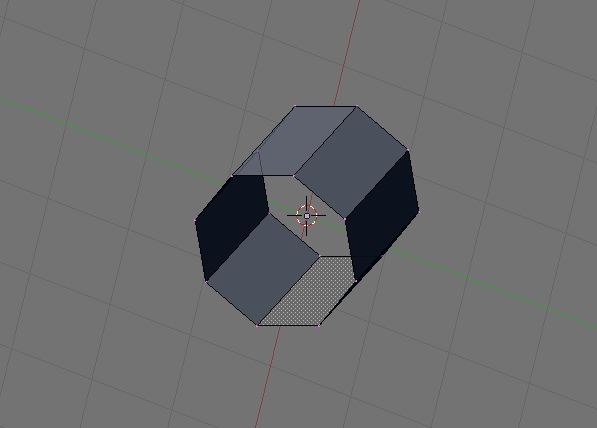
I was finding it a little too difficult to manipulate an 8-sided cylinder… so I went with Morio’s instructions and it worked! Attach is what I came up with, which is exactly what I needed… I now have a “slice” of hallway which I will copy and join together as needed.
Here’s another question… once the models are all done, I’ll be putting textures on the walls. Should I be concerned with that the fact that the faces are dark blue, or will those not matter once I put my textures on? …one of my textures involves a transparency…
still on the first question…we all love a “how many ways can you do this in blender” type problem
another method:
add a plane
edit mode, select all, W > bevel
turn on edge length
move the mouse until the diagonal edges are twice as long as the x-y edges.
scale up until diagonal edges = 2
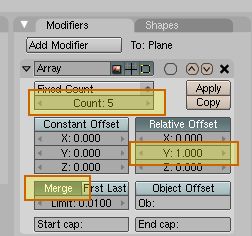
in object mode with your object selected choose Add Modifier
set Relative Offset Y:1.000
set Merge on
set Count to the number of repeats you want
then you should have a bunch of these shapes all lined up with ends exactly touching.
the beauty of this is that you can still edit your original object and all the copies will also change
when you are happy with the result, hit Apply in the modifier panel
now you have one mesh with no duplicate verts
(W-key > Remove Doubles to confirm!)
i almost always work with the vertex and closest options on.
select an object, G then X (or Y or Z, to lock to a particular axis), hold down ctrl and move mouse cursor to a point on another (or the same) object. works in edit and object mode.
Hey everyone,
my level is ALMOST done! I have all the pieces… from here on out I can duplicate and mirror as needed to get the full product… I’m working on the textures now, and will then start duplicating.
I couldn’t have made this without you guys… I’ll post a link to the finish game (sometime around this weekend) so you can see what a newbie can do with some good software and a forum of expert advice =)
Hey everyone, here is the finished/latest version of my level. I ended up turning into a full space station, rather than just part of the station.
On the left is the untextured mesh, and on the right you can see some of the textures.
I made this in about a week, with no prior Blender experience, and it got great response from the class mates and professors =)
I’ll of course continue to expand it and make it look better as I learn more. Thanks for all the help, guys. BTW, my team credited this forum in our game’s credits.