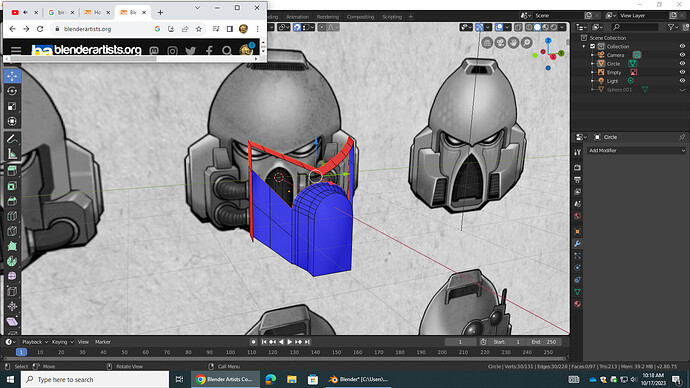
Hey fellas! so total blender newbie but as you can see im modelling this astartes helmet (or trying to at least) and while making the visor/faceplate piece im trying to attempt to attach the edges from one admittedly semi complex shape to a incongruent one both with a different number of edges in order to connect it to the helmet and im wondering how i might go about this without it being ugly as sin (and if maybe someone can tell me how to get a smoother transition between them than i already have thatd also be awesome) any tips or advice would be great! and once again total greenhorn so dont roast my “topology” or what have you too much. Thanks!
Subdivision modeling is the keyword here. There are many resources if you search for “subd” that should bring you forward.
And then generally i would start reversed to how you are doing it. Start with the overall shape of the helmet and then gradually become more complex.
You may even have a look one somethign like how to draw something like so:
reddit: Astartes helmet. Step by step drawing (by Gray-Skull) :
https://www.reddit.com/r/Warhammer40k/comments/fauhkg/astartes_helmet_step_by_step_drawing_by_grayskull/
…because it’s somekind of essential to strike the basic form… (maybe with less polygons first) some sideview also help…
Another tip… do not just look onto reference images ( ← which is already an important thing ) but just look at the real thing… something you can rotate whatever you like and touch may also increase your abilty to “see” the basics forms… end if if you look and try to model a blow-dryer… ( well some of them do have very complex form… so be carfeull what you choose ![]() )…
)…
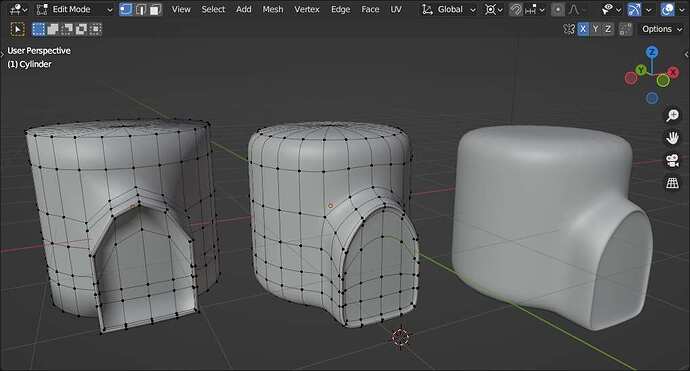
For this for example i started with a cylinder, extruded some faces and adjusted some edges by sliding… and an additional subdiv…
Go find more astartes reference images. Join Pintrest because a search there is only giving images, not reviews or toys to buy…
Use “Character Sheet Astartes” as a search (or any other characters name). Character sheets are a single image with front, side, and possibly top, back, bottom and the other side images of the character.
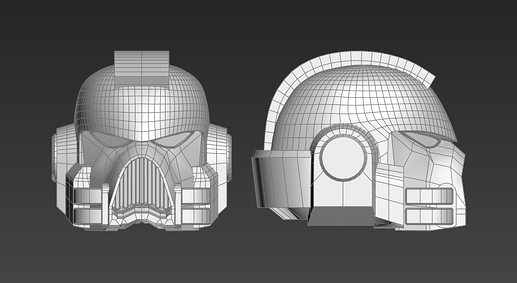
Find something you like - I grabbed this to use as a reference for this comment…
Pintrest will give you lots of wireframe images… Not necessary, but very useful.
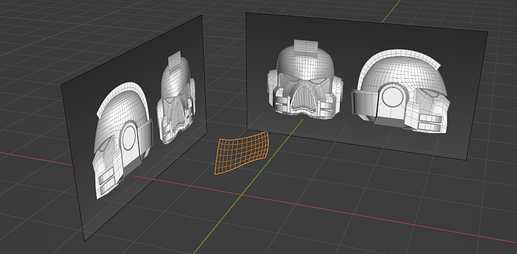
Get the image into Blender. Duplicate it. Line one up so the centerline of the head is on the Y Axis. Line the other copy up rotated 90 degrees on the X Axis. I lined this guy up by his ear - use whatever in the side view. Something you can see from the front view is a good idea.
Move them both away from the world center so you have room to work…
Numpad 1 & 3 give you front and side view. I have made a part of the helmet. Using wireframe so I can see the image.
Add a plane, rotate 90, scale down to a suitable size. Move it to the one side of the centerline (while in front view) and add a mirror modifier so you only need to do half the work. Turn on clipping in the mirror modifier. Add some faces in front view, align them in side view… Rinse and repeat…
Good to see you adopted the show face orientation… But you can leave it off and occasionally select all and press Shift-N. Turn it back on at the end - it is possible some entire areas are flipped because blender got confused.
Compare the point count across the top of his breathing hole. Remove 2/3’s of yours. Keep it minimal so you have less to fight when joining areas.
Speaking of joining - notice in my reference how areas are not connected to each other. They are just poked into the other mesh. That is normal and saves on work and polygon count. Just like the face mask and helmet are not likely to be connected by topology…
One final thing.
Primary, secondary and Tertiary. These apply to lots of things in art - look it up.
Primary: The whole helmet.
Secondary: A Cylinder (face mask) with half a sphere (helmet) sitting on top & duplicated cubes around the ears.
Tertiary: The fine detail. The rings on the end of the breather hoses. Bolts. Aging - dents, scratches and wear.
All models break down this way. Often the Tertiary details are done with textures. Some of the secondary details - like the breather grill can also be textures.
Learn to use the basic primitives in blender to get the rough shapes created - the Secondarys.
Have fun.


