Hi @Hornetzero. I think the issues you are having are related to how you are thinking about the uv Unwrapping, not the unwrapping itself. The map you have created is valid, and will work, but I fully agree is not ideal. This is going to be rather a long post, so bear with me ![]()
Imagine your model was made from paper, cut and glued together. Unwrapping is the equivalent of trying to figure out how you would cut it up in the most efficient manner [ ie fewest number of pieces ] that would permit you to lay each part as flat as possible. And then to make sure it really is flat you place a huge book on top of your cut out paper. If the seams you have cut along are not good then the paper will scrunch up and you’ll get a mess, but it will be FLAT!
Unwrapping has the advantage of not actually scrunching up bad seams, but it will distort things badly. Which is the issues most obvious in the tail of your dinosaur, caused by all the small ‘horns’.
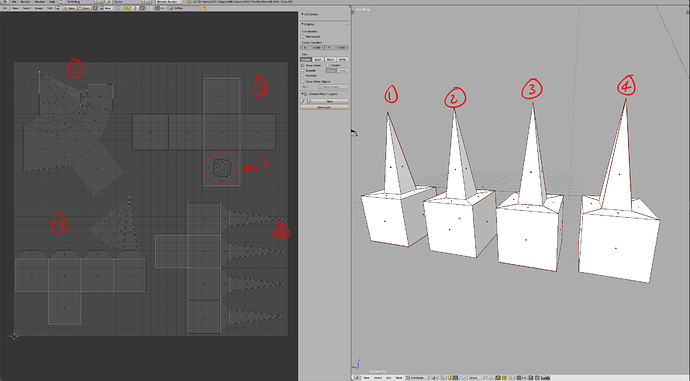
Here’s a simple object comprising 4 identical geometries - a cube with a pyramid on top:-
On the left are 4 possible unwrapping solutions, one for each geometry.
-
This is the ‘simplest’ cut, but notice how completely distorted every face is. Not a single face is a square even though it’s obvious from the geometry that it should have nice clean straight sides.This is the primary issues you are having with all the ‘bone-horn-thingies’ along the tail.
-
This looks better, the faces of the cube are now squares, but what’s the deal with the point of the pyramid? Well, it’s there, but in the unwrap bears no relationship to it’s actual size in the geometry! this is because the seams [ or absence of them] don’t allow the faces that define the pyramid to be expanded, therefore it HAS to be squashed into that place ( this is the book analogy from above ). Your model also has this issue with horns and ‘spikes’.
3/4. These represent the two most useful unwraps because each face is a flat as possible and if you were to cut either of these out of paper and fold and glue it, you would get exactly the model shown. Which of these you would use is more: an aesthetic consideration, depending on where the seams might be visible; or a packing consideration, on how easily it fits into a UV space with other meshes.
Your dinosaur will not lend itself to as clean a solution as this, unless you literally face map the entire model, but then the unwrap will be meaningless visually as you won’t have adjacent faces connected. But it is a solution in some circumstances.
Finally, before I exhaust everyone’s patience, it’s not clear if you want to use the map of the dinosaurs that you show. However, if that is the case:
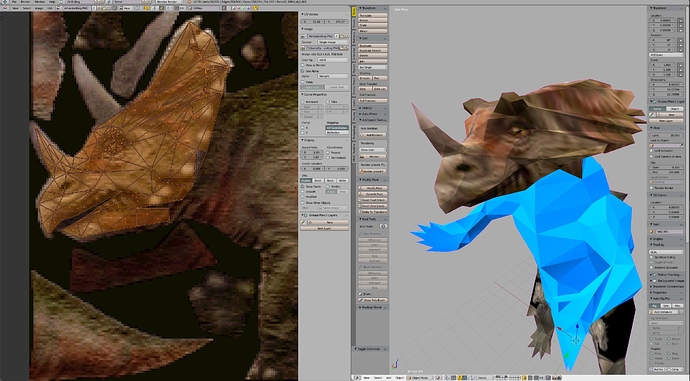
I’ve not changed your seams at all, but what I have done is simply move the UV vertices around for the head, so that they align, as best as possible, with the geometry. Notice the stretching and distortion, this is unavoidable, and there are no real short cut to do this, unfortunately. It will require you to go back and forth between seams and vertex manipulation, until you get what you are after.
UV unwrapping is complicated, that’s why software is written explicitly do just that, here’s a Blender add-on in a thread on this forum:
I hope this post has been of some use. Here’s your [ ammended] blend file with all the things I’ve outlined in this post in it. You may need to load in the map image yourself, to see it on the geometry.
ArmadonSunday26Feb2_DJ_1.blend (617.4 KB)
All the best, Dj

