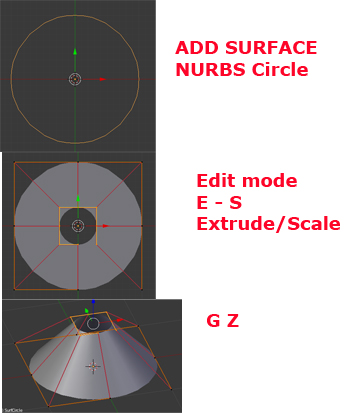
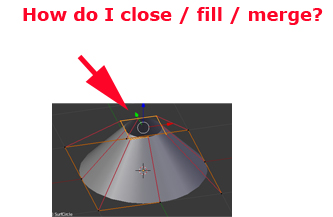
I 'm modeling a Pringles potato chip, using Surface -> NURBS Circle. I then extrude and scale 3 or 4 times and tweak the surface. I want to treat it like a mesh and merge the final small circle, but I guess you don’t do it that way with NURBS. I read the wiki and didn’t find what I was looking for, watched 5 tutorials and they never close them.
I can convert it to a mesh, merge the final circle, add a solidify modifier and it works, but I’ve got other models that I want to keep as curves. Is it something simple and easy or am I missing the big picture on NURBS? Thank you very much.
Thanks ricky, but I’m still not getting it. My workaround was to to snap all of the control points to the center, this does appear to close it, although I know it really isn’t, I just have six control points on top of one and other. I tried all kinds of variations of end point / cyclic, but I still don’t know how to do it properly. Could you maybe eloborate on “closing it with end point” I googled, but there isn’t much there. I see it there in the object data panel, and I just can’t get it to do what I’d like.
You asked “but which circle did you use is it surface nurbs circle here ?” - I’m not positive I understand. The outermost, largest circle was the circle I added using Add -> Surface -> NURBS Circle. The others were created by selecting the control points and extruding by scale. Thank you.
Appreciate it, looked at the blend file, but I still can’t figure it out. I’m still thinking in terms of meshes. And yes I want to fill the final circle.
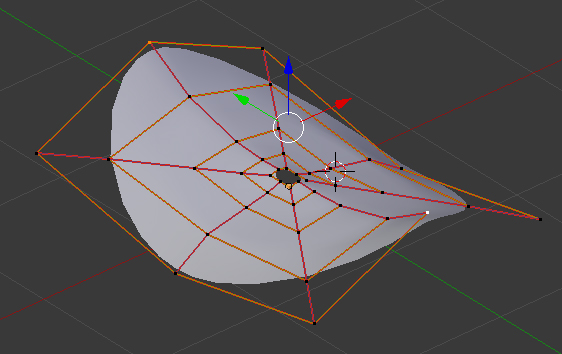
basically, you cant. not without converting it to a mesh. the simple reason is that your model isnt a plane, it is a surface created from a curve and the curve itself is not following a straight X Y diriection to the center, but is flowing between the orange lines and the surface is being produced across the red lines. as the redlines never meet the circle will never be closed and you cannot merge the center vertices together as they are the shape. (if that made sense)
the only way to vreate a pringle is to start with a basic nurbs curve and extrude it 3 times in either X or Y and raise/ lower the two middle vertex strips along the Z, then adjuts the outer vertices to create the rounded shape.
and if you try to subdivide it, you will just create a more square surface.
hope that cleared some stuff up for you.
Thank you very much troll. That made perfect sense. I really like the concept and the way it’s so easy to create complex smooth and continuous curves, I’m just trying to find a place for it in my modeling. Any types of object it’s perfect for? I’d really like to use it on a boat hull or something, but can’t quite connect the dots.
NURBS are best used to quickly model large smooth almost organic shapes. the handles in blender seem awkward though making them less intuitive to use compared to mesh poygons. Peter Draculic made an interesting tutorial for using NURBs though it may be worthwhile you checking it out.
Wow, great tutorial, thank!. Halfway through and I’m already ready to use it on a new art concept. It’s a surreal louisana swamp tree concept with this hard to box model root structure. This will work. Thanks bro.
Dude that tutorial changed my whole modeling philosophy. These roots made in 5 minutes with 66 verts and super flexible and gauranteed smooth, This is great. Thanks again.
I will, I’ve been planning this piece for awhile but the roots were bothering me. Did some sketches and even an old fashioned oil painting.
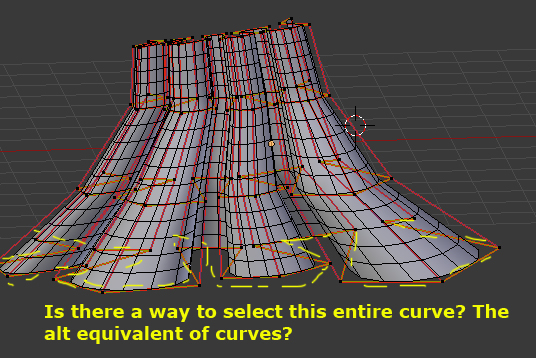
2 quick questions:
Can I select the “edge loop” equivalent of the curve? See image. Once these roots go haywire they will get off axis.
Can I subdivide any two control connected control points, or an entire curve “edge loop”, The only way I can subdivide now is the entire patch. Which will work of course, but it will make my control point count go up which I’d like to avoid. Thank you small troll.