I’m brand new to Blender, although by no means new to 3D modelling – have been at it, on and off, for almost 25 years. I’m getting into Blender because I’ve run into a organic modelling challenge which my primary software (architecture & civil engineering) isn’t suitable for, and I suspect Blender will be able to do the trick.
I need to model the lacey mesh enclosure structure from the Phallus Duplicatus mushroom. (Unfortunately since this is my first post, I can’t upload an image, but if you do an image search for “Phallus Duplicatus”, you’ll quickly get the idea. This turns out to be a much less dodgy image search than one might suspect…). The model needs to be a watertight geometry suitable for 3D printing. (The mesh will probably need to be a bit thicker than what you see in nature, but that’s fine).
So far, based on my experience, Blender’s capabilities seem… vast, omnipotent, and incomprehensible. I’m sure there’s a logical way to approach a modelling task like this, but it hasn’t yet occurred to me. Can anybody offer me some pointers, so that I can begin to blend my Blender self-education in that direction?
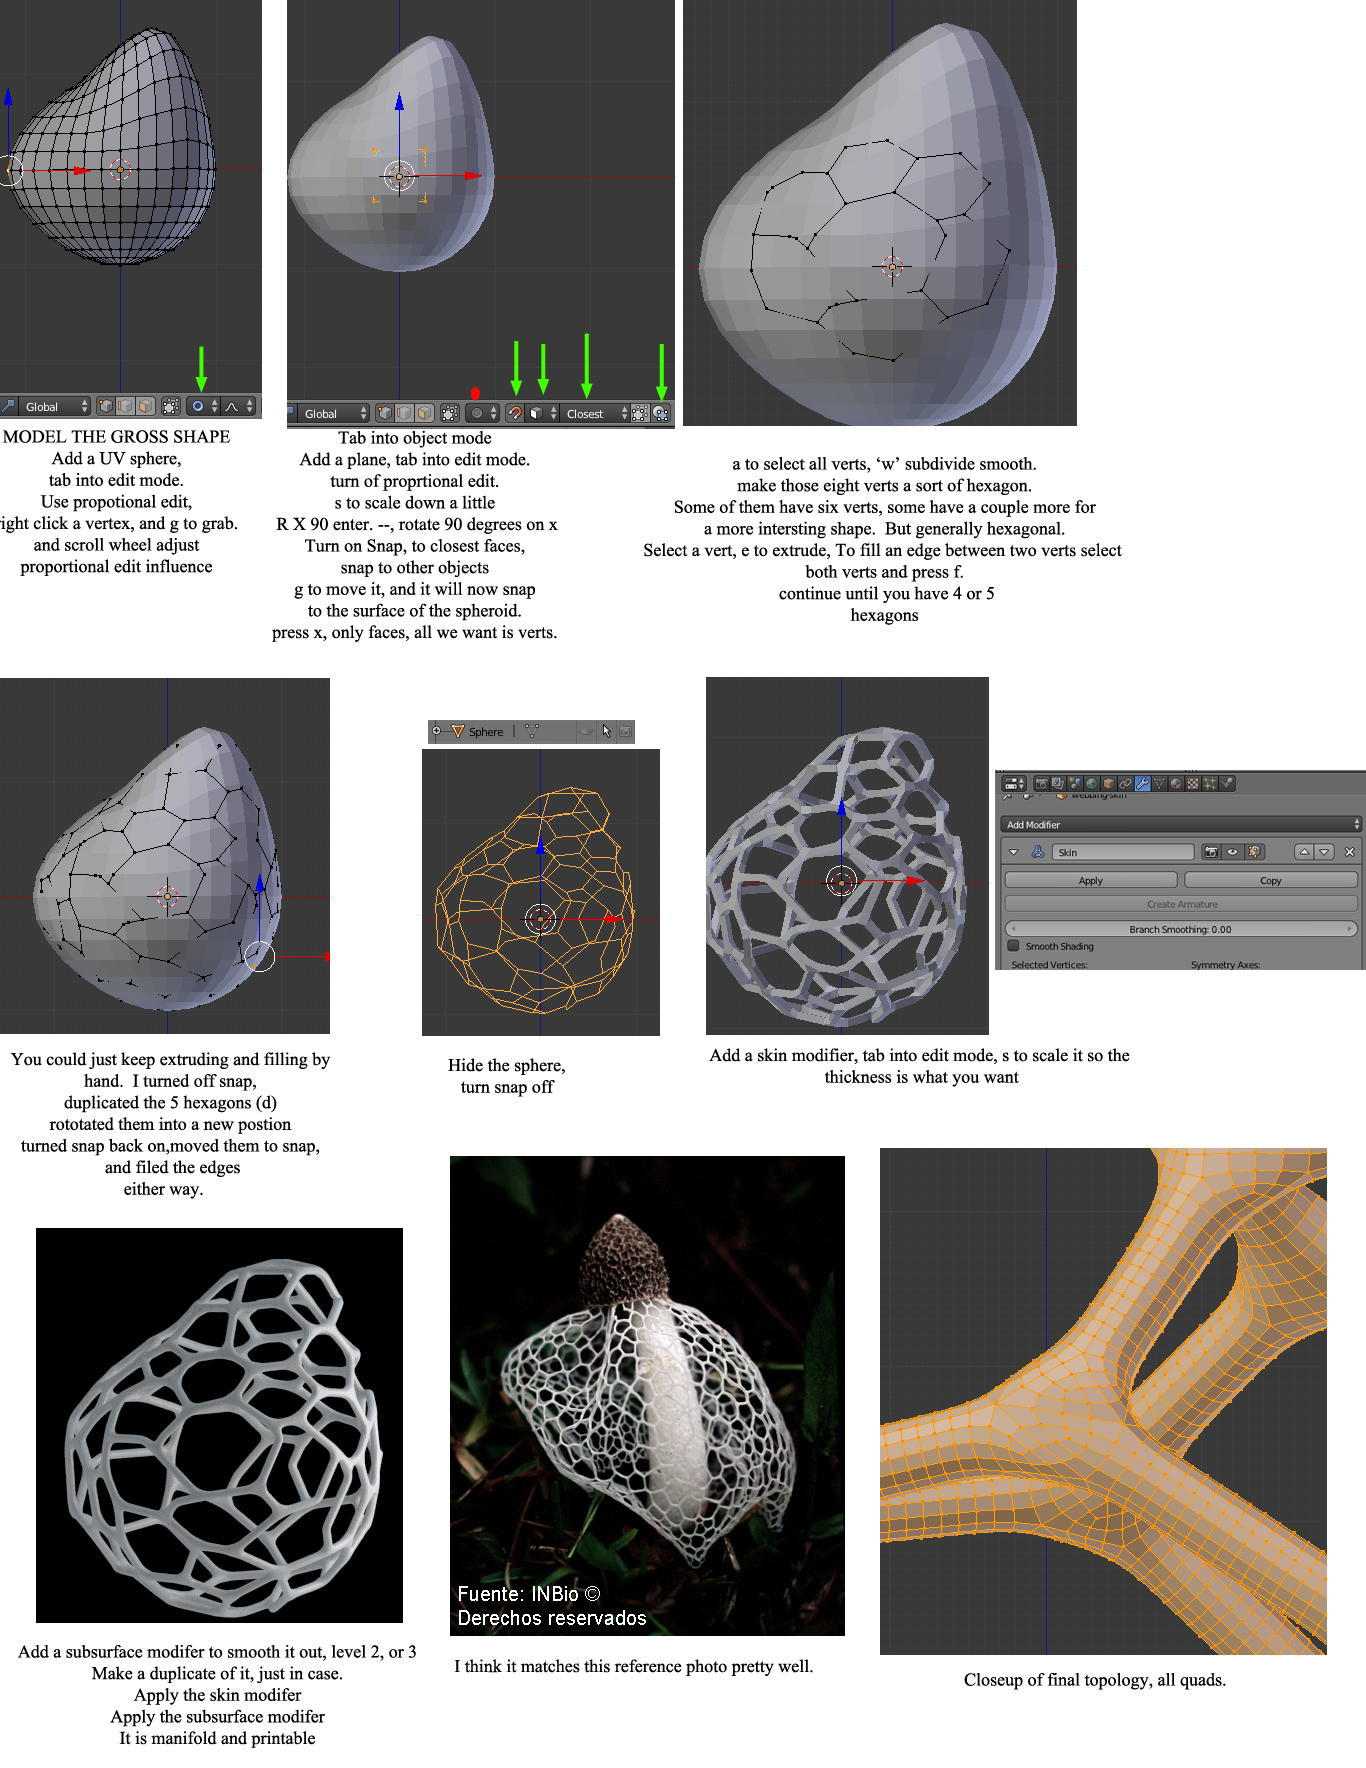
This is the kind of post that is sure to bring out some great solutions, and I hope it does. This is my workflow vision for it, it guarantees a clean, all quad, and manifold final result. And all without modeling a single face yourself. It takes advantage of one of the somewhat lesser used modifiers: the skin modifier. Here it is boiled down, and a blend to look at as well. And now I sit and wait for Kaluura to come in and lay down a faster, better, and more elegant solution than this one… (You can click on the image, and then click again, to see it at full resolution) [edit: duplicate is shift-D)
Oh, that’s absolutely superb, thank you! I’d actually discovered the skin modifier already, and was pretty sure that it held the answer for me, but couldn’t figure out how to create the underlying geometry. Looks like you’ve absolutely nailed it. I may come back to ask some follow-up questions if that’s alright, but for now this looks perfect. Thank you very much!
you could also have added a second uvsphere above first one
then use the hex script to make hexagones remove faces
use the shrinkwrap modifier add some offset
and then use the skin modifier
i mean there is more then one way to do it !
still nice way of making this type of strange mushroom shape
Ricky: where is this hex script and how do you use it? If you could convert a uv sphere to hex, remove faces and shrinkwrap that would be faster.
@skybum,
Sure, no problem. The biggest hurdle in this is duplicating the groups of hexagons and snapping. Snap is very agressive and can turn a mesh into spaghetti pretty quickly. You want to make sure that the verts you are snapping aren’t too close to the edges of your gross shape object.
Of course Ctl-z, undo, is your friend, and ctrl-L, select connected verts is nice too. Select 1 vert ctrl-L it will select all verts that are connected in some way.
If you haven’t already, there is an add-on for 3-d printing which will check your mesh to make sure it is manifold, overhang, non-flat faces, etc… User prefs, search ‘print’ should be the only one, ‘mesh 3-d print toolbox’ check the checkbox next to it, click save user preferences, and it should appear in you tools panel ont he left (hotkey T) select all verts and click the ‘check’ (As in check mesh) button, it takes a few second on this mesh as it’s 100,000 faces or so.
That is a great one Sanctuary. Really nice. I think the second subsurf (after triangulate) is supposed to be level 1:
“Add a subsurf modifer , level 2 and apply it”
I went through the whole thing and it’s really nice, the only problem I see is if the gross shape is highly distorted, the hexagons will all be larger/distorted in that area.
I’m still trying to get Ricky’s hexagon/geodesic script working. My gut feeling is that if you want a distorted gross shape, you will need to do at least some snapping/retopoing by hand.
Very cool ideas here, Sanctuary yours is the most familiar to me but I think it is the neatest for end result - but maybe subdivide and get your faces into hexagons first, then sculpt so you can see the result closer to the end product?
try the script bu
i think there is at bug at the end of script
you see verts selected
so you manualy have to delete these verts and it works well and super quick
but still have to deform it to what ever shape you want
seems to work better with a icosphere level 2 or 3
 (You can click on the image, and then click again, to see it at full resolution) [edit: duplicate is shift-D)