TUTORIAL: NURBS Head Modeling
An (old but still working) Tutorial by Jeremy Birn
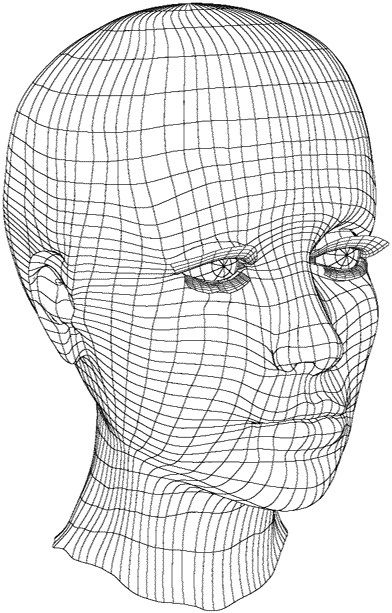
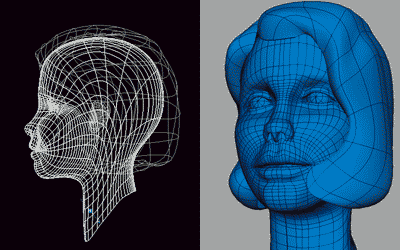
This is a head I modelled in the spring of 1996. The grid shows the UV paramaterization of the NURBS surface.
NOTE: These instructions work in most programs with a “loft” or “skin” function. There are many ways to model a head, and this isn’t necessarily the best for you, but the basic technique of lofting a surface from radial cross-sections remains valuable for building a variety of organic surfaces, including arms and torsos and other forms. - jeremy
HOW TO BUILD IT
This tutorial shows how to build a head out of one continuous NURBS component for the whole head, rather than using multiple components blended together.
- Start by drawing a single spline curve in the side-view window, to represent for the profile of the the head. (This is the line shown in white and blue below.)
[INDENT] 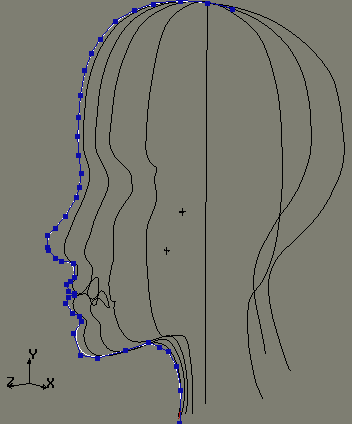
Start simple, and build in more detail after you like the basic shape.
[/INDENT] 2. Once the profile has been drawn in and looks good, make copies of that curve, and rotate the copies so that they all come together at the top of the scalp, much like the top of a primitive sphere. These lines should be in the position of the ones shown in black above.
- Modify each copy so that they represent the shape at each given angle, such as getting rid of the nose for the splines that are not right in the center. Don’t worry about getting it perfect - you can change the positions of some points later on, once you’ve seen the surface.
HINT: The fewer curves you use here, the easier it will be complete this tutorial. Start with a simple, basic form, and don’t make this too complex on your first try. Note that the figure above uses 9 curves to make half of the head, with 6 in front where more detail is needed, and only 3 to represent the rear of the head.
- When you have gone 180-degrees from the front profile, “skin” or “loft” together all of the spline curves, to form half of the head.
- Make an instanced copy of the half-head, scaled to -1 in the X axis. This way you can see the whole head, as you tweak half of it.
- Move points around, add or subtract rows and columns of points, and tweak the modelling until you are happy. Make sure you have enough edges in the upper eyelids that it will look good in the target shapes that make them close.
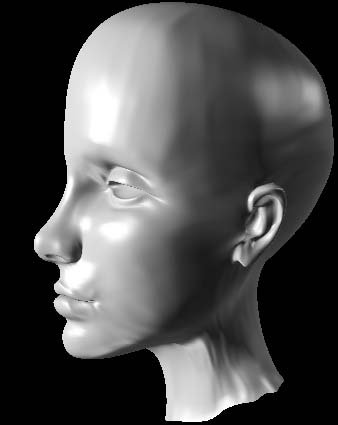
This is a “half head” after a few hours of intense tweaking. The immediate result of the loft command had less detail and more glitches.
NOTE: The whole trick here is getting the chords to come together in the places where you need more detail, such as the mouth, nostril area, eyes, and ears. You can see the grid squares mapped onto my rendering becoming thin and merging together as they head into these areas.
- Merge the two halves. Being symmetrical at this stage is OK - the target shapes you’ll make later can be assymetrical, as with your texture maps, so the final product won’t be unrealistically symmetrical because of the symmetrical neutral pose.
- Further adjust your model and repeat the skin/loft process if necessary.
There’s more than one way to skin a head. I made the ears a part of the same surface as the rest of the head. This is tricky to do, since you have to define the edges of the ears going “against the grain” of your parameterization. Just building separate ear objects and sticking them on could be quicker and easier and look almost as good. Instead of single-component heads, a lot of people blend together several different surfaces to make a head.
Single-component heads update more quickly during animation than blended-together heads, and have a few other advantages that make me choose them. Any area of the face can be addressed to add wrinkles or dimples to a facial expression. A continuous patch surface is guaranteed to look smooth and continuous, with any type of texture mapping, displacement, rendering or animation, while blends aren’t always 100% seamless. Continuous heads can easily be moved between application programs as an iges file, whereas the construction histories or relational modeling that make blends possible are more fragile and can’t be translated between programs.
Another issue to think about is the direction of your curves. In this head, they run up and down, becoming opened at the neck (very useful!) but all pinching together at the top of the head. There are other approaches.
One other way is to make all the curves radiate from the mouth. You can even make curves starting in the mouth twist back around the head to open at the neck, as in the example below:
This mouth-centered model, a more professional, animatable approach, is also available from turbosquid if you click the image.
This character is modelled with curves starting in the mouth, and coming out around the mouth all the way down to the neck. (It is basically a tube, in which one end is the mouth, the other is the neck.) The grid shows where the U and V direction curves move through the surface. Since you don’t get quite as much detail in the eye area this way, it might not be the best way to make a highly detailed NURBS human, but I use geometry like this for many character and creature heads. It’s much quicker and easier to make the mouth keyposes and animate the head talking with this kind of model.