I decided to pick up blender and went through the wikibooks guides. Now I’m trying something out on my own and I decided to make some simple to start out with, a standard No. 2 pencil.
I started by adding a cylinder with six vertices. For the tip I extruded a bit from on end, deleted the face, and merged(at center) the remaining edges. This gave me the rough look I wanted but wooden pencils have a much smoother look to them where they are sharpened. I tried to select the tip of the pencil and subdivide it, but it subdivided the whole object. Is it possible to subdivide just part of an object? If not, what would be a better solutions?
I am not exactly sure what your problem is. We need screen shot!
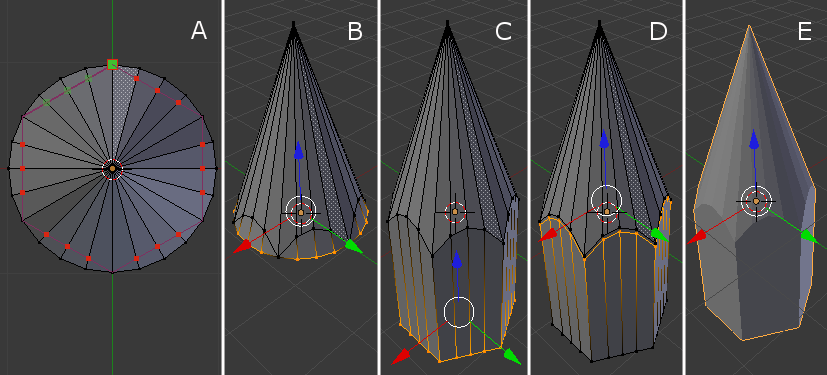
Any way, I approach pencil geometry build as follows: A) Start with Cone. Cut the hex shape from top view. B) This will give you nice arc edge where cone shape and hex shaft intersect. Erase unwanted vertices. C) Extrude hex edge down and flatten it by scaling Z-axis to zero. D) To get nice edge where hex and cone meet, add loop cut next to the edge. Just do [Ctrl][R]! E) This is the straight display. To get the render right, you need to select “Smooth” under Shading in Tool bar. Also try using “Edge Split” modifier to get the render you want.
In edit mode, what you subdivide is selection, so that if you select edge (or two vertices where edge is in between ) or face and W-key Subdivide, that part will be subdivided.
Trick to subdivide something like cone (which is your pencil tip) is to select just edges in edge selection mode and W subdivide them.
To make pencil even more realistic you could have made graphite part as a separate cylinder, not needle-sharp, but given it a bit more roundish look.
Here’s one too. I got lazy taking screenshots, so view the .blend for a closer look.

From top down, left to right:
- A plane primitive, rotated to face the front view (90° along x)
- scaled 0,5x along X-axis
- added two loop cuts and scaled them closer to edges and then added one in the middle
- created the hex shape with the spin tool (alt+r). settings: 6 steps (one overlaps), 360°, duplicates, center position adjusted so that the corners roughly match. Then select all, w -> remove doubles, merge distance ~0.02 to connect the vertices.
- Selected the vertices on the “flat” edge and moved them down
- Then grew the selection (ctrl+numpad_+), deselected the top vertices and moved those down
- extruded the bottom edge loop
- next steps reduce 3 edge loops to one so that the cone shape is smooth. Two quads become one “diamond”. Started merging 3 vertices that are close together at center (a bit repetitive process).
- merged the triangle faces to quads. Face select mode, selected one triangle, then shift+g -> similar area, then hit F to fill all of them as quad
- extruded the bottom edge loop
- scaled it way down and added an loop cut near the bottom
- merged the bottom vertices at center
- subdivision surface modifier, level 2, smooth shading, recalculated normals. additional edge loop was added to sharpen the result where the cut edge is.
pencil.blend (421 KB)
Thank you this is very helpful.
I’m a new user so I can’t post links yet.