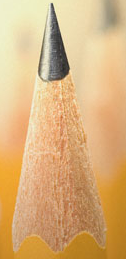
I am trying various combinations in texture to create pencil wood but failed.
Any hint please? Colour variation is not as big an issue as the procedural texture combination
Attachments

I am trying various combinations in texture to create pencil wood but failed.
Any hint please? Colour variation is not as big an issue as the procedural texture combination

I don’t know if this counts as procedural, but I think I could get something close to that by Painting it.
Like after a base color of light brown, make the brush size really small and create darker brown specs
Interesting, you gave some idea. I think that can be used too. And also the same map can be used for bump map to give a realistic effect
My friend see360, this is quite a complex stuff
Can you explain the fundamental?
if possible can you upload the sample file with nodes set up
would be a lot easier and faster to work with it!
thanks
Think of this material in two parts, which are circled in yellow. The color of the material is at the top. The displacement/bumpiness of the surface is in the lower yellow rectangle. If you set this up, to see what’s going on in the displacement shader, simply disconnect A & B (the blue letters). To see what’s going on at the top, leave A & B connected and disconnect C.
On to the displacement nodes:
i see but this is only for the wood tip
not the long yellow cylinder of rthe pencil
i tougt you did the whole pencil with this one material!
interesting way to do the mapping and add some details
but why did not you use bump node instead olf displacement?
thanks
RickyBlender, yes, it was easier to assign several materials to different parts of the mesh.
I read the huge debate over in the cycles thread about whether normal maps or displacement maps are better. Neither way is better all the time. Both suffer from only being approximations of a surface. Technically, for a well behaved surface displacement, there is a one-to-one correspondence to convert from displacement space to normal space and back, but both suffer from truncation error in different situations. I don’t want to get drawn into that, but I will say that I prefer the displacement node for this situation for all of the following: 1. it is simpler, using a bump node would require plugging into two nodes (diffuse and glossy) instead of one (displacement),
2. the normals that I wanted are steep compared to the surface normals, and there are not broad gently curved surfaces, which lends itself better to displacent to minimize truncation error,
3. and the extra bump node that is required seems to take a little longer to render.
you mean that the displa input is a displacement map
do you have any doc for this displac input and how it works
like to know more about it
but this is not equivalent to displacement map in normal blender
i don’t like when same name is used with different meaning!
i did some test on cycles normal map and bump map
use baking normal map in blender
and the best one was the normal map
bump map was not even close to what normal could do!
thanks