Perspective Transforms for IRL Video Projectors, and Physical Shadow/Perspective Art

I’m trying to figure out how to do “reverse perspective” warping in blender for IRL projection mapping.

I don’t really have the right vocabulary so apologies up front for awkward descriptions. I suspect this is probably a solved problem, if I new what to call it ;-).

So in non technical terms, I want to make artwork that is only fully visible from a given perspective. e.g. take a series of rectangular sheets and place them at angles from an observer at the front of the room. Point a projector on an angle perpendicular to most of the boards and project an image. It’s broken up from the front, but becomes connected when you look from where the projector is. But it’ll be stretched vertically on wide side (perspective effect?) If you pre-stretch the projected image the “opposite” way, it will appear square (parallel top and bottom) on the physical sheets. Take photographs, scale, print, and stick to the sheets, you don’t need the projector anymore :-).

I think this is typically called projection mapping- and I’ve used VPT8 & ofxPiMapper to do some simple, single projector, examples.

I recently discovered the really cool export paper model add-on, and found out it not only handles geo, but also can render textures onto the output.

So I’d like to set up in blender several vertical prisms with a number of facets, and project several images from different view points. I’ve figured out how to use the UV projection modifier, and confident I can stack several of those with multiple UV maps and textures and combine it all in with a shader so all the projections will be visible and overlap/interfere correctly.

But to make it more intelligible I want to pre-warp the projected images so from their projected vantage point they appear horizontally/vertically square. I also want to play with rendering each image init different colour monotones, different half toning patterns, different stroke styles - I think the changes in shape of the elements making up the images will help make them visible as the viewer walks around.

I thought I’d come up with an approach that involved copying all the verts visible from the projector/camera to a new object, adding a vert behind the camera, adding edges from all the copied verts to this new vert, and then intersecting this with a plane in front of the camera. The projected shape on that plane, when used as a UV, plus several copy/bake steps ends up with an image that works great on (is scaled down, but square to the horizontal and vertical from the camera perspective) on a plane in front of the camera… but it’s “wrinkly” when used with the UV projection modifier on the real shape. I’ve tried subdividing, but it didn’t help. (Note: I’ve just realized I subdivided at the end, maybe subdividing earlier in the process might have changed things.)

It’s almost usable, but not quite.

I’ll share my step-by-step process in a comment to this (as this is already pretty long!) if that’s helpful.

Thanks in advance for any suggestions!
Here’s what I’ve tried:

Use blender to find the perspective warp geometrically:

  • Create an empty entered on the projector/camera, but further “behind it” (same view plane) - call it “focus empty”
  • Make a copy of all the verts visible from the camera/projector
  • Create triangles from all the copied verts and the focus empty- all the edges are projections from the 3d verts on the projection surface to a focus point
  • Make a plane parallel to the camera view, in front of the focus vert
  • Intersect the plane with the weird prism thing just created. Tidy up any verts on the plane that are coincident, or missed edges - ie make it closed. Call this the perspective projection face.
    • Test:
      • Create a simple UV unwrap. The shape should be the same as the face verts.
      • apply this to a square image texture
      • On the original 3D (with depth) shape, add a UV project modifier; set that up to project the same square image texture.
      • Set the view to projector/camera position and move backwards/forward and flip the visibility of the 3D object + UV projection modifier & the perspective projection face. They line up/look visually the same!
  • to pre-warp so a square projected from the projector will appear as a square when viewed from that point
    • Copy the perspective projection face - call this the pre-warp face.
    • Keep the same UV shape, but “square up” the geometry. Ie make the verts into a square. Don’t delete any- just align them. Now a square image applied as a texture gets pre-warped on the pre-warp face.
    • To extract the pre-warped image:
      • create another plane, in front of the pre-warp face. Scale it to be larger.
      • Add a material, add a texture node, and create a new empty image.
      • Bake from selected… The baked texture will have the desired pre-warped image. Don’t forget to save it!
      • NOTE: I think there was some 180 degree rotations needed at some points here; my notes are a bit thin. I think this is due to me not always identifying the “front” and “back” of faces correctly and using the wrong rotation.
    • Test:
      • from the camera/projector perspective, looking at the plane with the pre-warped image, a vertical/horizontal square looks square ← (I think this was when using this for the texture with the perspective projection face )
      • Using this pre-warped texture with the original 3D shape + UV projection modifier, and viewing from the camera/projector… sort of worked. It’s squarish with some pretty bad horizontal wiggle. I tried subdividing so there’s more geometry, but that didn’t make any difference.

Project from view might be usable to do generate the appropriate UV islands that represent the perspective warp. Then in principle - I haven’t figured out how- the UV island shapes would be extracted and applied to a plane.

I didn’t spend a lot of time on this both due to not knowing how to extract the UV points and apply to a plane (convert to verts on the plane?), and that vertical edges were slightly rotated. In hindsight, I probably messed up the view (I still struggle moving things relative to other things - I have to be more careful about applying scale/rotation/transformation so as not to “loose” relative geo orientation.

For any one curious, turns out project from view DOES work great to create an inverse perspective projection.

It’s designed for painting a photo which has perspective onto geometry, from the point in space where the photo was taken. You can use something like FSpy to determine that from the photo itself. So items further away will have smaller UV islands. When they’re projected onto the geometry, it’ll look scaled up when you are near the face, but from the perspective of the camera, it will look correct.

If instead you use an orthographic/non-perspective image, the perspective is “undone” so the image appears square from the camera point.

The two issues I hit that made me think it wasn’t working was not separating all of the non-visible from the camera faces, which lead to parts of the mapping being wrong when moved/scaled, and image scaling artifacts.

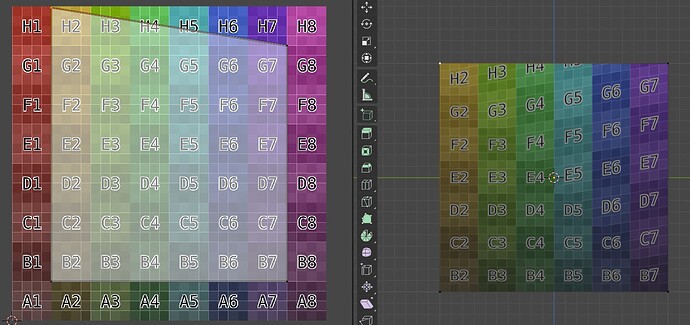
Artifacts first: I assumed that scaling the Y axis of a UV point for a square would give a smooth, “trapezoid” looking stretch to the texture; instead it sort of kinks:

ie I expected the boundaries between the rows to be straight lines - but if you look at the G-H boundary it “kinks” between columns 2 & 3.

That’s an easy fix- subdivide. As my shapes are simple (I want to build them IRL) I can afford to subdivide a lot, as 99% of them form larger planes.

Selecting the right verts took a little trial and error; this is what seems to be the most reliable:

  • in 3D viewer set up camera, view from camera, edit mode, select all
    • if you don’t select all, you might miss some geo that doesn’t get selected in a 2D box select!
  • project from view
  • change to selecting verts (press ‘1’)
  • box select everything that is visible from the camera’s plane. Zoom out so you can sell ALL the geo!
  • in the UV editor, make sure sync is off
  • invert selection, switch back to face selection mode, and separate selected
  • scale to 0, and move far out of the way. These are all the non-visible faces from this perspective
  • invert selection again, and turn sync on
  • in the 3D viewer, double check all the faces you’re expecting (and no extra) are part of the UV islands that you expect to be visible from the camera’s point of view

You should now have a complete set of UV islands for everything face visible to the camera, which you can select as a group that you can scale and move to grab your desired texture.

Rinse and repeat with other UV maps & textures, and create a shader that maps eg texture by the right map, and mixes them all together with MixRGB nodes.