I released a video about the LightPack and how physical lights can help you with your scenes:
https://www.youtube.com/watch?v=yrjWbdnTm7g
The Early Bird discount is valid for 3 more days! https://gumroad.com/l/oHhFAU/earlybird
I released a video about the LightPack and how physical lights can help you with your scenes:
https://www.youtube.com/watch?v=yrjWbdnTm7g
The Early Bird discount is valid for 3 more days! https://gumroad.com/l/oHhFAU/earlybird
Another nice work.
I’d like to know, if pack can easily be adapted to work with other engines (LuxCore especially).
LuxCore support is planned, yes, but I don’t have any ETA unfortunately. It should not be too hard to convert. The problem with physical lights is that hdr textures intensity is not standardized accross renderers, but it’s just a matter of finding the right multipliers and converting the materials.
I also plan to convert it for Unreal but this will take longer.
OK, sold 
chafouin, is Perspective Correction possibly coming to Photographer? I am trying to figure out right now if between camera stuff in Blender, Photographer, and E-Cycles if there is a way to click a button and remove perspective, just like I was able to in Octane, and I am not finding anything… If I missed a Perspective Correction button somewhere, please, someone, let me know…
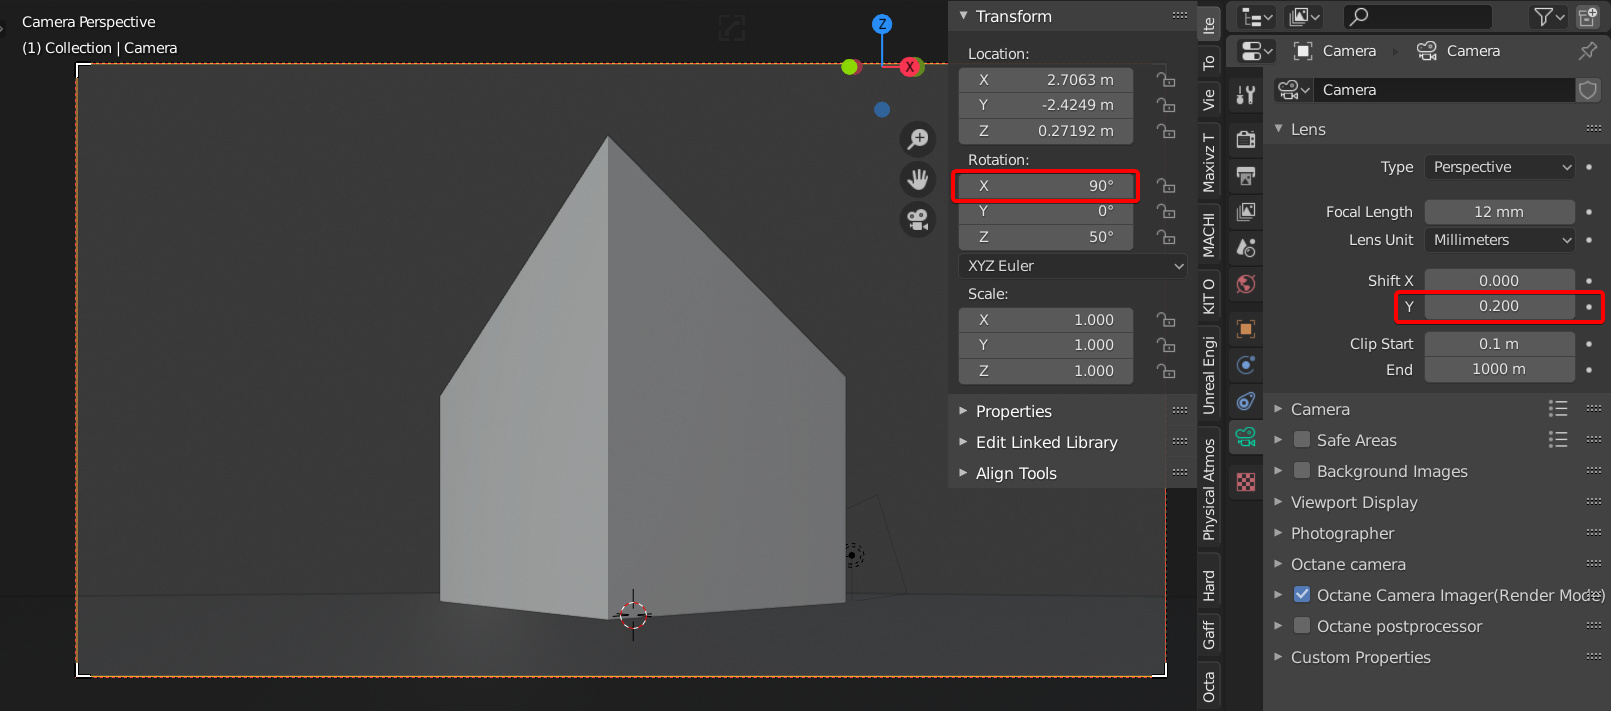
It is already possible to do in Blender using Lens Shift.
Set your camera X rotation to 90, which will make the vertical lines vertical. Then reframe your scene using the Lens Shift Y ![]()
Hmmm… doesn’t seem terribly elegant and/or straightforward (pun intended). I see you are an Octane user, so you must be familiar with their Perspective Correction, where you can toggle that and be good-to-go… Any way you could pop a simple toggle like that into Photographer, for us E-Cycles converts, who find themselves not using Octane much these days?.. You’d be even more of a rockstar than you already are. ;•)
Actually I do prefer doing it this way as I get to see how it’s gonna look in EEVEE and the viewport before rendering it 
If you want it to work exactly like in Octane, I think this would have to be a Cycles feature. At best an add-on could have button to convert camera rotation to lens shift, but it can’t override the camera information that gets exported to Cycles.
It’s a bit of trigonometry if you want to give it a try, align the camera to the horizon by rotating around the local X axis and adjust the Y shift by the amount necessary to keep the subject (or alternatively the horizon) in the same position on the film. You could set it up as a driver in a custom camera rig, or alternatively run it as a script.
OMFG, okay, I get it now. Duh. I thought you dudes were talking about rotating the camera 90° so that the viewport (whole scene) would be sideways, and I would need to work around that craziness… Yes, this is quite easy indeed, and is perfect. Exactly what I need. Thank you thank you thank you smilebags!
Hi,
thanks for the addon, die different Resolution per camera (a long time missed feature) brought me here. But then after i set up for my goal which is: compositing two scenes with different resolution together, - nothing new happened. I did all the things with the apply button and stuff. And when i go into the composer to the render layer input node and hit “render active scene” it renders fine in in the expected resolution.
But when i render via f 12 the both scenes composed together, it is overriding like all the years.
I read now in comments above - other people had theses issues too, and maybe i misunderstood, but at some point i interpreted one of your replys like, it isnt possible to do something in this matter, only command line render(what i am not interested in). If this is so, whats the use case for the different camera resolution? and why is it that hard to implement such a in my eyes cheap feature into blender by default?
Regards Cha Tai
Hi!
The idea to have different resolutions per camera is to have a quick way to switch between cameras with different formats in the same scene.
The best is to create a bug report. I don’t think it is intentional that it works fine in command line render but not inside Blender.
Hello @chafouin , I am glad upon discovering this addon, but I don’t quite understand the values settings. The EV looks inverted, when I tweak it up, the scene darkens, when I tweak it down, the scene brightens. I don’t know that much about camera, but I just did some search and the result says, most camera will set the EV to be 0 and people use the Exposure Compensation to tweak it up or down. The EV and Exposure Compensation in this addon looks different, could you explain what is happening? And in manual mode, most cameras do not have exposure compensations since you are adjusting the three values manually, but I see it in this addon, I wonder what that does? I am kind of confused, I understand that this addon is supposed to make the camera settings physically accurate, but so far I see some strange differences between it and real life cameras. P.S. Loving the autofocus function.
Hi!
Yes, this is how Exposure value works ![]() The brighter the scene, the higher the EV value.
The brighter the scene, the higher the EV value.
This is incorrect, the EV value is calculated from the Shutter Speed, F-stop and ISO of the camera at all times, it is just never communicated to the photographer. I think you are mistaking Exposure and Exposure Compensation.
Exposure compensation is a user-friendly offset of the Exposure value. Exposure Compensation is inverted to the Exposure value (which probably explains why the smart scientists who created the concep used the name Compensation, and not Offset).
A lot of artists and photographers will talk in exposure stops. Let’s say you set your scene and end up using an Exposure value at 6.37, which exposes the scene to your liking. Your art director comes by and tells you he wants it half a stop brighter. You can either do it with the Exposure: 6.37 - 0.5= 5.87.
Or you can use an Exposure compensation of +0.5. Which is probably easier for everyone ![]()
This is correct that cameras in full Manual mode don’t use Exposure Compensation. However, since this is a tool to create CGI, we are not entirely limited by the laws of physics. For instance, in CGI, ISO doesn’t have any impact on the signal received by the sensor, and doesn’t add more grain to your image.
So see the Exposure Compensation as a user friendly tool that gives your even more control over the exposure, without affecting your depth of field (lens aperture), or your motion blur (shutter speed). In fact, it is the same as changing the ISO, since ISO doesn’t have any impact other than the brightness of your image.
But your remark is interesting and I will consider to remove it. I just don’t want to take away too much of the artistic freedom for the sake of re-creating real cameras. In fact, this doesn’t make your camera not physically correct to use Exposure Compensation in Manual mode, the EV is always calculated and properly communicated in the UI.
Thank you for your reply!
So… If the scene is very bright, and I don’t want the image to be over exposed, I will need to tweak up the EV and make the image darker, is that right?
Thank you, that explains it, “half a stop brighter” means half a stop lower in number,
and the compansation works as I think, got it.
Please keep it, now I think of it, it helps when tweaking images from different cameras with the same settings but look different, like one from a DSLR and one from a smart phone, even with the same settings they sometimes look different, and the exposure compensation can just deal with that.
Exactly ![]()
Happy New year!
Hi.
I really love the photographer add-on and the lightpack 01. Looking forward to the lightpack 02!
Watching the video explaining the significance of lightpack 01 got me wondering - how would I know if the EV values of other HDRI maps that I use are valid?
I was in the middle of producing a few videos to explain it, but it will take more time than I expected as I moved and don’t have a computer or a desk yet.
If you have at least one raw photo of the scene, it’s possible to eyeball the Exposure.
Find an HDRI that has RAW backplate images like this one: https://hdrihaven.com/hdri/?c=urban&h=san_giuseppe_bridge
Download one of the backplate and read the camera settings from the EXIF data
Input these values in Photographer
Use the HDRI in Blender as a world texture. Notice that it won’t look properly exposed.
Open the HDRI image in Photoshop and add an Exposure node. Adjust the Exposure, save, reload in Blender, rinse and repeat until you manage to match your Blender render to the backplate image.
Fixing white balance will be trickier as the HDRI might have been color corrected differently from the RAW.
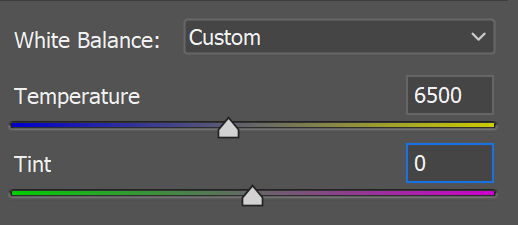
Open the RAW file in Lightroom / Capture One / RawTherapee. Change the White Balance so the temperature = 6500 and the tint = 0. That image will be your reference.
Color correct the HDRI image until you match your reference file. This will be very tedious and inaccurate, but I guess this can still be okay for artistic work.
Thank you for the thorough explanation. Would you happen to have any tricks for “fixing” those without backplates? I’m looking for a snowy scene and couldn’t find any with backplates.
Also, is photographer add-on affected by the World Scale? Personally I work with feet for measurement and I like to scale the world unit to .3048. Would I have to scale the model and the world to 1 or is this fine?