Photographer - Camera Exposure, White Balance, Autofocus, Physical Lights, Bokeh, Render Queue

Hello Fabien, I am not a Blender-user, but I have been told that this thread was the best place for me to share my feedback directly to you.

I followed the progression of this great addon, just out of curiosity due to the great initiative and execution. I watched a recent video on your YouTube channel, appears to be a live video replay, and noticed an incorrect information.

In regard to the lens vignetting, the explanation in the video is wrong:

In the video, it is “explained” that the lens vignetting is coming from the mattebox.
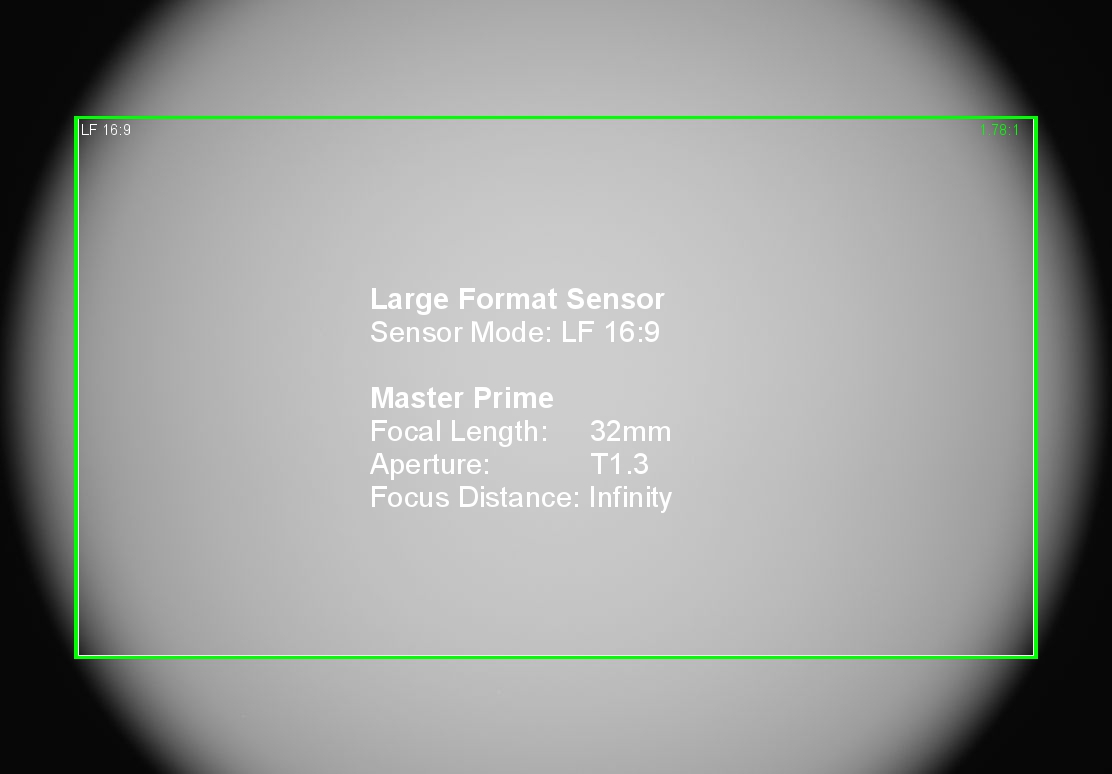
In reality, a common source of vignetting can be coming from when the rear mount of an optic (lens) is smaller than the sensor coverage. For instance (Google image result to illustrate) https://www.provideocoalition.com/wp-content/uploads/LargeFormatSensor_ARRI_MasterPrime_32mm_T1.3_Infinity.jpg

it can also come from the optical engineering of the optic itself, by design. A simplified view of a lens: https://www.photokonnexion.com/main/wp-content/uploads/2013/08/20130731_TheoreticalLensDiagram_005.jpg

The video also shows a mattebox-video footage from a friend, but the author of this footage is using a narrow FOV (lens) in a dark interior which made it use a small aperture which means a shallow depth of field which means that the mattebox will be a black blurred object in front of the lens.

If the mattebox is used with a wide lens, at day, you would see the mattebox, close to sharp (in focus), in the foreground. I have a footage of that as I shoot with a mattebox myself and I could show you privately if needed.

A mattebox never ever adds vignetting (should not*). If it does, that would mean the mattebox is wrongly used and the french-flags (or “barn doors”) are obstructing the framing. The mattebox helps for a few things:
• To avoid flaring coming from sources (when using barn doors or equivalent).
• To hold lens filters (ND filters are the most common ones for instance).
etc…
but should never be visible in the framing.

I hope this simplified explanation will be taken into consideration. Ideally, an edit of the video would be preferred, to avoid misleading information being spread-out.

Best.

Hi kn9!

Thank you for your feedback. I hope you understand this was a live video that I tried to keep simple and not too technical. However, there are some things that you probably misinterpreted, so I feel I need to take the time to explain it further :slight_smile:

Not really, you must have skipped a part.
I start by explaining that the default shape I’m using for Optical vignetting is round, to simulate the cat’s eye / swirly bokeh from lenses like Petzval or Helios 44. I mentioned this effect is created by the lens “hood”, and this is probably where the confusion lies because this is maybe not the right word (I’m not English native). Even after googling it I am not able to find the correct word to define the metallic/plastic parts that hold the lenses together. Would “casing” a better word?

Optical vignetting is the common term used by 3d render engines to create Cat’s Eye bokeh. What I am showing in the video is that by using a different shape with the same render technique, you can also recreate occlusion from matte boxes.
I will concede that vignetting from matte boxes is not called Optical Vignetting, but Mechanical Vignetting. But there was no point for me to create a separate render feature, as it is possible to create it with the same texture, so I kept the name Optical Vignetting, which is well known in the industry. My thoughts during the live were probably not well organized and I apologize if it wasn’t clearly stated.

You are correct about the setup, this is absolutely not uncommon when shooting a scene though.

As mentioned, the matte box is just right outside of the frame, but as it is out-of-focus for being so close to the camera, it still creates occlusion. You would not see it in the frame.

I also don’t see what day and night have to do with it. If you mean “using a lens wide open because of low light conditions”, we very often use ND filters during the day and to be able to keep lenses wider open for more depth separation.

Not true. “Conversely, matte boxes and filters are sometimes used to achieve various effects such as vignetting. It all depends on what final effect you’re after.”
This is often visible in movies. It’s an artistic tool as many others, you probably want to avoid it, but sometimes you can’t or you just want it.


Hunt for Red October (Top and Bottom flaps occlusion)

La La Land (Top flap occlusion)

Taxi Driver (Vignetting probably not only created by matte box but by the car elements as well)

Michael Clayton (Top and bottom flaps + cat’s eye bokeh)

Cheers,
Fabien

5 Likes

Because I like Photographer’s Add Camera button.
But, every time I start a project, and every time I add a camera, I have to set up a new camera :pensive:
Or could you add the Duplicate Camera button next to the Add Camera button?
I like to position the camera right away through this button.
(Because cameras that are duplicated through shit+d do not switch automatically)

1 Like

Hey guys,
I need an advice on making a following setup.
I need two cameras of different resolutions, but having exactly the same angle and aligned by two corners (no eyeballing). Like a full and a half of the image.
How would you do that? I would greatly appreciate any hints.
If it can be done by a constraints(s) so I could manipulate one of them and keep the other one follow - that’s even better, but any method would do :slight_smile:

It’s added and coming in the next version, I didn’t forget your request: :wink:

5 Likes

Wow, thank you so much! :blush:

Sharing the answer to your question with everyone :slight_smile:

  • Camera 1 is your “full” camera (example: 25mm, 1920*1080)
  • Camera 2 focal length = 2 * Camera 1 focal length (so 25mm * 2 = 50 mm)
  • Camera 2 resolution X = 1/2 * Camera 1 resolution X (1920/2 = 960)
  • Camera 2 Shift X = 0.5
  • Camera 2 Sensor Fit = Horizontal
4 Likes

@chafouin I’m guessing you already know that Photographer 4.0.3 is not working on Blender 2.93 Alpha and I do understand that is likely due to it being in Alpha but with 2.93 moving to Bcon2 next week, might there be a compatible version soon?

I didn’t know, I’ll have a look tonight.

1 Like

So you know what I’m seeing when I try to enable it:

Is Cycles enabled?
I have a fix already in the coming version to force enable Cycles before enabling Photographer.

2 Likes

Oh, that’s weird that Cycles was disabled on my PC. I’m guessing that happened when I was trying to isolate other incompatible addons with Python 3.9 and I went to Factory Settings but why Cycles got disabled too is unknown to me. Enabling Cycles fixed my “issue:slight_smile:

1 Like

Suggestion for the HDRI feature. Allow it to read sub folders. I have all my HDRIs organized in different folders and Photographer can’t detect them that way unfortunately.

2 Likes

Definitely a big hindrance, I’ll add it as a 4.1.x small release.

I have a beta ready for version 4.1 with a lot of small improvements and the Emissive Mixer, please PM me if you want in.

3 Likes

Hi all,

Would it be possible to add support for Ortographic views as well?
This is specially important for archviz when we need to render the facades of a building or if we want to render some billboards of some 3D models.

Cheers,
Juan

I was actually gonna suggest the Lens Type with it’s scale value instead of focal length when using Perspective. I use it a lot. There is another suggestion for HDRI world and is being able to have a library with folders and subfolders as all my HDRI’s are organized and it seems it is only taking a single folder for now?

It’s been a long time since I last checked the addon as I kept on using the first version and it has come a long way man. I got the latest version and it is awesome. Thanks a lot for sharing it with the world.

Another idea I had was being able to have a camera linked to the light mixer setups. So for instance linked to certain collection of lights plus HDRI with a certain intensity and rotation. That way you could have several cameras with slight light variations for a much better control. I know I am asking a lot but for product shooting I tend to have several lighting variations for each camera angle. So it would be wicked if I could have each camera use it’s own lighting setup. So when switching everything sets up without having to enable/disable collections plus you might have to connect/disconnect the HDRI’s manually, change the intensity or rotation…

Should be easy enough.

Yes, it’s high on my list.

World per-camera has been requested already, and I’ll add it in an upcoming version.

What you are describing is exactly what Scenes are for though :slight_smile:

2 Likes

That’s great to hear man. Keep it up.

Version 4.1.0 is available:

image

  • Emissive Mixer: press Scan to find Emissive materials in your scene.
  • Lightmixer: Stop adjustments buttons are now next to each other for ease of use.
  • Lightmixer: Added Stop adjustments for collections (will affect all lights in collection)
  • Lightmixer: Added Target for Point lights (useful when using IES)
  • Optical Vignetting and Bokeh: added Viewport and Render visibility buttons
  • Bokeh texture: will now squeeze using anamorphic ratio (disable and reenable to update it)
  • Optical Vignetting: Added support for EEVEE 2.93 using new Depth of Field.
  • Camera List: Added sorting using Collections
  • Camera List: Added Shift-Click to Add Camera to reuse current Scene camera settings (@Hyesung)
  • Lens: Renamed Lens Tilt to Lens Shift to be accurate.
  • Exposure: Adjusted ACES match with Unreal
  • Render Queue: Added Render Selected Cameras
  • White Balance: Fixed possible divide by zero error.
  • Preferences: Added Check for updates + Changelog directly in the Preferences panel.
  • Photographer now enables Cycles automatically on registration if this one is disabled.
  • LuxCore: Bokeh and Optical Vignetting support.
  • A lot of small bug fixes.
  • Documentation website is starting to take shape.
15 Likes

Another great update, Fabien!

Not sure whether this is already planned or not or if it makes sense for and add-on like Photographer, but I was wondering if you might consider adding some extra settings to the HDRI, like tint and blur.