oops, I completely overlooked this because of all the enthusiasm about the world override.

oops, I completely overlooked this because of all the enthusiasm about the world override.
Hi!
By pressing Ctrl + Numpad0 when selecting a light, I can use its perspective to place it in the viewport (if “lock camera to view” is enabled). Would it be, by any chance, possible to add this as a button in Photographer, like it is for cameras? It’s a little silly idea, but it could be useful, as I think this function is not that discoverable in Blender, and when having many lights it could be faster to just press a button, instead of first selecting the light than pressing the shortcut.
Thanks a lot in advance.
Sure, just need to find some space in the UI.
Hi @chafouin hope you’re doing well! ![]() I have a feature request. It would be IMMENSELY useful if there was a quick option to automatically create a track constraint set to target whatever object was first selected before adding a camera or light object. Or even better - automatically create an empty at the origin of the selected object, and have the light and camera automatically target that through a tracking constraint.
I have a feature request. It would be IMMENSELY useful if there was a quick option to automatically create a track constraint set to target whatever object was first selected before adding a camera or light object. Or even better - automatically create an empty at the origin of the selected object, and have the light and camera automatically target that through a tracking constraint.
Both options could also be available based on certain shortcuts, such as “Ctrl + click on an add camera/light” to target the selected object directly, or “Ctrl + Shift + click on an add camera/light” to create an empty to target instead.
Sincerely hoping you’ll work on this! ![]()
![]()
![]()
![]()
Will you be updating this to be compatible with the asset browser?
Yes, I’m updating Lightpacks to work with the Assets browser now that it supports collections.
As for Photographer, I need to experiment more with what’s possible to do, if we can use it for World HDRIs, Bokeh textures… But what I’d like to do first is giving the possibility to export a Camera or Light to the Asset Browser in one click.
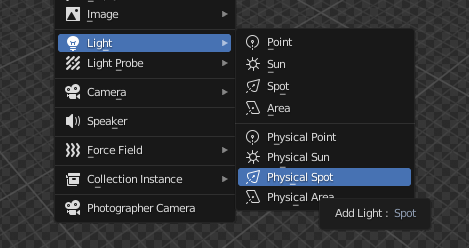
What’s the difference between the default and the physical versions? If the physical versions should be used instead when using Photographer, then is there a way to disable the default options from showing?
The difference is that the Physical lights will use the Default settings you have set in the Add-on preferences. This allows you to pick your preferred default physical unit, etc…
I do know how to remove entire menus but I don’t think it’s possible to remove items from a menu, which is why the default ones are still showing.
Thanks for that explanation! ![]() By the way, any ideas on when this addon might become compatible with Octane for Blender? Every time I use Octane, this addon is the first thing I miss.
By the way, any ideas on when this addon might become compatible with Octane for Blender? Every time I use Octane, this addon is the first thing I miss. ![]() It’d be awesome to add/control Octane cameras and lights from your N-panel!
It’d be awesome to add/control Octane cameras and lights from your N-panel!
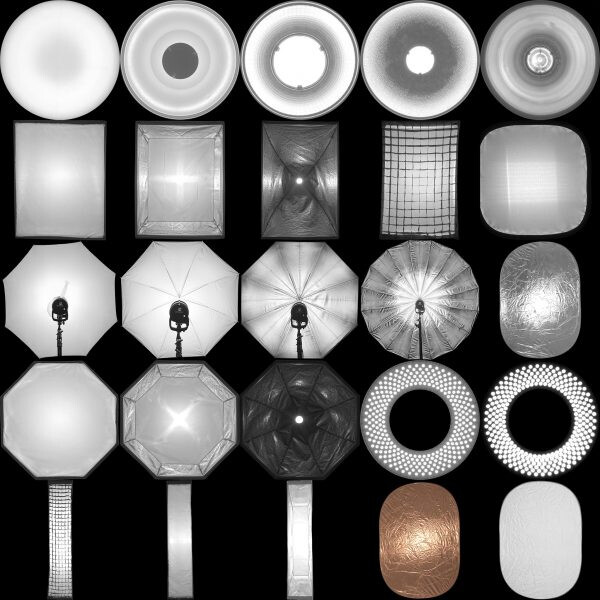
By the way I got another feature suggestion! Maybe you could consider adding textured lighting options like the ones below, like how you have for bokeh. Product lighting with default lights is way too clean and harsh, and having to set these up all the time is also troublesome. If the lights had an easy N-panal option to pick a softbox/texture, it’d be incredible! ![]()
Yes that one is one of the highest prio for me too. I wanted to get it done soon, but got caught up in other issues. Current plan is to fix some UX problems to make all the current features more coherent and stable.
Then I have big plans for lighting improvements that will probably be part of Photographer 5.
Octane is on the list for Photographer 5.
One feature request, if you think is useful…
Tile batch render option for big size renders in render queue, with auto or manual merge tiles option.
Big size image denoise and composition is unpracticable, huge memory use and very long times.
thks
Hmmm not sure if that functionallity is a little bit out from the scope of the addon ![]()
There is an addon created for that specifically:
https://kevinlorengel.gumroad.com/l/SuperResRender
AFAIK is active developed, at least that’s what it seems over their discord channel.
thks… I have and use it… it have problems with ortho render and dont have batch/queue render… anyway photographer is my hub for camera/render things and chafouin code works very well generally.
Hi there,
What is the relationship/relevance of the slider ‘exposure’ in the Color Management under View Transform and Look?
I find that when I use normal EVs like in the 8-12 range and light the scene with a mix of reduced World HDRI and physical Area Lights, I get unpredictable ‘exposure indication’ values in the slider mentioned above.
Example: Shaderball scene with a World HDRI at 0.5 and three area lights (Key, Fill, Top) in the 50W-150W range and camera is fixed at EV12. The exposure slider now reads -2.57 stops under.
It’s not so much that I can’t render images that look right, but I don’t like the feeling of “fighting” Blender in the background. I haven’t found a manual for Photographer 4. Is there one?
Is this an issue of mixing World HDRIs with Area Lights? Should I disregard it?
OK. I experimented a bit more before posting and I think I’ve got it. Setting an EV of 9.42 results in a zeroed out exposure in the color management, regardless of how the image looks. Seeing that it’s a resonable EV, my question changes a bit: should I just light to this EV using photographer? Are there consequences (rendering/compositing) when lighting to EV3 or EV16?
For many normal scenes I might as well just use 9.42 but there might be other cases where I’d want to change it and I want to know how to reason about it. Thanks!
You found it, the default exposure in Blender corresponds to an EV of 9.416. This is based on the maximum (ideal) luminous efficacy conversion of 683 lm/W.
You are not fighting against it, Blender’s exposure is similar to Exposure Compensation, and the EV scale is working the other way around.
There is one, although this specific topic is completely missing, I need to find the time to gather and condense all the information I have been writing in this thread. You can always find the documentation link from the add-on preferences (https://sites.google.com/view/photographer-documentation/)
So asking here is the best thing to do right now ![]()
There is no issue mixing World HDRIs and Area lights, but I think there is some misunderstanding of the physically based lighting workflow. I’ll do my best to answer your questions.
There is absolutely no problem doing so. The only small thing that could affect your renders is the Light Sampling Threshold that could create noise in low-light renders, but Photographer will warn you and calculate the optimal one for you. Look for the warning at the bottom of the Exposure panel.

If you need to composite outside of Blender, you can decide to keep the render “scene-referred”, save a 32bits EXR file, and apply the exposure adjustment in our compositing software. Or you can decide to “Apply at Compositing” and the Exposure will be “burnt-in” the pixels of your EXR.
If you do compositing in Blender and output images with applied color management, then what you see is what you will get.
Now let’s talk about Physically based lighting! I will take a “Explain to me like I’m five” approach, please don’t take it personally if these are things you already know about, but the goal if to make it accessible to everyone. I think I have written many similar things in this thread already, but a little reminder is always good (until I write a proper documentation, or decide to make a presentation I wrote 3 years ago public).
HDRI at 0.5, but what does this 0.5 corresponds to? Do you know what’s its unit? Do you know if the HDRI image is pre-exposed, or absolute?
Light at 50-150W, but do you know what these watts represent? Why did you decide 50 to 150W was a good range for your lights?
Radiometric units like Watts or Watts per steradians might be the most scientifically accurate ones, but mean nothing to artists or the guy next door.
While photometric units might be less accurate if not correctly measured (this has to do with human’s sensitivity to different wavelengths), they still help you to get a ballpark number. You can easily find how many lumens a lightbulb emits from its packaging. You can find how bright your screen is from its specs (look for nits or candela per square meters). You can find the light output of a cinema fresnel spotlight from its spec.
So now that you have some numbers, let’s create a standard lightbulb: a point light that emits 700 lumens.
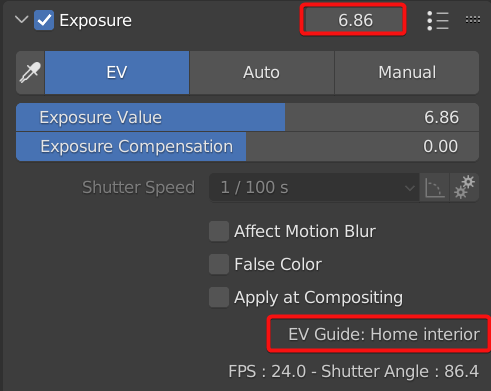
The first thing you’ll notice is that it won’t light much in your default scene. What would you do in real life if you were taking a photo? You can’t make the bulb brighter, so you adjust the camera exposure. That’s what the EV is, and this is where you will find that EV 9.42, which might be appropriate for some scene like a sunset, is probably not good for a interior scene lit with lightbulbs. It would be even less correct if your interior was lit with candles!
In short, there is no right or wrong EV value, it all depends on the scene you are reproducing. At the top of the Exposure panel you will find a guide that tells you what kind a scene the EV roughly corresponds to.
What’s the point changing the EV? Leave it at default, and adjust all your lights “visually” until they look correct to you. This is actually what’s been done for many years in animated movies and games and there is nothing wrong with that, you get perfect artistic control. It’s just a bit more tedious if your goal is to reproduce photorealistic scenes.
But where it becomes a lot worse is when you have the same scene under different lighting scenarios (i.e. dynamic time of day in a game, day/night renders of an architectural project). Using the right EV and the right light intensities will create a correct lighting ratio between your local lights, your sky, your sun. And everything will fall into place naturally.
I recommend watching this video where I talk a bit more about it: https://www.youtube.com/watch?v=yrjWbdnTm7g
I also explain why using absolute HDRI images is a must. Unfortunately most HDRI that you can find online are not, but it’s coming slowly. You can also visually adjust them if you have some EXIF information.
There is a lot to be said about physically based lighting, I do share how I work use it (and break it) in my videos, in my tutorials, in my GDC presentation etc… And I can always answer your questions here if needed.
Thank you very much for taking the time to properly answer my questions and going one step further.
I come from Cinema 4D (but it’s been a while since I switched) where I used Maxwell Render, which is also pretty photometrically accurate, and I am very familiar with EVs and what they represet (also from my background in actual photography). In Maxwell I had some scenes that were setup with Power + Efficacy (but much lower than the ideal you mention), so that is what I’ve been using even if I didn’t mention it.
Admittedly, the strengths of my lights in the Shaderball scene are a bit arbitrary, since it was only about balancing the area lights against the World “fill”, while maintaining a resonable EV. For actual work I always use actual strengths of lights and use that. I very much value a work ethic where I try to replicate actual real-world setups when it comes to scale and lighting.
Unfortunatley, it’s to the point where I have a hard time using large area lights (even if it would look good) because I don’t have any soft boxes of that size myself… ![]() it can be a bit unproductive…
it can be a bit unproductive…
Anyway, I just wanted to make sure that there weren’t a couple of well known “gotchas” that I had missed. I think it was the material preview (that I mostly have folded away) that was looking strange at some point, since it’s based on the 9.42 exposure and reacts to what EV I have set in Photographer.
It’s good to know that all is good!
Glad to hear you have experience with physically based workflows and Maxwell, and I apologize if everything I wrote were things you already understand. I have developed this add-on cross checking with Unreal and LuxCore to make sure it follows industry standards and renderers that put emphasis on realism. There are some parts where I had to take some liberties (mostly in white balance, I haven’t found any standardized way to treat “extreme” color temperatures nor tint, and I only support sRGB), but Exposure should be pretty solid.
With Photographer you will find the Advanced Power unit that allows you to control Power and Efficacy the way you’re used to ![]()
There’s never a need to apologise when you answer questions with only a few minuets delay and make sure you write answers that target/benefit as many users as possible—it’s impressive!
I’ve opened up a tab with the documentation you linked to above. I’ll go through it and learn something for sure!
Can’t Enable the addon in Blender 3.3.0 LTS windows version:
Traceback (most recent call last):
File “C:\Program Files\Blender Foundation\Blender 3.3\3.3\scripts\modules\addon_utils.py”, line 333, in enable
mod = import(module_name)
File “C:\Users\13515\AppData\Roaming\Blender Foundation\Blender\3.3\scripts\addons\photographer_init_.py”, line 36, in
from .ui import (
File “C:\Users\13515\AppData\Roaming\Blender Foundation\Blender\3.3\scripts\addons\photographer\ui\pie_camera.py”, line 3, in
from .camera_list import camera_list_panel
ImportError: cannot import name ‘camera_list_panel’ from ‘photographer.ui.camera_list’ (C:\Users\13515\AppData\Roaming\Blender Foundation\Blender\3.3\scripts\addons\photographer\ui\camera_list.py)
This is weird, can you try a clean install in case some files didn’t copy properly?