Models are made in blender and Nomad. Walls, floor, moon and sky made in procreate. It’s rendered in Eevee. I can’t use cycles, it crashes my laptop.
The issues I’ve faced; my laptop is struggling to render this scene and I had to remove quite a lot of details just to get this render. The lighting has been hard. While it looks good on my computer, it comes out very, very dark on my phone, making it hard to get a good balance. I want it to look dark, moody, but on my laptops its quite bright and cheerful. It’s a frustrating issue I haven’t been able to figure out.
Ignore the position of the alien. It’s mid animation. I just moved it there to get an idea of what the lightling looked like on it.
I want to get the scene looking as good as possible before I start rendering the animation. Please, can you critique and give me ideas on how to improve this. I will be very grateful. It’s for my portfolio.
reminds me of some retro horror survival video game.
What you might wanna improve is the vent cover and the lamp shade. They either need to be more darker and reflective… or rusty? And the wall texture on the right hand side, looks too repetitive. Ground could be a little darker and bumpier too.
When making a dark scene in a movie, you don’t want it to actually be completely dark, that would just make it hard to see and lots of people complain when they actually do that in movies.
A better way to do it is to give an illusion of darkness by having zones of brightness and darkness. At night time, there are some very bright areas near light sources surrounded by a sea of almost complete darkness. This effect is what we associate with night time and what you may want to convey.
Something else that will help is to make sure there are sharp shadows in the image and to make sure they look dark. Something that can help convey a dark scene is to have your lighting placed in ways that purposefully creates big, well defined shadows and have objects placed so they can cast those shadows. Also, you seem to have lots of ambient (sky) light, which flattens the image. In Eevee, sky light doesn’t cast shadows (they can be faked with ambient occlusion). If your computer can handle it, try turning on ambient occlusion and play with the distance until it looks right, that will already help a lot on this side of things and will darken the flat areas that should not be lit by the sky, like under the garbage container.
You can light your monster much more stongly than it is right now, and as long as there are still areas of darkness and nice shadows, the viewer will still think of the scene as being dark. Try increasing the lamp and give the creature a nice rim lighting that really shows its shape.
So, let’s recap:
-Try using ambient occlusion and give it enough distance to darken the recessed corners noticeably.
-If you can’t have ambient occlusion, try reducing the sky light instead and light everything with lamps, that will look more like actual night.
-Have zones of light and dark. Your lights can be pretty bright and as long as there are still dark areas, the illusion of darkness won’t be broken.
-Make sure your lights have defined and obvious shadows and that there are objects placed so they cast well defined shadows.
-Give your creature a strong light to make its shape well visible on one side, but keep parts of it in shadow. Rim lights are your friend for a dark image.
Also, if you can, try screen space reflections if you don’t have them already, it will make those puddles look more realistic.
Hi, your post was very detailed and has helped me improve the lighting dramtically. Thank you so much. Here is the improved scene. I just wish cycles worked because there’s so many more lighting options I want to try on there that would make is so much better!
Please, if there’s anything else I need to improve before I start rendering my animation please let me know.
Very nice, that would already give a pretty good result as it is now!
If you want to go further, well that will depend on what your computer can stand.
Do the creature’s materials have subsurface scattering? If no, it might be worth trying for a more realistic translucent skin effect. Assuming that you are using a principled shader, Just add a little bit of sss, like maybe set the slider at 0.2 or 0.3. Then, its just a matter of tweaking the 3 radius values (they determine how far red, green and blue light make it inside the model, so they are the main way to affect the color of the sss. Default values are for human skin).
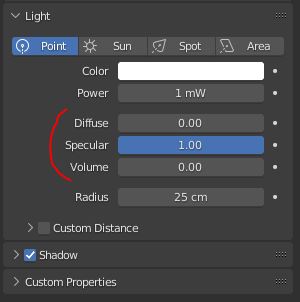
Something else I would try: add a glimmer to the creature’s eye.
Make sure the creature’s eye material has a low roughness so it shines. Then add a point light behind the camera. In that light’s settings, deactivate the diffuse and volume sliders so you have only the specular effect, then move the light around so it creates a nicely placed glimmer on the eye. You can then change the radius setting to decide the size of that glimmer. The color of the light could be something different from the lights already present in the scene, having a variety of colors is great for a night time effect, because it suggests artificial lights. As a side effect of doing this, it will add extra reflections on the creature’s body too, making it look extra wet.
Apart from that, the improvements I could think of would all be about modeling the building’s features for real instead of using flat textures, but it all depends on how much work you are willing to put into the scene, and your lighting would already make it work pretty well.
The creature already has subsurface scattering on.
I tried to add the glimmer to the creatures eye, but I’m just getting the light reflecting off the fog, an issue I can’t actually fix unless I can use Cycles, which just won’t run on my laptop at all. Unless you know a way around the issue that I don’t? I’d love to add that extra light to the scene, but I don’t want to remove my fog effect.
I was going to model the door properly, but with the issues I’m already having with my laptop and rendering my scene, I decided against it. I made the door and walls using image from google and I think they do the job pretty well, even if they don’t have too much texture. I’d love to change that in the future if I can get a better machine. Unfortunetly, I don’t want to do the work for the scene to crash on render so I’m keeping them as basic as possible.
That’s why I was talking about deactivating the volume slider in the light. In the light’s setting, there are 3 sliders, you can deactivate the light’s effect on volumes and diffuse, keeping only the reflections.
Something you can try is to duplicate your blend file to keep a backup, then open one of the files and try subdividing the building a few times. That way, you can quickly test what the performance would be with more faces and see what your computer can handle.
If you find that you can support more detail, your current building could be an excellent starting point for the modeling. You could add loop cuts that match the features of the texture and then just extrude some parts a little bit. That’s a technique that’s pretty quick to do and doesn’t need much geometry (the texture still does most of the job).
I really don’t have those options using Eevee. I learned from googling it was a Cycles option only.
I did add the loop cuts and made the door indent in. I think I need to add a real box and pipes to the left of the door, but I’m unsure if I can do much more to this. My laptop is starting to struggle opening the file. https://imgur.com/a/o9rqZPa
You must be using an older version of Blender than me. In Blender 3.3, I do have those light options for Eevee.
If you have trouble running the scene at all, then this might be as far as you can go on your current computer, and that’s already pretty good. Though you might want to check if some of your objects have modifiers on them (they are one of the most common causes of viewport slowdown), especially subdivision modifiers. If you do, check if they need to be as high quality as they are and maybe deactivate their viewport visibility, but keep them on for the render. If you haven’t already done that, it could give you back some performance.
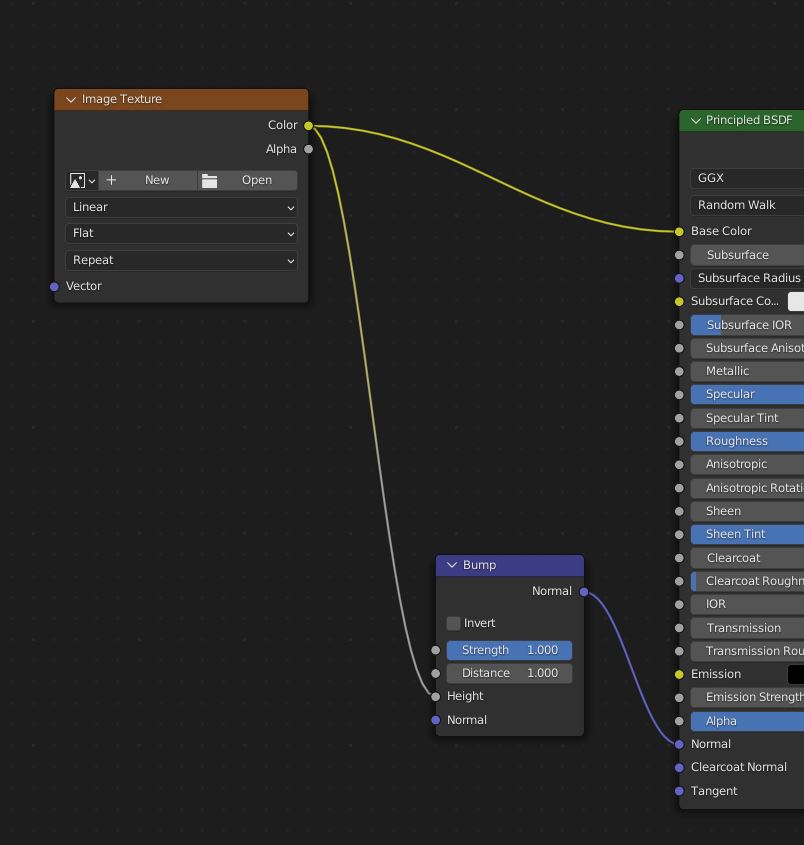
I might have a suggestion to try that should have basically no impact on performance. Try taking your existing building texture and re-use it as bump.
Then, play with the distance setting on the bump node and make it a subtle effect. I am almost certain it will look great on the bricks, but I am less sure what it will do in the door area.
Ah that explains it. I’m using 2.83. I wanted to update it, but I was worried it would damage my project.
I’m starting to struggle with more random crashes. Blender just randomly closes on me, so I think it’s time to render the animation (I hope my laptop can handle it) and see how that goes! I’m hoping it goes well!
I can’t see any modifiers that are in use. I have been turning stuff off to work on it, but it doesn’t help too much which is a shame.
I added the bump map like you suggested. There was a little worry about the door, but I think it really improved how it looks. It gives it an old texture which is what I wanted! https://imgur.com/0V9bdt2
Thank you so much for your help and advice. It’s helped me so much. My scene looked so basic at the start, I’m in love with my design now.
No problem! You have applied my advice really well and I can tell you have a good eye for this kind of art. I would like to see what you could do with a stronger computer!
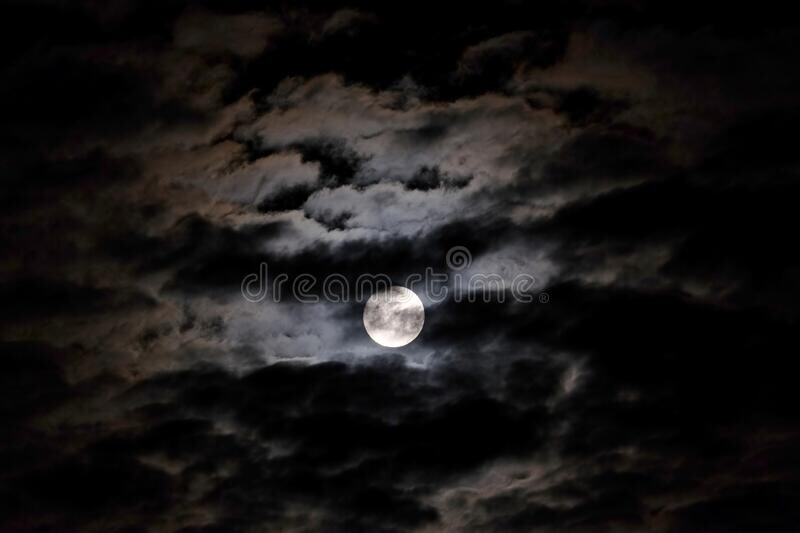
You have improved the scene very much from the first post. My only problem is with the sky as on a full moon night, a pure black sky looks artificial. If you can put some soft lit clouds in the sky specially around the moon it would be great.
example


")