More information about Pref!
#ObjectPointPosition #Pref #ObjectPointReference
I just wanted to update this topic for future readers since I was looking for this information the other day and wasn’t quite sure how to proceed after reading the above.
For those who don’t know, Pref (or any variant on the name Object Point Position Reference ) usually pronounced “Pee Ref” is a common AOV pass used by compositors in VFX because It provides a coordinate system that sticks to the vertices by basing it off the original vertex positions before the object was deformed. As a compositor, you would use it to single out a portion of the object for a matte or stick a texture/decal onto a character just to name a few things.
It would seem trivial to create since there are already object coordinates available. But as mentioned above, the issue comes into play when you have deforming objects. This is because deformers like bones, move the object’s points “Through” the objects coordinate system just like Pworld (the World “Position” pass in Blender). So, as mentioned above, you’ll need to use the new built in “rest_position” attribute which provides a consistent point value in object space.
Okay, but how?
1.) Box or shift select all the objects that need Pref. Basically, all deforming objects and even non deforming objects that are being moved by bones (because they actually are deforming  ).
).
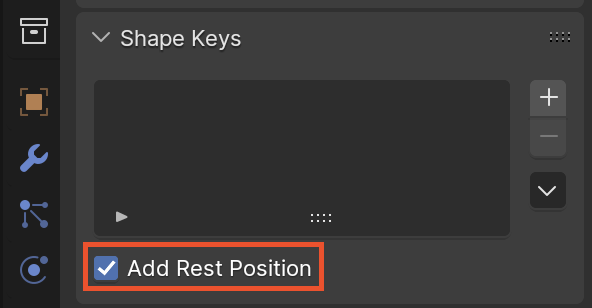
2.) Go to the Object Data Properties and find the “Add Rest Position” button At the bottom of the Shape keys panel. Now, hold ALT ( or Option on Mac) and click it. This will make the change for all selected objects
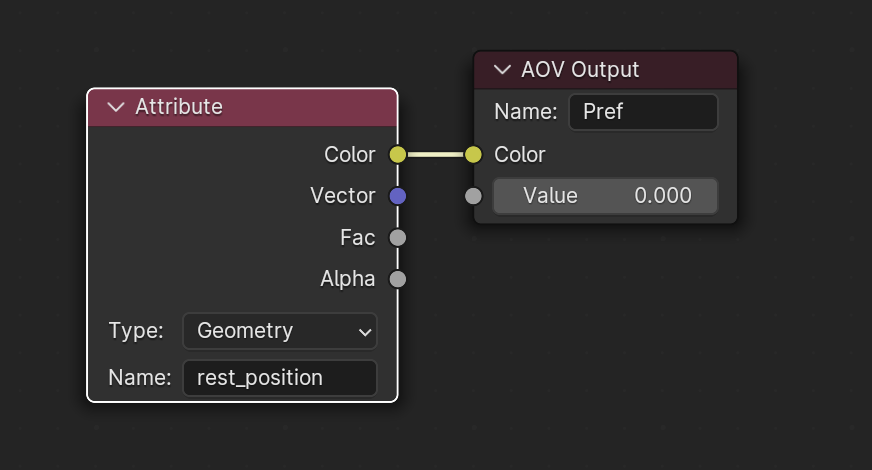
3.) Select one of the objects and go to the Shader Editor. Add an Attribute Node and fill in the blank name field with “rest_position”. This is the standard name that Blender give to that attribute.
4.) Now add an AOV Output node and connect the color output of the attribute to the color input of the AOV. Give it the name Pref or whatever you like.
5.) go to the View Layer Properties and scroll down to where you see Shader AOV. Click the little “+” icon and change the name to the name in the AOV Output node we just created: Pref (or whatever you called it).
6.) Now, when you render, you’ll see “Pref” in the passes list of the render viewer.
I’m Sorry to say, this isn’t visible in the viewport passes yet. However, if you have Node Wrangler enabled you can just CTRL+SHIFT click the AOV Output node in the shader editor and it will be displayed in the viewport so you can check to see if it’s working in realtime.
If all the objects in question have the same material then you’ll only need to do this once but chances are, that’s not the case. You’ll need to copy and paste these nodes to your other materials.
In fact, you can just create a node group and call it “Pref” and drop that down instead. Not only that but you can just add this node group to your default scene along with the Shader AOV setting in View Layer Properties and you’re good to go.
Note: There are times when you see that your objects are black in the Pref pass in the render view. This may be an indication that something is wrong but MAYBE NOT! You’ll need to check with the eye dropper tool to see if there are actually values in the black parts or not.
This happens when objects exist entirely in the negative object space. Don’t panic, this is normal. Just use the eye dropper tool and check if you see negative values in the black.
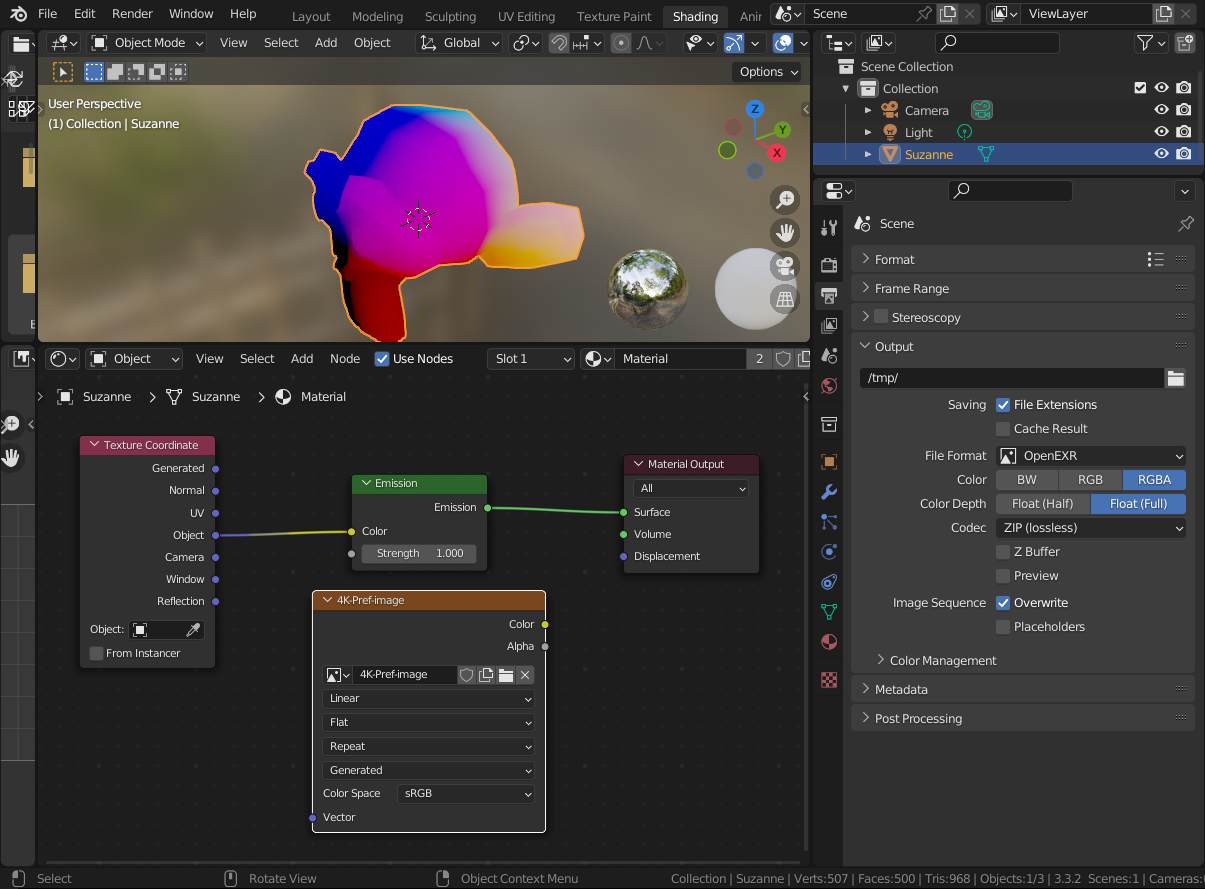
Nerdy stuff: This of course, happens because floating point colors can only be represented as a value from 0 to 1 in the viewport. So if your object is larger than 1 unit, or has parts that are located in negative values, it will likely be in a value that can’t be represented accurately by a 0 to 1 color. You can see this happening in the screenshot above. The tall box has a very thin gradient in the center that goes from Blue to black. The pivot point was in the center. If you sample the black, you’ll see values going down into the negatives and that’s totally normal.
Good luck!