Hope someone can help me. I’m trying to figure out how to add glare node only to diamonds in animation and not the metal. is there a way to only effect the diamond shader or affect diamond mesh? Only thing I have been able to do is mess with the lighting to direct the glare to diamonds but doesn’t work for the other camera angles in animation. Im new to composting so i dont really know what to look for.
Welcome!
The compositor affects the image after the render, so the actions you will need to take have little to do with the 3D scene.
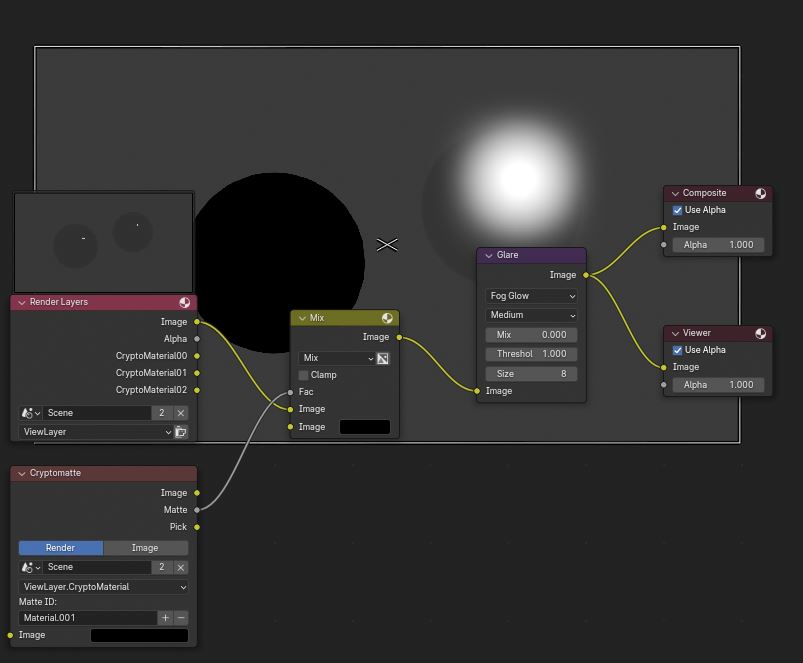
This seems like a good use case for the cryptomatte. It’s a feature that allows you to select and mask individual materials and objects in the compositor after they are rendered.
Step 1-
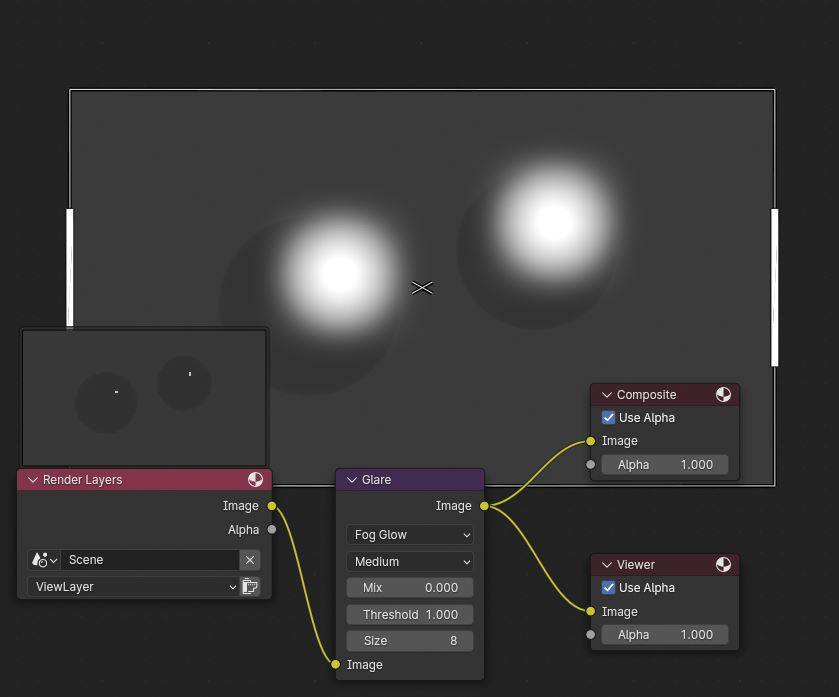
We start with a scene with 2 balls that have 2 different materials. They are both affected by the glare.
Step 2-
Create a cryptomatte node. You will see there is also a cryptomatte(legacy) option, ignore it, as it’s part of an older and more complicated way of doing the same.

Step 3-
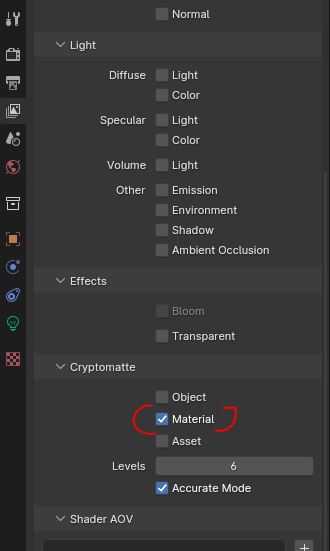
In the “view layer” options, activate cryptomatte for materials. You will see this is going to add some cryptomatte pins in the compositor, but ignore those, as they are for the old method.
Step 4-
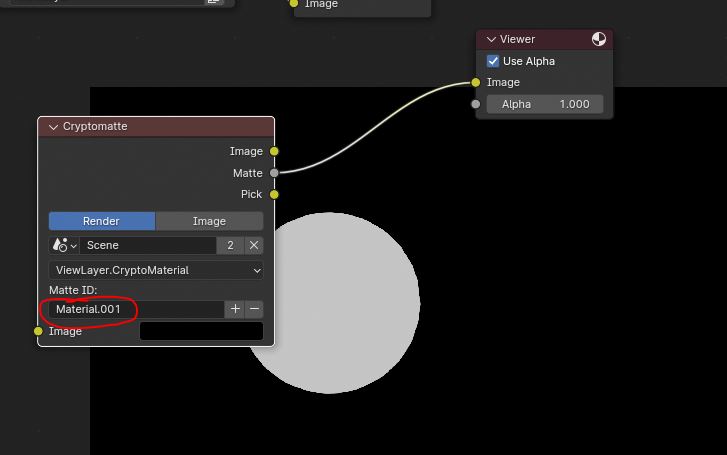
On the cryptomatte node, enter the name of the material you wish to mask (in this case, your metal part). If you plug the “matte” output into the viewer, you will see you get the shape of the material as a white mask on a black background.
Step 5-
Pass your main image into a mix node with the other input set to black and the cryptomatte mask as the fac. You now have an image where one material has been removed and doesn’t affect the glare.
Step 6-
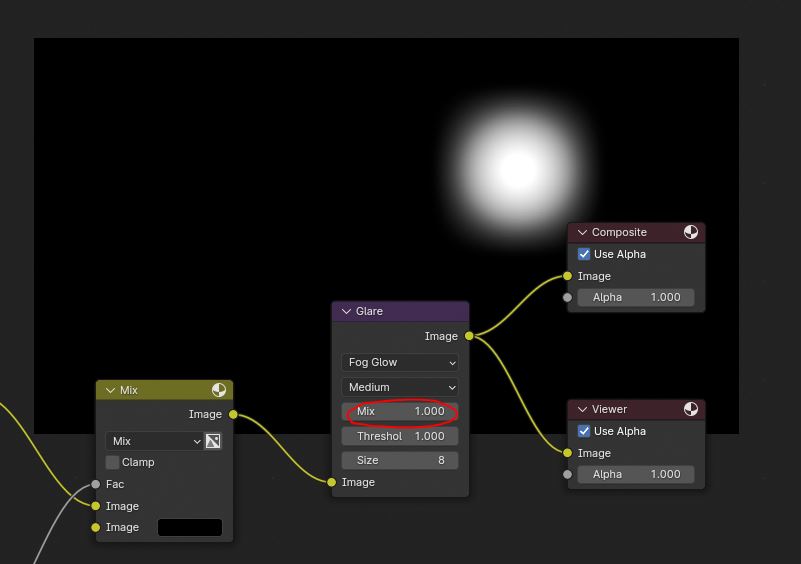
We now have to isolate just the glare and place it on top of the original image. Set the glare’s mix to 1, this will give you an image with the glare alone.
Step 7-
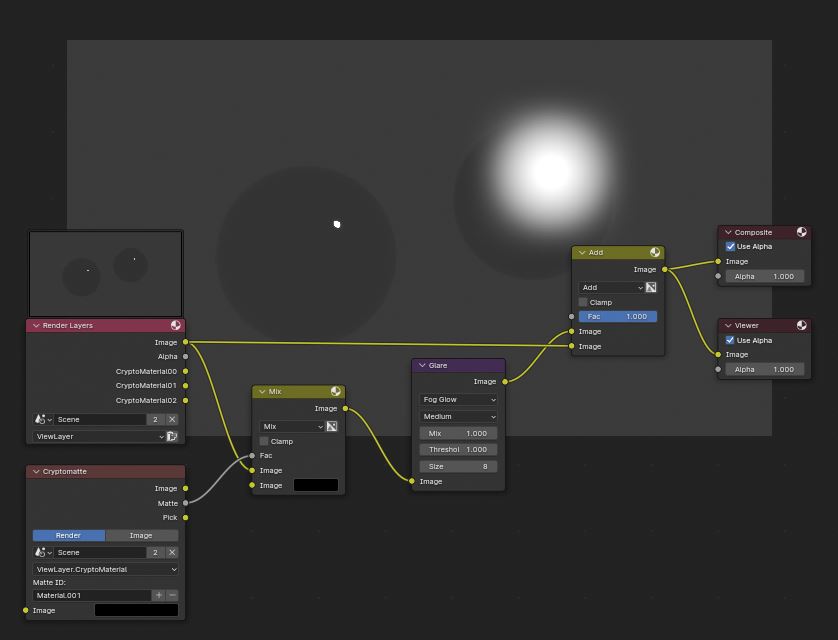
After the glare, create a mix node and set it to “add”. This will allow the masked glare we created to be placed on top of the original image.
Step 8-
If you wish to have a little bit of glare on the metal, you can pass the mask through an extra mix node. The fac will allow you to mix the mask with the color black, allowing you to control how much glare you allow on the masked material.

5 Likes
thank you so much for your help ! sorry for late response I had work all day.
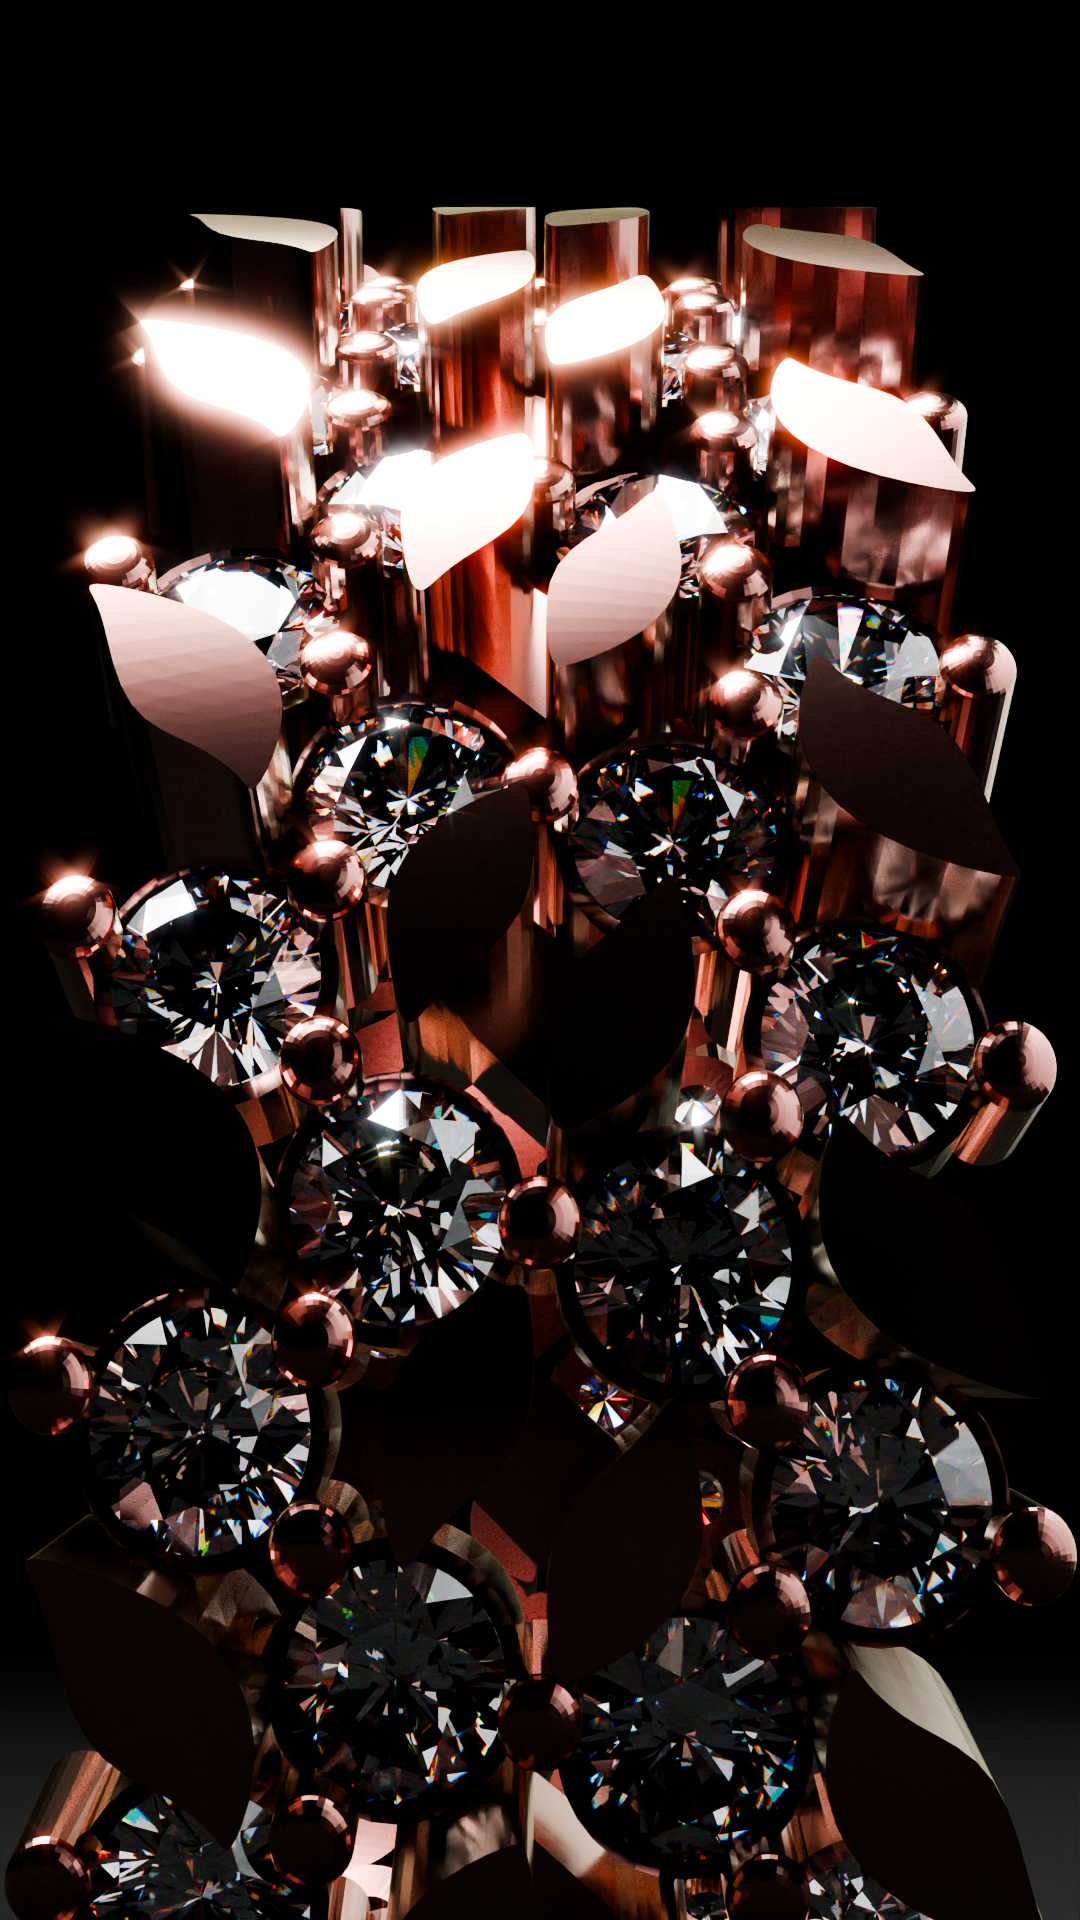
so before I saw your response I managed to find out about cryptomatte and came up with this last night.

which worked and gave me this result

but I’m probably going to do your way since you explained it so well and i can understand what’s happening. the way i did it i just messed with it until it worked.
but my second issue is that i read when using cryptomatte i have to use exr file?
i tried exr multilayer render and it gives me all black renders ( no image )
and then switched it to open exr ( normal ) and it worked but washed out the contrast of the image . ( my first time using exr file format )
by any chance do you know the correct way of exporting something like this ?
( animation of 450 frames )
and again thank you so much for your help i really appreciate it !
1 Like
Before I can answer the file format question, I first have to ask one thing: are you doing the compositing immediately at render time, or are you saving the files and then doing the compositing later as a separate step?
If you are doing the compositing immediately as a part of the render, it doesn’t matter what file format you output, as the compositing will be complete when the saving occurs and you will just get a completely normal image that can be saved to any format, like PNG.
However, If you are saving the un-composited file and intend to work on it later, you need to save it to a special format that supports this workflow. The best format to use in this case is EXR multilayer. That format contains all the data that would have been sent to the compositor, so you can import it later in Blender and work on it in the compositor.
If you decide to use this workflow, you should deactivate the compositor for the rendering step, as you are going to do it later as a separate step. I’m not sure why you got a black image though.
EXR is what’s called an HDR format (high dynamic range). This means that it’s a format that stores the full extent of light intensity. Non HDR formats like PNG store only values that can be displayed on a monitor, but that means they can’t accurately contain very bright lights. So, HDR formats are useful for color correction, because they contain the full light data and react better to having their exposure altered.
Not every software can display an HDR image (or does it the same way), because you have to somehow display something that can’t fit on a monitor. Some may compress the result in visible range, other will have bright and dark areas not visible (though the data is there if you change the exposure).
Also, different software will interpret the colors of an image differently, depending on their own color space settings. Usually, this isn’t that noticeable, but the complicated HDR formats might give some wildly different results between apps if you don’t take color spaces into account.
However, if you reimport it into Blender, it should look the same as it previously did at export, provided you are careful not to re-apply the color transform (AGX, filmic) a second time when re-importing and working on it.
4 Likes
Wow you are a life saver I would have never realized I can do png image sequence!
I thought I would have lost the cryptomatte effect ( at least that’s what I read / I misinterpreted )
I did a 10 frame test render in png and it worked perfectly / didnt effect any of the lighting.
yea i checked out the workflow for blender exr to after effects and was able to make the multilayer appear but to be honest is overkill for my situation
it brings too much complexity for my skill level / dont really need that much control
my main objective is to simply control glare ( which cryptomatte worked perfectly for )
your explanation of exr enlightened me so much thank you ! was extremely helpful
by and chance do you know if there a way to get the glare node to flicker
( do I have to animate the glare or lighting, or is there camera ray - way of doing it ? )
don’t really know how camera ray works but the youtube video i watched for the diamond shader used it and i think that’s what allows more of that diamond variability look to work.
I promise to stop bothering you I greatly appreciate your help your beast!!!
1 Like
Depends what you mean by flicker.
Are you trying to make the diamond’s reflection vary with the viewing angle so you naturally get the twinkling facet effect in the reflection? If so, you will need to have lots of glossy bounces in the render settings so the diamonds have lots of internal reflections and you will need to experiment with the light size, number and placement (I suspect a smaller light diameter will catch the facets in a more fleeting way and you will get more flickering with the angle).
Alternatively, you could get a similar effect by moving the lights around the object instead of moving the camera. This will also vary the look of the metal.
Do you mean you want the glare to vary in intensity all at once? That would require animating the light’s intensity, the glare or the diamond’s color.
so this is for like a product render animation, multiple camera views with camera movement and ring staying still. my glossy was at 4 but i will bump it up and see how that does in the next test render.
I rendered it over night as it was, to confirm if the glare node streaks are staying still ( not a natural look in real world ) and they are staying still.
just rendered a test of 100 frames with bumping the threshold up ( to get less glare streaks ) and animating a small up close light ( to trigger the higher threshold - for the streaks ) and it worked !
only issue is in 1 of the camera views, the up close light is over exposing the metal so ill just have to trial and error it till i get the right result
recently heard about light linking would this be a good use case for it ?
ill have to look into it more
but the other camera angle looks like a gem!
I’m incredibly grateful for your help you taught me so much !! Thank you !
1 Like
If the diamonds and metal are separate objects, you could use light linking.
Just be careful though that you still have something to reflect in the metal like an HDRI background, you don’t want to lose all sources of reflections or the metal would become flat and unrealistic.
1 Like
good point been playing around with it and i think your right the close up light on the metal definitely adds an extra premium layer just have to fine tune it.
thank you so much for your help your a beast !
1 Like