I asked this question in my Robot thread but it sunk to the second page. So in order to make the question more visible, and more accessible to a search, I’m starting this thread.
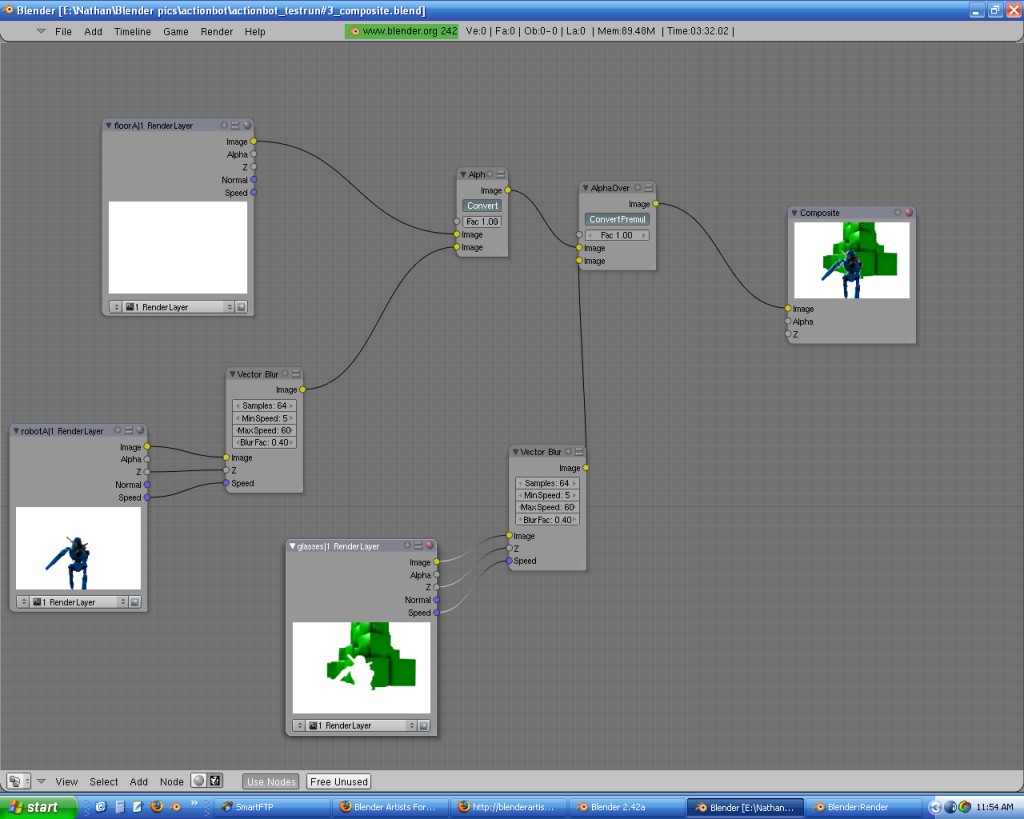
My problem is that when I tried compositing with nodes I got a border around the composited passes. I’m attaching a screenshot of my node set-up, and the resulting render.
I have “convert premul” pressed in the alpha over nodes. I found that taking the world setting out of the robot and scenery passes I could get the line to be thinner, but it was still there. And without a world setting I couldn’t use AO. I found that I could get a 3 minute render (on average) by using AO on the robot and the scenery and the floor, but rendering them seperately from each other. (This frame was rendered in 3 1/2 minutes.)
So how can I get that white border to go away? I searched on the message boards but could only find that pressing “convert premul” helped. But that doesn’t get rid of it entirely in my case.
Have you tried pressing the Conv-Premul on just one node, not both?
When I compositied my Wu-Man pic I had 2 alpha overs feeding into a third one (four render layers composited together) and I left the Conv-Preuml “OFF” in the final alpha node. Don’t ask me why - I just did it that way because it looked awful with all three turned on
Yeah, I read about that post of yours when I searched. I tried it with one on, one off, vise-versa, and then neither. Both on looks the best. Thanks anyway.
Thanks, rawpigeon. Another question at you: Where would I get that alpha channel from? The input nodes? I tried that and it didn’t work. I’m afraid you’ll have to specify a bit more since I’m still learning the nodes and have no idea what I’m doing. (But don’t tell anyone that!)
What you are seeing is the vector blur that you have applied to the layer rather than the fringing that occurs when an alpha channel is improperly interpreted (if you blow the image up in photoshop to 1600% you will see the afore mentioned fringing in addition to the the white halo…which is actually a light shade of blue, compliments of vector blur). This leads to what the above posts alluded to. The alpha in your vector blur seems to be revolting against the notion having more than one channel operation performed on it.
Why are you trying to composite like this anyway? Are you just experimenting to see what will happen? Renderlayers cannot be accessed within a singular file (yet!) so you’re just causing yourself a lot of pain for naught. If you are going to seperate your comp into renderlayers then you should have a specific reason for doing so - such as creating depth of field, relighting isolated elements within the image via a normal pass, adding a colorcast to specific portions of the image, etc…The keyword here is isolation. Renderlayers allow you to disect, effect and or correct individual elements or groups within your composition before outputting your final render. This saves you from endlessly re-rendering your scene just to find out whether a correction is going to work or not.
RamboBaby, thanks for replying, but I still don’t understand. When I take the vector blur out, it still has a white border around the composited elements.
The reason I’m trying to do this is left over in the other thread. I forgot to bring it over. I work in animations and I’m trying to get my render quality better while keeping the rendertime manageable (the impossible problem, no?). Well I found out that when I do – hang on, it’s in my first post. When I render it all together with ambient occlusion on, it takes forever. But when I render each element with AO seperate from each other, then I can get a 3-minute render. Is this a round-about/wrong way to do this?
See, I really don’t know what I’m doing. “Renderlayers cannot be accessed within a singular file” means nothing to me. My object is to get a good render. My particular object is to render each element: the scenery, the robot, and the shadows with AO seperately and then composite them together. Again, to someone who knows what he’s doing, is this rather stupid? It makes sense to me, but I know nothing about compositing. I’m trying to learn.
Change the color of your world to 100% saturated red and let me know if the color of the fringe changes also. Confusion seems to reign when it comes to alphas so I’m about to post a bit of definitive alpha info that’s destined for the stickies.
I’d take the alpha from your robotA layer. I think you have a problem with your glasses layer - it’s got a white version of your robot in it and, unless the robot in the robotA layer exactly covers it, it could cause the white fringe you see in the final image. I think you need to alter the source for that layer to remove the white image of the robot - it should just show the green boxes.
Yes the fringe does change color. I already tried changing the background color out of a loss of other solutions.
No, the white version of the robot is a mask. See, the robot runs behind the boxes (relative to the camera) at certain points, so that white needs to mask out the boxes otherwise he’d always be “on top” you know? Now, again, I could be going the wrong way about this. To get the mask, I just copied the master scene, dupcliated the robot and added a “mask material” to this new mesh. So the camera angles and the animation are exactly the same in each scene. Exactly, because they are the same and are just linked from scene to scene.
Oh, and taking the alpha channel from the robotA layer to the alphaover node doesn’t work.
RamboBaby, I eagerly await your solution. Even if you stick your foot in your mouth again. Maybe it’ll help anyway. (I don’t know what I’m doing, so it can’t get worse, right?)
You used an alpha over node to keep the layers seperated, right? Well, as it turns out the inverse is true when depth buffers are involved. This happens even if you don’t choose the option of including a Z pass in the renderlayers tab. I’ll post a screen shot in a second.
Well, i’ve had nothing but trouble out of Blender today. I cant seem to keep it from crashing B4 making the screenshots to show you whats really going on. Several things could be happening. 1) unless you antialias your z-buffer - it can and WILL punch holes in the alpha channels belonging to any and all layers that it has the depth to reach. Today I discovered that you do not have to render a depth pass in order for this to happen. Now I understand why it is taking so long to code the nodes. These are seroiusly complexf iles and can choke the hell out of your machine. 2) If you rendered your files with a straight alpha channel by pressing the “KEY” button rather than the “PREMUL” button, do not under any circumstances press that button labeled “ConvertPremul” as you will end up with a milky or cloudy halo every time. This is due to the fact that different arithmetic operations are used to translate the 2 types of alphas and neither are compatible with the other. Premultiplied alphas are the lookin good, feelin good, golden boys of the compositing world who get their asses beaten into the the matte every time they they try to step into the octagon with the true powerhouses of the compositing world. Straight alphas win hands down every time because they spend their entire lives as ugly little trolls who have nothing better to do aside from honing their combat skills because they’re so ugly that they can’t get a date and their own dogs cant even stand to look at them. But unless or untill you’re ready to start looking for a professional outlet where you can wreak havoc with some mad visual effectiveness, then it’s just easier to deal with those pretty little little premul sissies. 3) There is no reason that you should have to create matte passes in front of geometry the way you did with the white, self luminant robot as you have done in the above screen shot. You can simply use apply an arithmetic operation via a mixing node that will let the alpha channel from one render layer act as a stencil which will cut out the desired portion of another renderlayer’s alpha channel. These go by catchy little names such as traveling mattes or track mattes but around here everybody gets to roll their own. I like to think of them as “spleeffies”.
If you try to just bring the alpha from one layer over to the next then nothing is going to happen because 1X1=1 and white times white is always gonna give you an opaque alpha channel, so you need to invert the borrowed alpha via a color ramp. Then when you multiply white times black or 1X0 it will return a result of nothing, zero, naught, nada or clear transparency, but only if you correctly interpret it.
Sounds like you might be better off using a Z Combine node to accomplish what you’re doing - you won’t need to use a matte as it’ll combine the layers according to their distance from the camera - if the robot is behind the boxes it will layer the boxes on top of the robot, but if the robot is in front it will put the boxes behind the robot.
Wow. Did you actually say something, or was that all just pulled out of your hat? I’m working on your suggestion . . . at least I think I am as I have time. Thanks for the help.
rawpigeon, z-combine leaves a jagged edge around the composite. I know, it sounds like the logical solution, but I can’t get it to work. Thanks anyway for the idea.
golly, you techies complicate the heck out of things, especially when the answer is freakishly simple: LGM, your robot has a force shield around him, integrated into his armor plating. Bingo. problem solved. live with it. Ha!