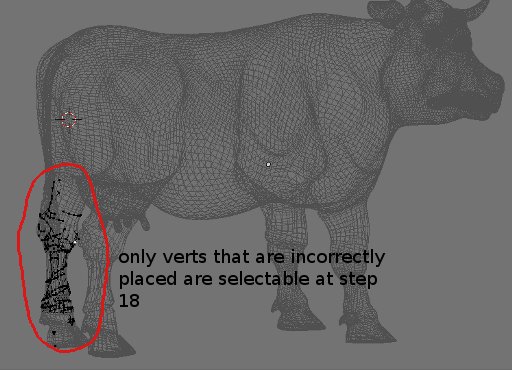
problems with x axis mirror sculpting in sculpt mode

hi
i am having a few problems with sculpt mode and multires. i have a model that has multires with 4 levels. i am currently sculpting the model mainly on level 4 to achieve details such as folds in the skin of the character.
the problem is that i am trying to achieve a mirrored effect ie. when i sculpt the right leg the effects are mirrored on the left. i have turned the x symmetry mirror button on. and the results are varied. the sculpt tool does not always seem to achieve predictable results, regardless of the type of brush i use (grab, inflate, pinch etc).
i have alread layed out the UV’s for this model and do not want to have to change the vertex ordering by adding or deleting vertices with anything other than multires, as multires keeps my original UV layout (which has non-overlapping UV’s) when it increases the vertex count by adding levels.
is there a tool/script that will move the vertices on the left side of the model to the correct position based on a mirror of the corresponding vertices on the right side of the model?
any help is greatly appreciated.
thanks
lyndon

Attachments


http://blenderartists.org/forum/showthread.php?t=150594

hi there
i tried your suggestion of the above mentioned tool for mirroring vertex positions but this did not work. i tried it with various different options, on a high res mesh, on a low res mesh but the results were the same it seemed to recognize which vertices were in different locations as it would always select these vertices after the script had stopped running, but it failed to move the vertices to thier corresponding mirrored locations.
please help, i can post a copy of the mesh if necassary?
thanks

i can post a copy of the mesh if necassary?

Yeah, you do that!

hi
here is a copy of the mesh i had to apply the multires at a level below the highest level or the .blend would have been too large.
i’ve also had to post it to my website’s server as the current file size (2MB) exceeds the limit for .blend file on this forum. here’s the link
http://www.lyndondaniels.com/makehuman/cow.blend.zip
hope that is ok?
thanks for your help, i sincerely appreciate it.
lyndon

hi
here is a link to the mesh as it’s too big to upload to this forum, hope that is ok?
http://www.lyndondaniels.com/makehuman/cow.blend.zip
please let me know if there is anything else you require.
thanks sincerely for the help
lyndon

hi there
i’ve had a few problems trying to post the file on this forum due to the size restraints of a .blend file that can be posted. so i’ve had to subsequently apply the multires at level 1. the geometry on the right and left are still different. can you please tell me how to get the goemetry to match on both sides. without having to delete or add additional geometry as i have already layed out the UV’s for this model.
thanks
lyndon

Attachments

cow07.blend (585 KB)

I assume you want to mirror the left side of the cow to the right.
I will try to make that for you - using the script that I mentioned for that purpose (without breaking the UV map). I will post the fixed model later.
Nice model, anyway!

Here is the fixed object:

Attachments

cow07-fix.blend (598 KB)

hi syziph
thank you very much indeed for fixing the model, the uv’s are preserved perfectly and the left and right sides are exact mirrors. this is however not the finished model as the finished model has about 4 levels of multires details. i could not post the high res model because the .blend file size is over 50MB.
it would be very useful if you could please tell me the settings you used in the mirror vertex locations and weight script, and whatever other steps you used to achieve the final result. i will need to repeat the procedure on some of my other models too.
thank you again very much for your help and for the complement on the model, i still have quite a bit of work to do on it till it is completed. i’ll post a pic detailing the differences in the model between level 1 and level 5 multires so you can have a better idea of what the completed model is supposed to look like. btw will the procedure you used to correct the model work on a model that still has multires enabled?
many thanks
lyndon

Attachments


The procedure I used is a bit complex and is hard to explain with a few words.
Basicly the script is applied a few times. It selects the vertices that haven’t been mirrored. Make a vertex group of those selected vertices and manipulate the vertices so they get closer to mirror state, then apply the script again and create a vertex group of the vertices that remain not mirrored - manipuate them again and so on untill no vertices are selected after execution of the script.
You can also play with the distance parameter(MaxDist) of the script to make things faster.
But still this approach is very specific to different meshes. The script usually is meant for slight asymmetry problems and when the mesh is severely asymmetrized it is more difficult to fix it because it mismatches the corresponding vertices. But not impossible :slight_smile:

The script can be used on meshes with multires.

If you still have difficulties. Try to upload somewhere the bigger file and I will see what can be done.

It seems that this is a big problem recently with sculpting. But giving asymmetry to the object makes it more believable and interesting, isn’t it?

ha ha, yes indeed giving asymmetry to a mesh does make it more interesting. only thing is that it often means having to do twice as much work to achieve a result that often does not correlate with the amount of effort expended, particularly because this model is intended for animation :slight_smile:
thank you for your suggestion, syziph it is a very sound and reasonable suggestion for dealing with low poly models, but due to the direct vertex manipulation approach that it requires, it will take me a very long time to make this script work with a model consisting of 668 000 polygons and this number will double if i have to add another level of multires for more detail. i think at this stage or until the developers sort out the sculpt mode mirror issue it might be best for me to change my workflow and work only on one half of the model, use the mirror U option in the mirror modifier when laying out UV’s, then only apply the mirror at the end of the sculpting process and not before. this way i don’t have to use the buggy sculpt mode mirror option. perhaps i need to report a bug, as i have noticed other issues about the mirror option in sculpt mode?
thnaks for you help, i sincerely appreciate it and if you can think of any other suggestions that might be more suitable for high res models i would really like to hear them.
none the less i’ll give your suggestion a try and see how long it takes to see some redeemable results :slight_smile:
all the best
lyndon

668 000!!!
Okay - can you upload the file with the multirez levels - I would like to give it a 10 minute try :slight_smile:

hi syziph
that’s very brave of you :slight_smile: as much as i’d really like to take you up on that offer, the file is approximately 145MB and i don’t really have the bandwidth to upload a file of that size. it does however compress quite well to 28MB but even this file size is a little too much for me to upload as bandwidth is pretty expensive here in south africa :frowning:
none the less, i gave your suggestion a try and i managed to get it to work at level 1 with multires enabled :slight_smile: the problem arose when i tried the next level, ie level 2 the script worked by detecting the misalligned verts in edit mode, but when i tried to create a vertex group, it gave me the error
“operation only available for multires level 1”
seems like you can’t create vertex groups on a multires enabled mesh at anything other than level 1 in blender 2.48a.
i can understand why you chose to create vertex groups, as they serve as a great aid for quickly selecting the missaligned verts and refining a selection, they also serve as an excellent visual aid to see which verts to move as this can become a bit tricky in wireframe mode. am i correct in assuming that the creation of vertex groups is not necassary for the successful execution of this script. if this is the case then is there perhaps another way of achieving the same or simillar results, of what creating vertex groups does in this situation, with some other tool or script?
thanks again for the help
kind regards
lyndon

Another way worth trying is by using displacement map and displace modifier.
But I am not sure how it will turn out.
If you create a displacement of the 4-th level model, and try to symetrize the resulting texture in panting program (flipping of part of the image), then you can try to apply the displacement to a new symmetric model in the same level of resolution (4-th)?!

hi syziph
i was thinking of something similar along those lines, but like you said the results will not be predictable due to using a paint program to do the symmetrizing. however at this stage it seems that this will be what i’ll have to do, once the sculpting process is completed.
take care
lyndon

About the file size, I noticed that saving the object with highest multires level gives large file size
If you save the file with the lowest level turned on - the file size drops drastically.
What could be the reason for that if both files hold the same information about the object?

interesting observation, i really have no idea? perhaps the higher level data exists in a ‘compressed’ format until it is recalled in the viewport or at render time, maybe?
it seems that at the lowest level, my file is about 8MB. if i do feel a bit rich :wink: and decide to upload the file it will probably make more sense to do so when the modeling/sculpting is completed.
thanks for the help syziph, it is greatly appreciated :slight_smile:
best regards
lyndon

since i started working with multires, sculpt mode and the mirror brush option i have noticed that the symmetry when sculpting across X, Y and Z planes does not always work as predictably as one would think. i have come up with a suggested workflow that will yield more predictable results.
problems:
1)when working at high resolutions (high levels on a multires enabled mesh) the mirror brush option seems to struggle or not work at all on the other side of the mesh.
2)when hiding geometry in sculpt mode (using ctrl-shift-left mouse drag) the mirror brush option seems to once again yield unpredictable results.
solutions:
1)working on high resolution meshes tends to create non-realtime feedback in the viewport eg when you drag your sculpt brush across the surface of a high res mesh and have to wait to see the results of this operation this is non-realtime viewport feedback. if you do not have a fast computer the results of non-realtime viewport feedback are particularly prevalent. sculpt mode seems to have a problem with this is, it is therefore necassary to reduce the amount of visable geometry in the viewport to a amount that will always yield realtime feedback. a suggested method of achieving this result in sculpt mode and being to keep your object multires enabled is using the crtl-shift-left mouse drag option to create a markee around the geometry you wish to sculpt. the remainder of the geometry will be temporarily hidden. the results of sculpting will be far more predictable when viewport feedback from brush operations are in realtime.
2) in order to achieve realtime viewport feedback at higher levels on a multires enabled mesh, geometry needs to be hidden using the crtl-shift-left mouse drag option. geometry outside of the demarkated area will be hidden.
when making this selection with the intent of sculpting with symmetry on the mesh thereafter, drag the markee out in an orthographic view such as

  • top or bottom when mirror sculpting with the z option enabled

  • the left or right viewport when mirror sculpting with the x option enabled

  • or the front or back viewport when mirror sculpting with the y option endbled.

these suggestions are all subject to the orientation of your model, and are based on a model facing in the direction of the positive Y axis.
the point is simply to ensure that you have as little geometry as needed to produce realtime viewport feedback and that the geometry consists of the areas you wish to sculpt, on both sides of the mesh. if the geometry you wish to sculpt is hidden (even if you are sculpting it’s symmetrically mirrored equivalent) the results will be less than predictable.

since i still had the problem of the mesh not mirrored properly along the x-axis after using the sculpt brush to complete the model. the suggested workflow above in my previous post is fine if you have not started using sculpt mode and have not encountered mirror problems with the mesh, but for the rest of us that do have the problem of the mesh not being mirrored properly along the x axis after using sculpt mode, and still being able to keep the mesh multires enabled, and not having to add or delete vertices because the UV’s have already been layed out; another approach will need to be taken to fix the mirror problem. however i warn you this is no quick fix :slight_smile:
if your mesh is anything like mine and every level of multires has geometry that has not been mirrored properly you will need to repeat this procedure for every level of multires of the mesh that has the incorrect mirroring.
i am suggesting this workflow because of the current limitations of working with multires of which most applicable to us is the inability to create vertex groups on any level of a multires enabled mesh other than level 1.

1)firstly switch to the level of the multires enabled mesh that you wish to have an exact mirror on the opposite side of.

2)with the multires enabled mesh selected switch to object mode and shift-D to duplicate the mesh

3)hit M on the keyboard and choose another layer (other than the current layer) to place the newly created mesh on

4)switch to the layer with the newly duplicated mesh on it, select the mesh and apply the multires. this removes the multires information from the mesh and bakes the mesh’s current topology. the reason we need to remove multires from this mesh is because we need to delete vertices from it, thereby making it easier to select and move vertices on our multires enabled into thier correct locations (this will make more sense a little later).

5)i am mirroring my mesh on the x axis, so i need to flip the mesh on the x axis. if you are mirroring on a different axis flip the mesh on the axis which you are mirroring on, for example to flip the mesh on the x axis; with the mesh selected hit s on the keyboard to go into scale mode, while in scale mode hit x on the keyboard to constraint scale on the x axis, while in x scale constraint mode, type -1 (that’s negative one either, on your keyboard or numpad) and this will flip your mesh on the corresponding axis. so we now have an exact mirror of your original multires anabled mesh. so we can start to use the vertex positions of our newly mirrored mesh to move the vertices of our multires anabled mesh into thier correct symmetrical positions.

6)switch into edit mode by hitting TAB on your keyboard with the mesh still selected. delete the half of the mesh with the incorrectly placed vertices. in my case since i am mirroring on the x axis, first i switch to the front view then hit a on the keyborad either once or twice to make sure that no vertices are selected, then hit b on the keyboard to switch to bounding box mode, once in bounding box mode i draw a bounding box around the vertices on the half of the mesh with the incorrectly placed vertices.

7)with these vertices selected hit Del or x on the keyboard and choose vertices from the resulting menu. you should now have half a mesh that is a mirrored copy of your original multires enabled mesh.

8)with your mesh still selected hit TAB on the keyboard again to exit edit mode and return to object mode. hit F7 on the keyboard with your mouse over a buttons view. this should take you to the object buttons view. in object buttons view locate the panel called draw and click the button that says Wire. this will make your meshes edges visable even when the mesh is not selected. this will be a useful tool for visualizing what vertices need to be moved on the multires enabled mesh when it comes to moving these vertices around.

9)you are now ready to switch back to the layer with the original multires enabled mesh, so do so :slight_smile:

10)select your multires enabled mesh and hit TAB on the keyboard to enter edit mode

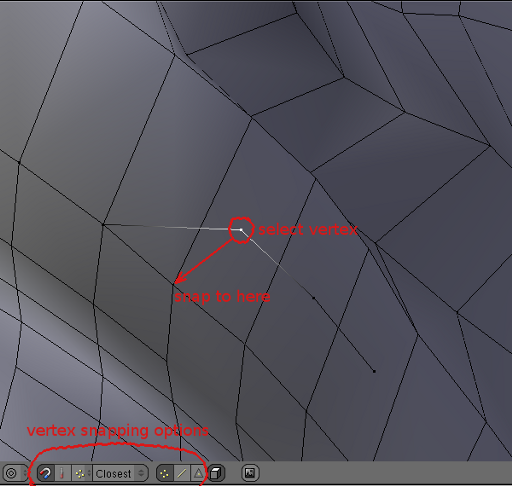
11)hit shift-TAB with your mouse in a 3D view to enable snap or snap to grid. make sure vertex is chosen for snap element and snap mode is set to closest.(see vertSnap01.png)

12)this is where the fun part starts! switch to an orthographic view if you are mirroring along the sides of the mesh (left to right or right to left) switch to a side view make sure you are not in perspective view. you might have to hit 5 on the numPad once or twice to correct this. make a selection of the vertices that are problematic in wireframe mode. this simply ensures that you are selecting the same vertices of the mesh on both sides of the plane that the mesh is mirrored on.

13)with this selection active click mesh->scripts->mirror vertex locations and weight. depending on how many vertices you have selected Blender will take some time to calculate which vertices are not mirrored correctly.

14)Blender then makes a selection of all the vertices that are not mirrored correctly on both sides of the model (ie those vertices that are not mirrored correctly and thier correctly placed counterparts). if you are on multires level 1 you can create a vertex group of this selection for later usage. however if you are at any multires level other than level 1 you will not be able to make a vertex group so skip this step and continue to the next step.

15)with your cursor over a 3D view hit ctrl-i on your keyboard to invert the selection. with the inverted vertices selected (ie the vertices that have been mirrored correctly), hit h on your keyboard. this will hide these vertices as you do not need to edit them.

16)if you are mirroring your mesh along the left and right switch to a top or front view, if you are mirroring your mesh along the front and back switch to a side or top view etc. you should have some vertices floating around on both sides of your mesh. select the correctly placed vertices and hide them with the h key.
you now have only the vertices that are incorrectly mirrored active and editable in your 3D view. this is exactly what you want, because now you cannot move any vertices inadvertantly that are in the correct locations.

17)hit TAB on your keyboard again to exit edit mode and go back to object mode. shift click on the layer that you moved your other mesh to in step 3. you now have atleast two layers visable in your 3D view, the layer with the multires mesh and the layer with the duplicate mesh with deleted vertices created in step 2.

18)make sure your multires mesh is selected and hit TAB on your keyboard to enter edit mode. back in edit mode your previous selection of vertices that you hid should still be hidden, the difference is that now you know where those vertices need to be placed because you can see thier correct positions based on the duplicate mesh. it’s a good idea to work in wireframe mode from here on and switch occasionally to solid shaded mode when necassary. do this by hitting the z key on your keyboard.

19)because you switched vertex snapping on in step 11, you can now select the vertices that are not mirrored correctly and snap them to thier correct locations on the duplicate mesh. do this by selecting the vertices one at a time and hitting g on your keyboard to move them, then holding down ctrl while moving them. Blender will snap the selected vertex to the closest vertex in it’s vacinity. i did mention that this was not going to be a quick solution :slight_smile:

20)once you have selected and moved the vertices into thier correct locations, unhide the vertices you hid in steps 15 and 16. deselect everything by hitting a on your keyboard (you might need to do this more than once). if you have a vertex group, select the members of that vertex group. however if you do not have a vertex group make a selection on both sides of the mesh where the problem vertices are. make sure your selection includes both the vertices you moved and thier mirrored counterparts.

21)with this selection active click mesh->scripts->mirror vertex locations and weight. Blender will calculate weather the vertices have been mirrored correctly and make another selection. if there are vertices that have not been mirrored correctly repeat the process of inverting the selection hiding the vertices and moving them into position until the point when you run the mirror vertex locations script and blender does not select anything. if blender completes running the script and no vertices are selected your mesh is now mirrored correctly.

hope that helps some one out there! please let me know if you have any question about this process, i’ll be happy to help out if i can (remember i’m still a newbie, myself).
this process definitely does work and yield decent results how ever there is quite alot of work involved. none the less it’s worked for me on my mesh :slight_smile:

Attachments