I am trying to model a character and i’m following a tutorial but when i try to edit with something called proportional edit it’s not working as it should it just works as with normal edit please help me and it says i should select the right-most vertex i maybe do it wrong too. Here’s the bit of the tutorial.
Shaping the mouth

Shaping the mouth, from Top View.
Let’s give the mouth some shape.
-
In Front View (NumPad 1), select the right-most vertex
-
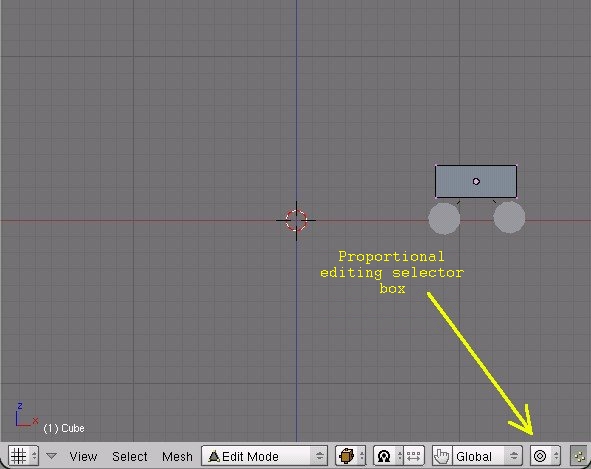
O to enable proportional editing. Proportional editing transforms nearby vertices even though they’re not selected. After starting a transform (grab, rotate, or scale), the mouse cursor will turn into a circle to outline the sphere of influence. You can use MW
 to adjust the size of the sphere of influence while transforming.
 -
Switch to top view (NumPad 7.
-
Move the vertex up and in a little, using G, to look something like Shaping the mouth. I ended up making the sphere of influence pretty large with MW
(so the outer edge of the circle was almost touching the Object Center) to form this mouth shape in a single move. Proportional Editing
O to toggle proportional editing
MW to change the influence
(or Alt NumPad + and Alt NumPad - after G, R or S)
More info: Manual/PartII/Advanced_Mesh_ModellingIf everything disappears . . .: If you press a number key at the top of the keyboard by mistake and everything disappears, press the
key (the one next to the 1 key, it also has a ~ on it) to get it back. This happened because the numbers at the top of the keyboard let you view individual layers. The Plane was added to Layer 1 by default and there's nothing on Layer 7. So if you press 7, it shows just Layer 7 and it seems like the plane disppeared. Just press thekey to show all layers at once.