Hi,
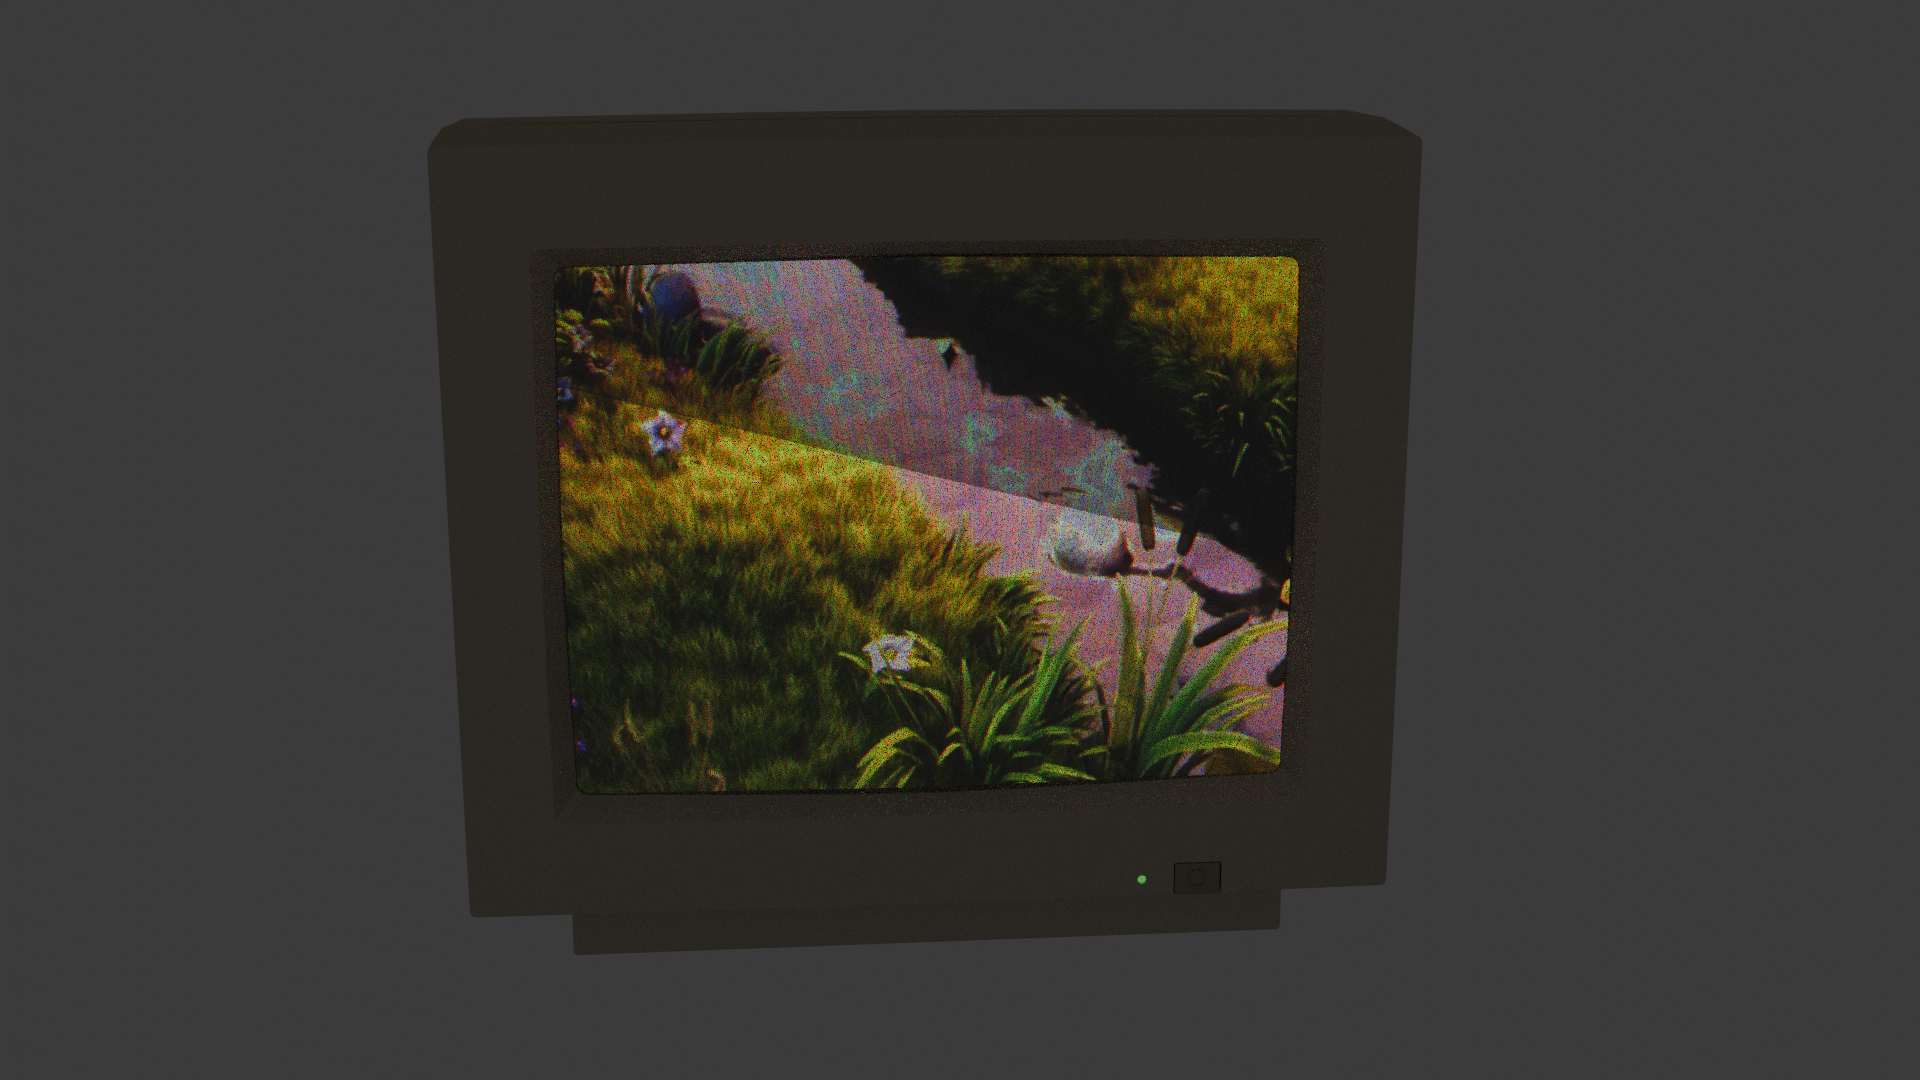
I’ve created a realistic CRT Monitor Shader and would appreciate some feedback. The .blend file is included, feel free to try it out and use it in your own projects. (Note: press play)
Download: https://drive.google.com/file/d/1xU-IBMHFlXeedCjdc-lrRvfpvNR2fkdu/view?usp=sharing
Features:
- Simulation of individual pixels and sub-pixels
- Variable width and height
- Chromatic aberration on every channel
- Visual glitches (makes the monitor look broken)
- “No signal” and “VGA” overlays
- Option for static noise
- Option to lower the bit depth per channel
- Gamma adjusting
- Variable pixel and sub-pixel size
- Variable screen brightness
- Option to simulate individual scanlines
- Option to simulate flicker
- Variable flicker speed and intensity
- Look-up-tables to match real CRT color
- Variable black value
- Power light
- Variable static noise “resolution”
- Option to adjust the input signal
HOW TO USE:
- Select the “CRT Monitor” Object (NOT one of its children)
- In the properties window, open the Object-tab
- Scroll down to “Custom Properties”
- Here you will find all the properties that control the behavior of the monitor
PROPERTIES EXPLAINED:
0_width: Width of the screen in pixels. Default: 800
1_height: Height of the screen in pixels. Default: 600
2_chromatic_aberration_x_r: Chromatic aberration of the red-channel in x-direction (percentage). Default: 0.0015
3_chromatic_aberration_x_g: Chromatic aberration of the green-channel in x-direction (percentage). Default: 0.0
4_chromatic_aberration_x_b: Chromatic aberration of the blue-channel in x-direction (percentage). Default: 0.0
5_chromatic_aberration_y_r: Chromatic aberration of the red-channel in y-direction (percentage). Default: 0.001
6_chromatic_aberration_y_g: Chromatic aberration of the green-channel in y-direction (percentage). Default: 0.0
7_chromatic_aberration_y_b: Chromatic aberration of the blue-channel in y-direction (percentage). Default: 0.002
8_time: Current frame. Default: <hashtag>frame
9_glitch: Simulate glitching. Default: False
_10_state: State of the monitor: 0=off, 1=no signal, 2=vga banner, 3=normal image, 4=static noise Default: 3
_11_bit_depth_r: Bit depth of the red-channel. Default: 4
_12_bit_depth_g: Bit depth of the green-channel. Default: 4
_13_bit_depth_b: Bit depth of the blue-channel. Default: 3
_14_gamma: Gamma value. Default: 2.2
_15_pixel_size: Size of individual pixels (percentage). Default: 0.8
_16_sub_pixel_size: Size of individual sub-pixels (percentage). Default: 0.75
_17_time_factor: Makes the time go faster or slower. Default: 1.0
_18_time_offset: Frame offset. Default: 0.0
_19_emission_strength: Brightness of the monitor. Default: 4.0
_20_simulate_scanlines: Simulate individual scanlines. Default: False
_21_simulate_flicker: Simulate flicker effect. Default: True
_22_flicker_speed: Speed of the flicker effect. Default: 24.8
_23_flicker_intensity: Intensity of the flicker effect. Default: 0.7
_24_flicker_tilt: Tilt of the flicker effect. Default: 0.3
_25_use_lut: Use a look-up-table to simulate realistic CRT colors. Default: True
_26_black_value: Black value. Default: 0.005
_27_power: State of the power lamp. Default: True
_28_static_noise_x_size: X-size of a pixel of static noise in pixels. Default: 8
_29_static_noise_y_size: Y-size of a pixel of static noise in pixels. Default: 4
_30_hue: Hue adjustment of the input signal in degrees. Default: 0.0
_31_saturation: Saturation adjustment of the input signal. Default: 0.0
_32_value: Value adjustment of the input signal. Default: 0.0
_33_brightness: Brightness adjustment of the input signal. Default: 0.0
_34_contrast: Contrast adjustment of the input signal. Default: 0.0
_35_red: Red-channel adjustment of the input signal. Default: 0.0
_36_green: Green-channel adjustment of the input signal. Default: 0.0
_37_blue: Blue-channel adjustment of the input signal. Default: 0.0
HOW TO CHANGE THE INPUT SIGNAL:
- Select the Screen object (child of the CRT Monitor object)
- Open the shader editor
- Change the image of ALL THREE image texture nodes