Hej,
I am working on some Roman or Romanesque architecture project and I started with the roof tiles.
Roman Tegalue and Imbrex are quite easy to construct, but I am struggling with the realistic texture.
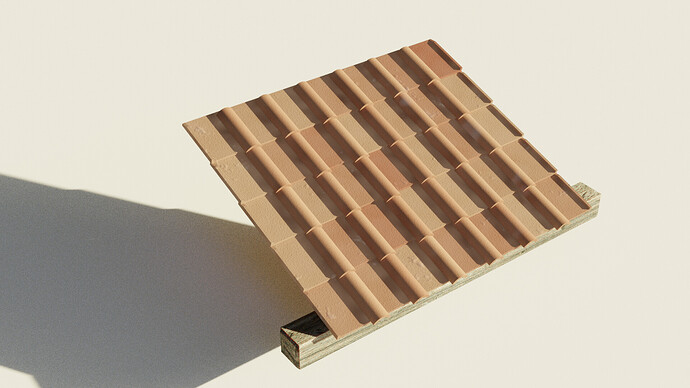
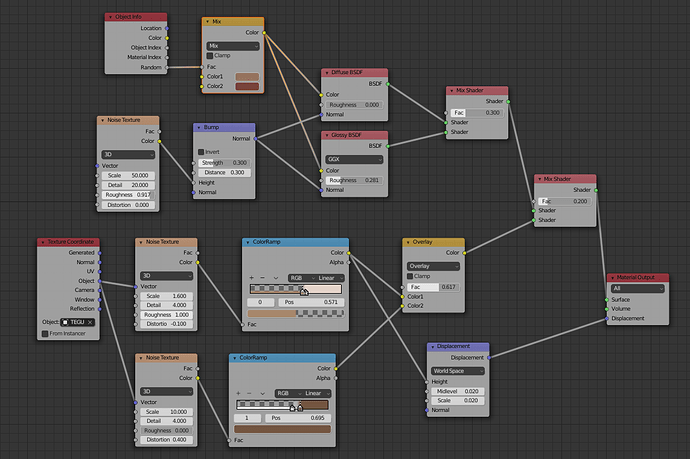
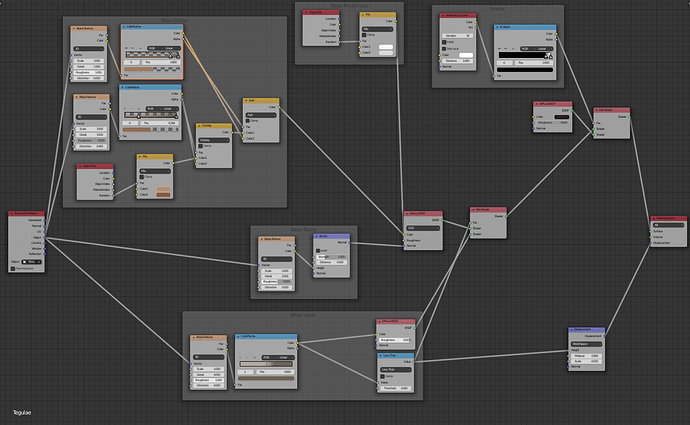
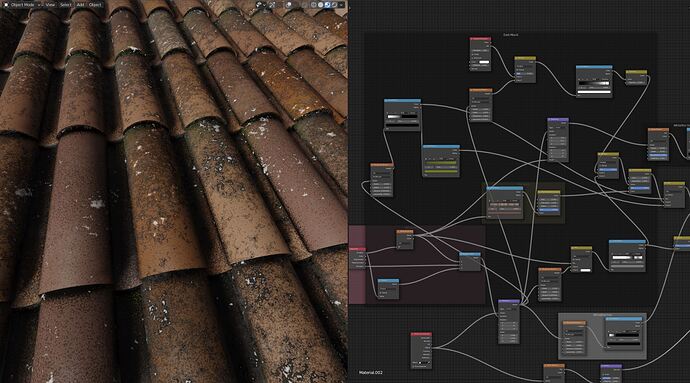
I added a render and the workflow for them. I am not quite happy with the look of the roof tiles. I was aiming for a bit more weathered look, but the more I try the worse it gets.
Could you give me a hint how to further improve it or what to do different?
Thanks a lot and best regards!
Chris
Here you can get weathered PBR rooftile textures.
You can use the textures as is like a typical UV PBR texturing.
…But what many artist maybe are doing is study them to improv your own procedual material,like your approach.
With the PBR textures you have perfect albedo of the roof tiles you can simply colorpick for your own procedural mat.You get the roughness values from the roughness map,even the normal bump maps or heightmaps,displacement maps worth to learn from, how to make your own procedural.
I notice in your material build,that you have mixed the most if not all nodes without a driven fac.
the key here for a weathering,is masking.you should see some tutorials about grunging etc.
here a quick YT search
https://www.youtube.com/results?search_query=blender+procedural+grunge+
unplug the herringbone maths nodegroup from this €1 shader https://twitter.com/greenbaburu/status/1395259779749142534 and you have a great basis for roof tiles. if you want procedural looks 
WOW! That looks incredible!
Thank you for the suggestions. I am a beginner, so there are many things for me to learn, like the use of fac. I will have a look in the tutorial and get back as soon as I have another version.
Thanks to your suggestions I got a step further with the texture. I used Ambient Occlusion and used a filter to create an alpha value after the color ramps I used than as fac.
It looks better now, but is still not what I had in mind. Maybe I have to add some noise to the geometry as well, as it is all to straight right now.
Thanks a lot for the suggestions!
If you have a reference pic from what you are looking for,maybe we try to help you to get the result.
You are right, I should have posted the current situation this morning and also some references.
Modelling reference Tegulae and Imbrex:
Color and look reference:

Where I am right now
If you have some suggestions for how to drive the realism further I would be very happy. In any case I already learned a lot from that. My idea would be to get some noise in the shape and geometry of the tiles maybe. Right now they are simply duplicates, but with particle systems it should be possible to arrange them with a bit of irregularity?
Anyway, happy to hear your suggestions ![]()
Thanks in advance!
PS: Funny detail, my ambition was to work on one of the lovely Italian Romanesque churches, but it seems I got stock early ![]()
These are looking pretty straight forward terra cotta like,with some weathering.
Your result looks interesting,but i guess if i look at your nodes a bit try and error randomly put together right?
Nothing wrong this that,now it looks like it has a dark burned top with chipped of red paint from a concrete tile.
the best would be to load up a minimalstic file with only a rooftile and the actual mat,otherwise if we want to improve it,we have to rebuild your nodes and model a tile.
Tegulae_base_blenderArtists.blend (1.1 MB)
Here it is … I took out all the duplicates and the rest. To mess it more up, I have different textures for the tegulae and for the imbrex, but they could also be the same (just some minor differences). 
download now,i start later to get this texture right
Thanks, I am curious! 
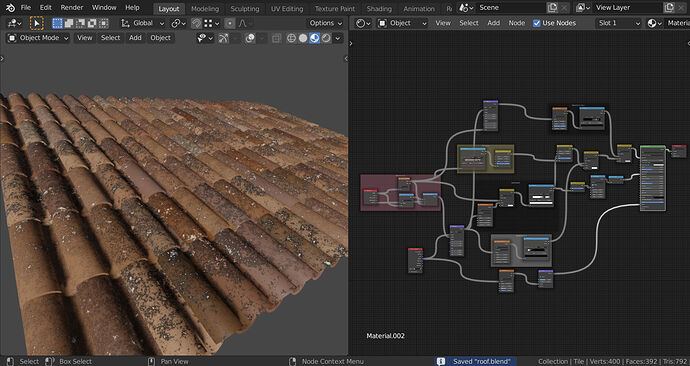
I can never resist having a try at a texture when a thread like this crops up. So here goes my try:
I have used one (doubled) tile and instanced it on a subdivided plane.
I used the object location and random outputs to get the random colours and texture mapping.
Here is the file if you are interested (you will not be able to read the nodes from the screenshot):
roof.blend (897.6 KB)
feel free to use, adapt or throw away!
Your result looks great,better than my try.For this reason i downloaded your version and tryed to add a few more layer.I added a AO multiply to the darkening of the tiles color,to give more dirt between the tiles.And i added a moss layer.
roof1.blend (947.9 KB)
I like this too.Maybe from time to time we could start a build that material challenge for fun.
I love the moss, and darkening! ![]()
I’m in.
Wow … I see, the nodes are growing like mushrooms and I am super curious to see how you did it and how it works. Unfortunately I can only look into this in the late evening.
I want to thank you both for your great support already now. 
PS: If you are looking for challenges, I think I could drop the one or other tricky question along my way? 
Sure,we are waiting ![]()
really amazing ![]()
maybe a very subtle random move along the tiles axis and another subtle rotate to mess-up the roof a bit ?
just like i tried to do here ?
The dirt and moss thing is really not easy to achieve ![]()
For the mat nodes challenge, this would be a great idea !
I guess that also a geom nodes challenge would be nice ![]()
happy blending !
Thank you,the credits belongs to @DNorman and his build.
No just material build,you can go crazy with the mesh and and the mat as much you like ![]()
![]()
A great idea anyway though,tweaking the procedural tiles and mat to perfection.
btw, @KatzenGeist i have seen that the upper tile part Imbrex is put on mortar that is placed on the Tegulae.If you want perfection you could model or better sculpting the mortar between the two tiles.On some reference images the mortar is clear visible,but if you dont render that close then its maybe overkill to do it.
more dirt plus subtle moss is easyer vs many moss.
yes,but tbh i dont have played with the geo nodes yet.
You are welcome, we are having fun ourselves!
As a basic concept, when you want to make a texture you have to look at the reference and try to brake it down into different parts, or “layers” as pixelgrip says. Then recreate them the best you can one by one and mix them together.
In this case the basics are different colours for each tile and different types of dirt (dark and white), mould etc
You need to get a random value to drive the different colours and location of the textures so that the tiles are all unique. As each tile is its own instanced object I used the location with a white noise texture (gives you loads of different colours/values) and the random object output (only 10).
I strongly recommend you activate the node Wrangler add-on and with ctrl shift you can see the outputs of the different nodes.
You can go on and on adding new “layers”, pixelgrip’s AO and green mould are lovely.
If you want to go further some randomness in the geometry an angle of the tiles would be great as pitibonom says.
I too look forward to new challenges. ![]()
