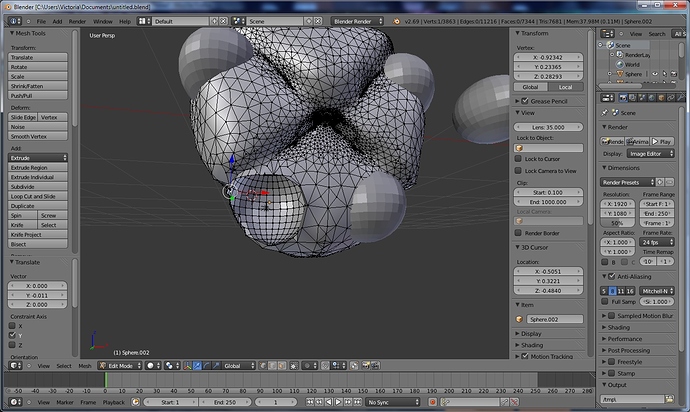
I’m rather new to Blender- I’ve mainly been using Sculptris but thought I should try my hand at this 
Now I’m pretty sure there is an easier way then what I’m doing, if not this is going to take awhile lol.
I’m making a snap in set of wings for a doll, which will then be Printed via shapeways. What I need is the ball joint to be removed from what I’ve created in Sculptris so it can pop in and out.
What I’ve done so far is remove the verticies from the ball, and then add the edges to the piece, leaving the original sphere inside.
Is there a way to just easily cut out the sphere from the object? Or is the way Im going at it the only way? I’ve already spent an hour just doing what I did so far lol.
Thank you! ~Brittany
Simplest option would be a boolean modifier http://wiki.blender.org/index.php/Doc:2.6/Manual/Modifiers/Generate/Booleans
Depending on how clean you want your mesh yo may want to do some manual cleanup of the result you get
I kind of have a similar problem that I will try to explain without confusing people:
I have been using Blender to model a character for my Unity game (BTW, anyone with tips from personal experience with the same thing would be helpful :D). I have been using a lot of different resources to try and learn different techniques in order to know how to problem solve fairly quickly. Having said that, I have been using BlenderCookies Tut Videos for a reference of sculpting my model as I have very little experience with sculpting in ANY program, much less in Blender. The tutor instructs you to separate all of your major parts before beginning to sculpt in order to save on processing power (based on his model). In the back of my mind I knew that my model would need less separation because his character has a mask which allowed him to leave out a good chunk of his characters head. My character only has a hat on his head, so I skip through the section where he modeled his mask and just deduced which steps I should take to combat this issue.
I have done well all the way up to the point where he switches from sculpting the head of his character to sculpting the neck which has a seam which can be covered by his mask, conveniently enough for him. I was worrying about how my head would match up with my neck all the way up until the point when I finished modeling my char’s head. Well, my nightmare has become a reality because upon completion of the head, I realized that it would be virtually impossible to precisely match the neck to the head in sculpting. My first instinct was to join the two meshes in ‘object’ mode and hopefully they would join together enough that I could just keep sculpting with the neck now connected.
This was a terrible choice as my sculpted head was severely distorted upon entering ‘sculpt’ mode. So I reloaded my project to just before I joined the two meshes and just decided to delete the neck mesh in ‘object’ mode and just pull down the bottom of the head and form the neck from that, as one piece. This worked just fine until I switched to ‘object’ mode and saw that my head still had the low-poly shape it had before I added and sculpted the neck. I’m really worried now that I have screwed myself and I will have to redo the whole damned thing. Should I just extrude the faces in ‘edit’ mode and try to match it up to the shoulders about the same as I had the neck mesh before I deleted it? Will this solve my dilemma so that when I get to the normal making phase of my project I won’t have to worry about issues when I go to map the head (now the head & neck) mesh? Someone please he me out because I’m going to pull my hair out if I have to restart this whole process. It’s been very time consuming and taxing on my patience. Help me prease? Any ideas are welcome, assuming they can solve the problem I have plagued myself with…
P.S.
Sorry about the long explanation. i just wanted to explain my problem in detail so there is no confusion as to what I’m dealing with.

