Guys look at the background how can I make it look better?
1 Like
Look at some reference for what you want to achieve. I would add some skirting boards to the wall.
I would also add something to have on the cupboard. Vase etc.
Edit: if it is for an animation i think you have nailed the focus aspect. I wasnt drawn to this particular area of the frame. Only because you asked for it specifically.
1 Like
The bottom of the wall should probably have some sort of border. Most walls in houses do.
2 Likes
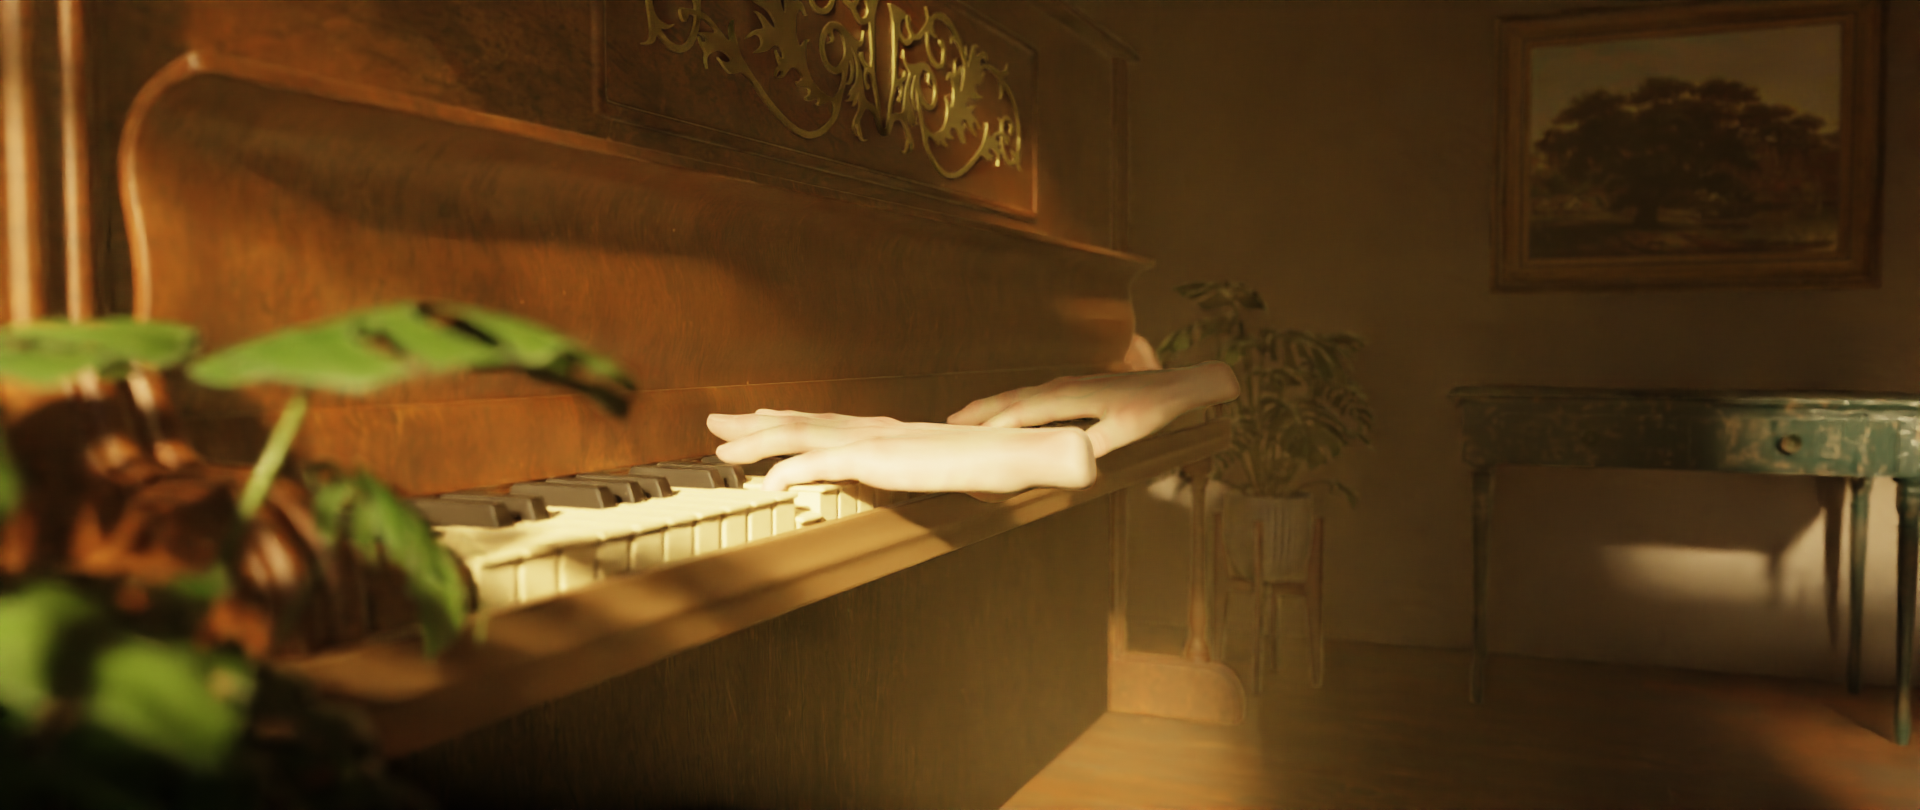
thank you! Indeed yes it’s for animation but I guess I wasn’t clear I actually meant the quality of the background cause the plant at the background seems kinda odd I don’t know why, but I am gonna add the things u said anyway, thank you! ![]()
![]()
1 Like
thank you!![]() um I wasn’t clear actually I meant the weird quality of the background cause the plant at the background seems kinda odd
um I wasn’t clear actually I meant the weird quality of the background cause the plant at the background seems kinda odd ![]()
That looks like some sort of denoising problem.
What are your sampling settings like?
Are you using some special denoising setup?
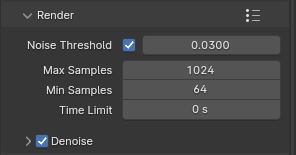
0.1000 noise threshold with denoise enabled and samples are 8 and the tile size 64. I tried to lower down everything as possible as I can cause it’s for animation ![]()
Yeah, that isn’t going to be enough, especially not in an interior scene (they are more noisy). Also, the heavy depth of field and the fact the scene is lit by narrow sun beams are both things that will require more samples.
For an interior scene like this, I would expect the kind of sampling settings you will need to be something like this:
If you are using a recent version of Blender (at least 3.0), the small tile size might not be helping the render speed. The current version of Cycles is built to work best with no tiling used at all, tiling exists mostly to make very large renders possible.
But, this doesn’t mean there is nothing to be done to accelerate the render. Interior scenes are noisier, but there are some tricks to improve them.
Is the lighting going to stay the same through the whole animation? Do you have big, flat surfaces like walls and ceilings that won’t have moving shadows on them?
If yes, you could bake the diffuse light on the walls, ceiling and possibly the floor, which will greatly accelerate the render and reduce the noise. This is a bit of work, but well worth it for the result.
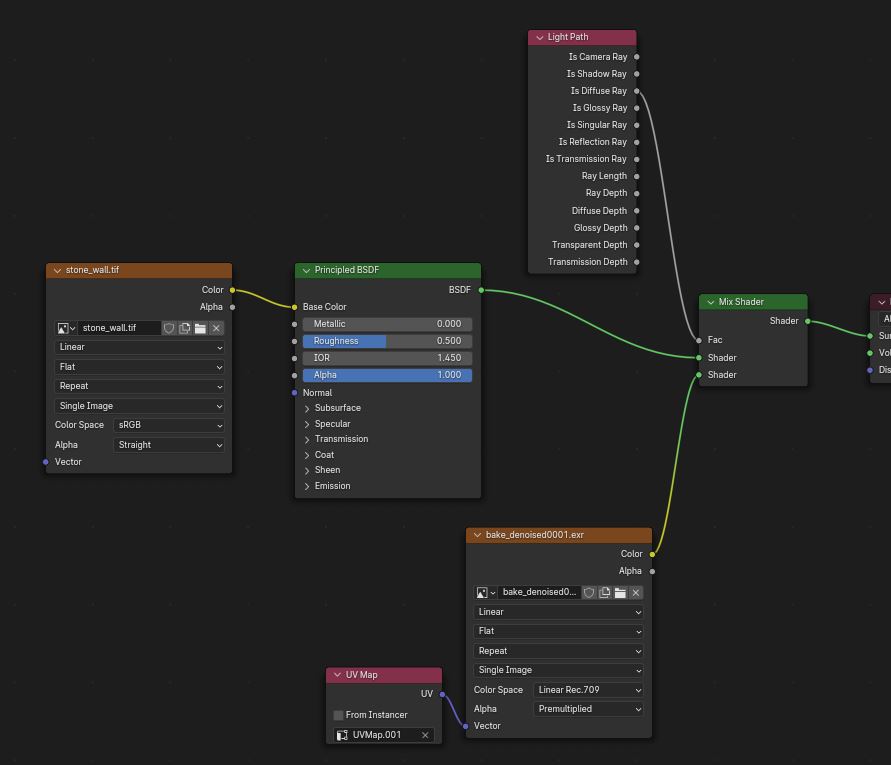
1- Lets start with a simple scene as an example. It’s a rather noisy scene, as it’s completely enclosed.

2- Pick the largest objects in the scene, such as the walls and ceiling. They will have the biggest impact when baked. If they already have textures and UVs of their own, you might need to give them a second UV set that has no overlap and fits the UV space, so textures can be baked on those objects.
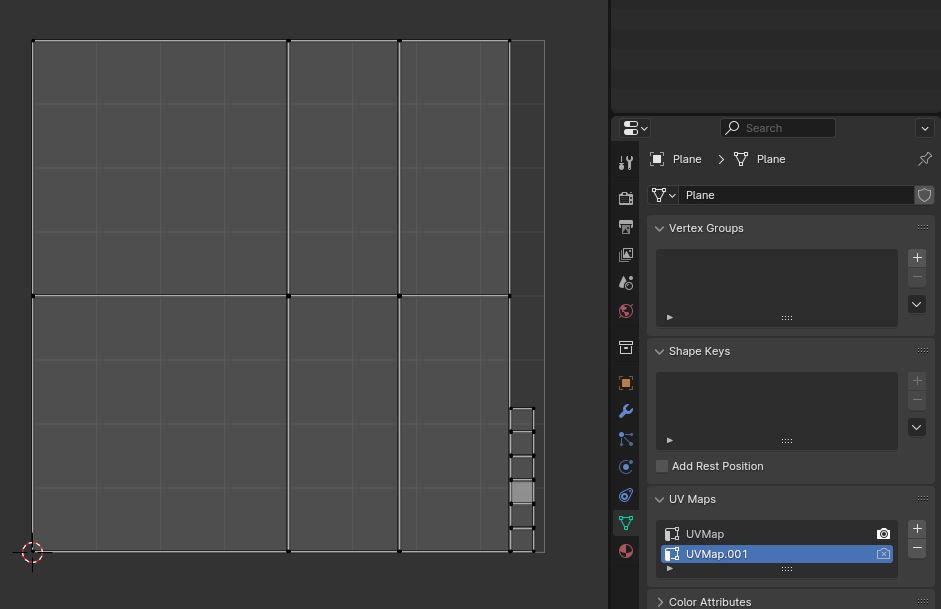
3- If the walls and ceiling share their materials with other objects in the scene you don’t intend to bake, make a copy of the materials. Then, create 32-bit textures to receive the bake and set them up in the materials, with the proper UV map attached to them. The textures should be 32-bit so they can capture the full intensity of light.
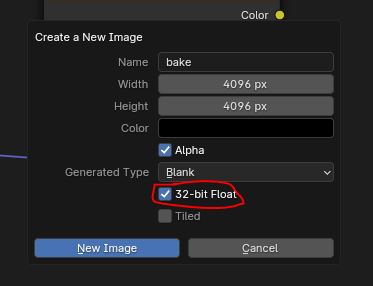

4- Put this setup in every material you will bake, but don’t connect it to the material yet. If you shared a single UV layout for all the baked objects, you can share a single 32-bit texture between the materials. If each object has its separate UV layout, you will need to create multiple 32-bit textures.
5- Set the baking settings to diffuse. Deactivate the “color”, as we are going to bake only the lighting, not the texture.
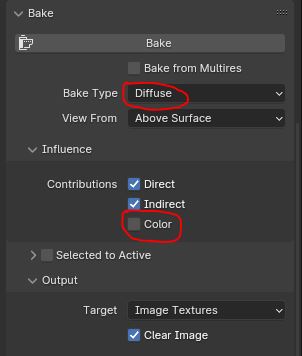
6- Make sure the textures that will receive the bake are selected in the material editor and nothing else. Make sure the proper UV set is selected for each object. This is a one time bake, so you can put the render quality much higher than for the animation.
7- Bake the texture(s), then immediately save them (or pack them in the file), so Blender doesn’t get rid of them.
8- You will notice the diffuse bake doesn’t use the denoiser. You can either make a render of a very high quality that doesn’t need denoising, or you can do it as a separate step, importing the baked file in the compositor to denoise it (or use any software that can do it). if you denoise the image, make sure to always keep the file in 32-bit (and use a format that supports it, like EXR).
9- Now, let’s apply the bake to the material. Here is my material before.
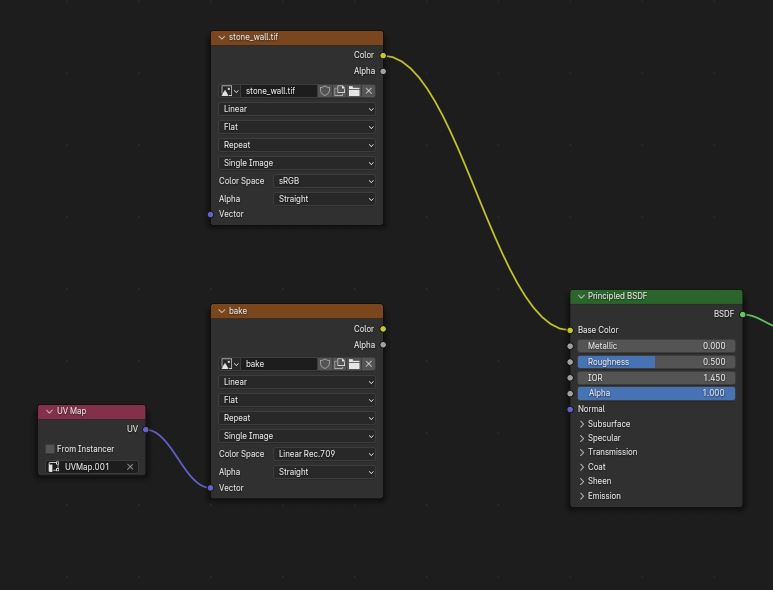
Now, I will disconnect the color texture and replace the color slot with black. I then plug the baked light in the emission. We now have a material where the diffuse component has been fully replaced by a texture, but the specular still works just fine. It renders super fast and clean, but it cannot change during an animation.
10- Use a mixRGB node to multiply the bake with the color texture, so we can have both together.

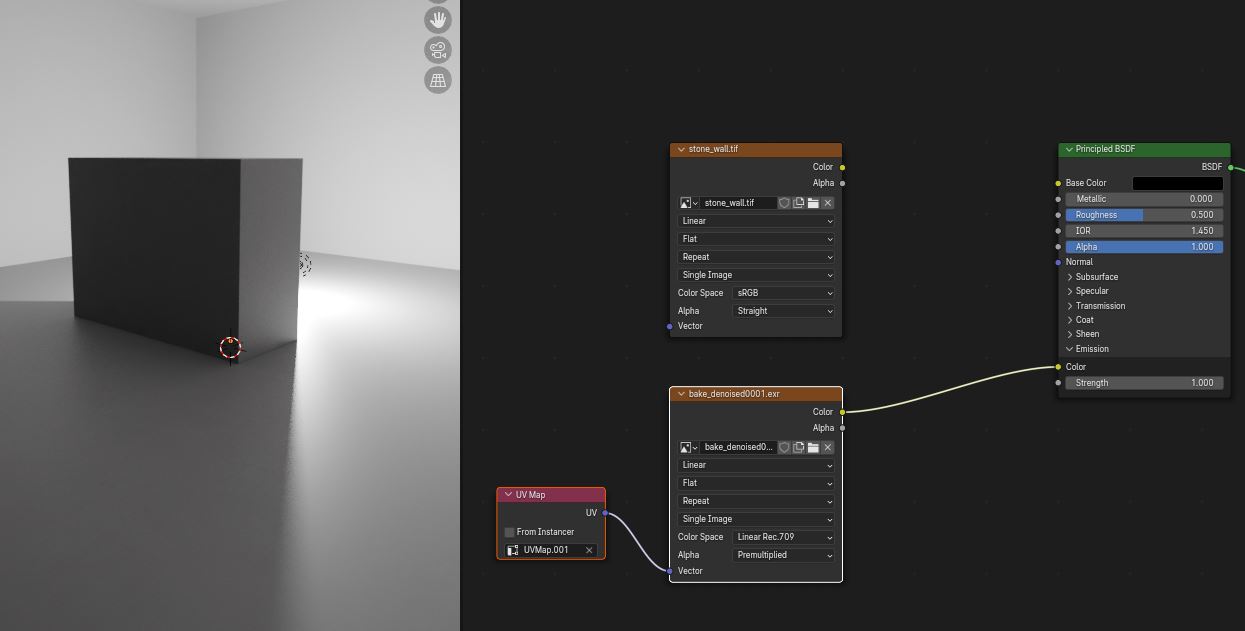
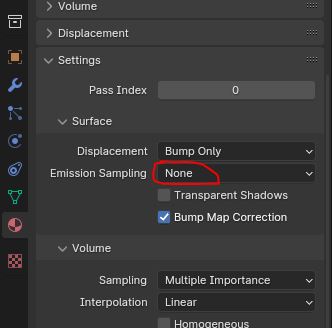
11- In the material, set the emission sampling to none. We don’t want Cycles to treat the walls as lamps, as they are rather an imitation of diffuse shading.
We now have the end result. It renders really fast and clean, but cannot change, receive moving shadows or have detailed bump.
If you need a surface to have moving shadows or bump, there is a slight variation you can do to allow it. It is a bit slower but still helps a lot with overall noise.
Instead of replacing the diffuse part of the material with emissive, you use the light path node so the bake only affects indirect light. The camera won’t directly see the bake, but any ray that indirectly bounces on the baked objects will be guaranteed to be clean.
3 Likes
OMG YOU ARE A LIFE SAVIOR! I will follow these step by step I can’t thank you enough really! it’s for my graduation project actually and it means a lot to me thank you!! ![]()
2 Likes
No problem!
Don’t hesitate to ask if you don’t understand parts of the process, it can be a bit complicated.
1 Like
hi again! I have another question about render I would be more than happy if you can help me out again ![]() so in my another scene the render doesn’t start all I see is black and gray squares what should I do
so in my another scene the render doesn’t start all I see is black and gray squares what should I do
Part of the problem I see is the scale of the piano and the items in the back is off… You expect to see a painting at eye height and the keyboard approximately 2.4 feet (usually recommended when sitting with the elbow at the height of the keyboard when in the ready-to-play position).
So that visually makes the sideboard a bit less than 2’ in height and the center of the painting about 3’. You don’t want to do too much with plants or cupboards back in that corner or it will ruin your focus on the hands, ( although when animated you will get a lot of the focus back)…
Perhaps a fern on a fern stand that goes out of the frame…
1 Like
EDIT: I have seen your other post and have also left an answer there.
-
Is there an error message? It should appear at the top of the render window if there is one.
-
Does the render stop suddenly when the squares appear (like it never even started), or does it freeze and crash your computer? If it’s the latter, it’s probably a performance problem, the scene might be too heavy for your computer to render.
Let’s check if it’s a performance problem.
-
Do you have objects with subdivision modifiers? If yes, how many render levels do they have? This can add up quickly in memory use, so don’t use more levels than needed.
-
What’s the resolution of the textures and how many are there in total? If you are using a bunch of 8k textures everywhere, this could use a lot of memory and crash a render.
-
What’s the resolution of the rendered image? Is it a huge resolution?
1 Like
oh thank you whatever I put the behind of the scene it just looks weird maybe its too dark and I use denoiser with lower sample? don’t know ![]() I will try to change the scale thank you
I will try to change the scale thank you ![]()
1 Like
oh I tried with 10 or 20 but after the render the ground looked so bald so made it 100 the less I can get ![]() and for the render it somehow started rendering but the render time seems more than an hour suddenly
and for the render it somehow started rendering but the render time seems more than an hour suddenly ![]() it was 30 min yesterday and I never changed anything I guess its bc of the ram. Thank you again
it was 30 min yesterday and I never changed anything I guess its bc of the ram. Thank you again ![]()
1 Like
Well, like I said, you could try going into the “hair shape” settings and making the strands thicker, so they cover more ground with fewer strands. The strands being as thin as they are right now, the fineness of the detail will hardly be visible in the render anyway.
If you really do need that sheer grass density though, you could try modelling a mesh that’s a clump of multiple grass blades and rendering the grass as this mesh. You would need fewer children to achieve the same density. I believe there is a good chance the performance would be better, because meshes used as particles are instanced (they are stored in memory only once and get reused for each particle). This would avoid Cycles the need to store millions of individual strands.
1 Like