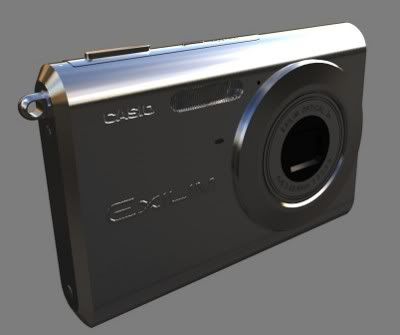
Have a look at the top right. A huge patch is completely white when spec’d.
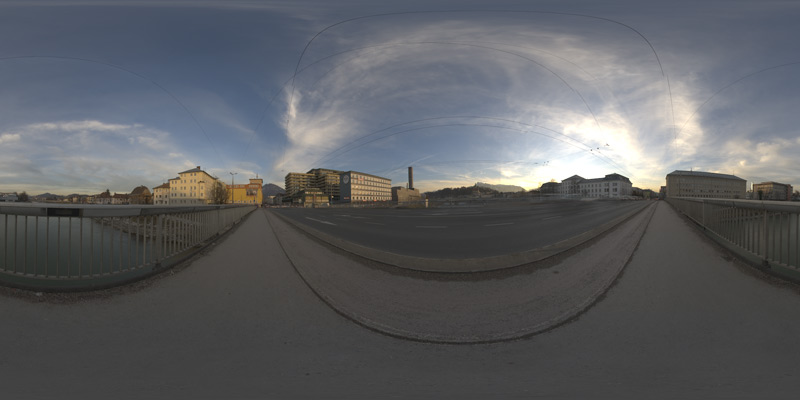
There are no lights in the scene, just a HDRi world panorama for the reflections.
Using Colour, Ray Mirror and Bump maps.
Here is a preview of the HDRi I’m using
The preview in blender looks a lot more contrasted than this though.
Decreasing the Col value in World buttons > Map to works but it makes everything darker, which is not exactly what I’m after. I’ve tried using the RGB curves node to correct the colours but is there anything I can do without post processing?
What’s your Specularity setting in the material? Maybe it could be reduced?
Also, it looks very much like the blown-out sky in the HDRi image is what’s being reflected in the camera – maybe go into an image editor and tone that down some?
Specularity is set to 0. I’m only using Ray mirror reflections.
I can’t and do not want to edit the panorama. It’s in HDR format. It’s not a regular image. The link i posted is just a preview.
I’m pretty sure the white reflection is from the sunset, but like i said, the blender preview of that HDRi has a lot more contrast than the preview in the link. It makes the bright area around the sun a lot bigger and a lot brighter.
Well, you’re never going to get more information than what’s in the HDRi image, and that area looks blown to hell, preview or not. Not an uncommon situation for the kind of scene shown – exposing for shadows areas tends to overexpose the highlights. Even if the exposure there is somewhat less than the preview shows, it’s still over-exposed… the fact that reducing Col value helps somewhat just shows that the contrast range of the original HDRi image is marginal for that usage if you want to have a decent contrast range in your rendering, especially since you’re using only Ray Mirror to establish your model’s lighting – it has only the HDRi to work with.
Not saying that Blender treats the HDRi image with perfection, but in this case you may be expecting too much from an image that’s not ideal to start with.
“Blown to hell” means that bright spot probably has few tones other than pure or very near white, which is what’s being reflected by your model. Keep in mind that even if the HDRi has a massive tonal range, including a lot of steps in the highlights and skylights, the rendering can’t discriminate between those fine tonal steps because it’s distilling things down to an 8-bit format.
Tone mapping sounds like a good idea if it can knock the highlights down to a more renderable range.
HDR images are inherently stored in linear color space. The Jpeg preview files is most probably stored in sRGB color space (Gamma 2.2). This is the most probable explanation as to why the HDR image looks darker in Blender than in the preview Jpeg. If you want to use a HDR image for reflections or lighting, then you must adopt the linear workflow for texturing, lighting and rendering. You mention tone maping, I’d suggest simply gamma correcting your final redner should help greatly.
@organic Tonemapping that image resulted in a very washed out render. I haven’t been able to learn much about HDR but it looks like too much information is being stripped. I’d just like to reduce bright end of the spectrum slightly if that makes any sense.
@chipmasque You’re right, it’s a bad image. Other ones i’ve tried don’t do that. Thanks again.
I wouldn’t go so far as to say the image is “bad,” just not necessarily right for your use, since it seems to have a steep contrast gradient in the sky area around the sun that doesn’t translate well to a reflected image.
ypoissant’s comment about using a “linear workflow” sounds logical as well, since that would likely make better use of the inherent properties of the HDRi image and result in a more satisfactory rendering. There may be more highlight info available that this approach can preserve.
RE: tone mapping, it will more than likely always result in some contrast flattening, since the main purpose is to compress the HDR tonal range to one that can be displayed pleasingly in RGB color space. Keeping it under control looks to be an art unto itself, but the results are often spectacular.
+1 for ypoissant’s comments, (btw read up on linear workflow it’s the way to go)
Although everyone has been using hdr lighting successfully in a gamma 2.2 set up for years. Albeit with workarounds and hacks.
Consider dropping the resolution of your hdr right down in size 25%, 10% even and try it blurred.
Commonly for hdr illumination, the image is a fraction of the size you are using. Such a large image may well increase render time, introduce noise and bright spots unnecessarily. You say the hdr is for reflections and there are no other lights in the scene, but you call it hdri so it’s obvious more for illumination, the reflections on an anisotropic surface like your cameras should be, would not require defined reflections from a large hdr image.
The times you would want use a near full size image would be for accurate defined reflections on highly reflective surfaces not for lighting.
The scale of the image you are using could be contributing to the harshness and extent of the white in comparison to the scale of your model.
Also the lighting to your image is uneven, the front face of the camera is definitely underexposed, perhaps supplement your hdr with another light source towards the front reducing the brightness of the hdr for the overall indirect sky lighting of the scene or consider rotating your model until the hdr bright spot is landing on your model to give it a more even exposure. Perhaps consider an alternative hdr.
And is the camera floating in mid air, if so place a plane under it to bounce some light back into the scene, rarely do objects exist without an environment to gain bounced light from.
I’m still ignorant as to whether blender can do hdri and if so what settings I never bother with BI and use Yafaray instead which I know can do and that gives far more pleasing results.
Thanks yellow
Well this is my first attempt at photorealism so with that in mind:
I glanced at it. I’m assuming it’s also relevant to HDR world backgrounds/env maps, but I’m still not sure how I’m supposed to correct the gamma or contrast of a material before it’s sent down the pipeline.
You’re right. I hadn’t realised those images provide illummination until i deleted the lamp I have setup by default. Also as far as I know HDRi just means “HDR image”. Correct me if I’m wrong
The back of that camera has a display covered by smooth glass/plastic. Actualy the smaller version of that HDRi is the one I’m using partly because it DOESN’T freeze blender.
That just seems very odd to me.
I chose that particular image for it’s features (blue sky, sunset, horizon, bright coloured ground) which IMO work well for this kind of metal material. If only the contrast were slightly lower, it would be perfect. There’d be no over- or underexposure. Placing a lamp in front of the camera brightens it up, but the white patch on top remains unchanged.
I plan to place it on a glass table, but it’s a low priority at the moment.
Yeah… It’s probably me or my computer, but I’ve had a lot of unpleasant experiences with yafaray.
Generaly speaking: On further inspection I’ve found that a lot of HDRi panoramas from that site look over- or underexposed when viewed in blenders preview(and therefore mess up the render). I’d just like to be able to create a setup where I can load a background and render without having to place lamps in my scene or fix curves in post. It just seems a little cheap to me.
Like I mentioned, HDR images are stored in linear color space. This makes them look overexposed when viewed in an image viewer that don’t do gamma correction on them. This is not a problem with the images nor with the viewer. If you want to use HDR images, you have to understand the difference between linear color space and sRGB color space. Otherwise, you will always be confused with your results and how to solve it.
I mentioned the “Linear Workflow” as a solution. That is a quite complex topic and can be quite confiusing in itself. But nowadays, it is well documented on the web as well as on Blenderartists forum. If you are using Blender 2.5, then you just need to turn “Color Management” ON and you will be working in Linear Workflow without having to integrate all the knowledge associate with it.
If you are using Blender 2.49 and don’t have time to figure the Linear Workflow thing, then your best bet may be to simply use the jpeg image instead of the HDR image. This way, you will not have those hotspots and your environment will be better balanced for your non-linear workflow.
Simply gamma correcting the final render is not linear workflow and will not get you satisfactory results. As the name implies. it is the whole workflow that is involved. Not just the final step.
I tried blender 2.5a and the colour management tickbox didn’t do squat.
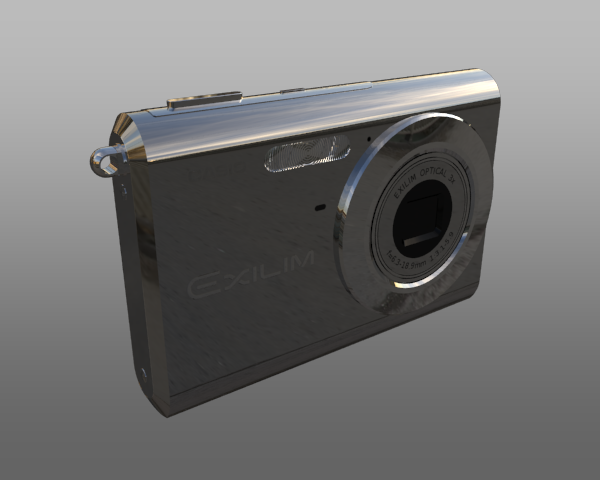
So I gave yafaray a try…again, and after tweaking the world background power and gamma i got the following results. It looks acceptable to me, i just need to fix the materials now.