I am posting this paper about “Reverse Catmull-Clark Subdivision” here.
My question is - is it possible to create a script based on the formulas in it?
PDF link:
http://wscg.zcu.cz/wscg2006/Papers_2006/Full/B89-full.pdf
1 Like
looking at this and it could replace the decimator
to get a lower poly count and get a nice mesh afterward
that alone would be a great application and very userfull
hopefully someone can code this in python as a script or in C
but it’s math intensive and probably not easy to do
Happy blendering
Zbrush has been able to do this for a long time. It would REALLY be awesome if Blender had this feature, to be able to rebuild a multires model level by level from a high poly model.
As mentioned in the paper, the only drawback is that this will work only on meshes previously build by Catmull-Clark subdivision. But with some approximations such tool could be a super fast retopolgy aid for modelers.
TorQ, I didn’t know that Zbrush has such feature. Can you point at some links - videos or tutorials? It will be interesting to see it in action.
It will be great to hear more programmers opinion on this topic 
Edit: I searched about this Zbrush feature and found this:
http://www.pixologic.com/docs/index.php/Tool:Geometry_Subpalette
The tool is called Reconstruct Subdiv and requires UVs?!
Edit2: And a video demonstration here:
https://www.digitaltutors.com/store/video_popup.php?vid=1718
It reqires registration, but that is what we are talking about
A short demo showing reconstructing subdivisions in ZBrush. You don’t need UVs to do this.
http://www.blenderwho.com/videos/zbrush_reconstruct.mov
Richard
I can understand the math, but to construct an algorithm based off of this, you would have to know which points were vertex points, and other than storing that information before subdividing, I’m not sure if there’s a way to do that.
I’m not an expert on the subject though, so would someone like to point out something that I’m not seeing?
Actually isn’t true,Zbrush needs uv for reconstructing subdivision levels.
I don’t think it uses uv for the computation,but without having texture coordinates flag enabled,Zbrush can’t reconstruct subdvision levels.
Btw,That feature is great,I use it everytime to move my mesh from blender to zbrush.
Well the model I reconstructed didn’t have any UVs so they are certainly not required for the latest 3.12 version of ZBrush.
Richard
WITHOUT the ENABLEUV flag it doesn’t work,this is the fact.
Well the Mac version 3.12 has had changes to uv and texture management to the windows version 3.1 so may handle reconstructing different for you.
Richard
I can’t speak for the mac version,but the windows version works in that way,I use that function almost every day.since 1.5 years
If mac 3.12 doesn’t need the flag,it’s a good thing,if I remenber well version 2(or even 3)didn’t need that flag,after the behaviour changed.
Had time to play around with this, so I decided to copy from the paper with the toroid:

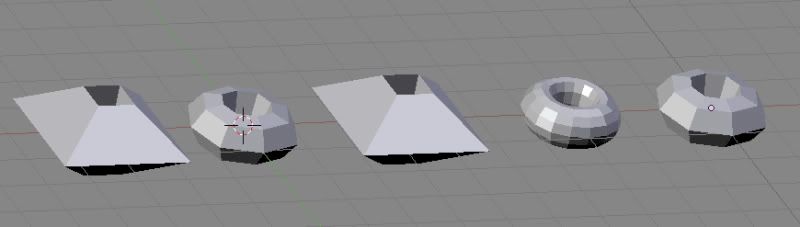
http://gamulabs.freepgs.com/blends/scripts/ccu/ccUndo032709.jpg
In the picture, from left to right:
1.) Original Mesh
2.) Blender generated subdiv level 1
3.) Script generated subdiv level 0 (from subdiv level 1)
4.) Blender generated subdiv level 2
5.) Script generated subdiv level 1 (from subdiv level 2)
@Zoel: I ran into that exact problem concerning how to decide which vertexes should wind up on the reduced cage. I left it to the user to select a single vertex to be on the cage and the script calculates the rest. Ideally, one could create a vertex group with the original cage in it, and as you subdivide preserve that cage. You could then just select one vertex on the lower subdivision level (known to you by the vertex group), and the script would work off that. I’ll try to implement that later, since a new mesh is created now without regards to preserving vertex groups and you may wish to go up several levels from one mesh and preserve multiple mesh states.
So far I’ve just implemented the basic n=4 case from the paper, but n = 3 and the boundary case shouldn’t be too bad…
On a side note, doesn’t the multires modifier (doesn’t appear to be in Blender 2.48) essentially implement this?
Well, that’s a great result!
I didn’t expect to come so quick.
I was thinking the same thing - about user deciding which vertex belongs to the original mesh. Very often it’s easy to tell where the original vertices go while subdividing, but this could be guessed on a trial and error basis too.
Good luck with more complex mesh! Suzane for example!
On a side note, doesn’t the multires modifier (doesn’t appear to be in Blender 2.48) essentially implement this?
I did some experimenting with multires meshes:
take three identical meshes -
a) one for control mesh
b) one with applied subdivision level 1
c) one moderately deformed mesh with multires of level 2 (coressponds to level 1 of subdivision)
Try to use Shrinkwrap modifier on the multires (level 2) object using the subdivided model as target object.
After perfect matching of the vertices apply the modifier and go to the base level of multiresolution.
The control mesh and the modified multires mesh don’t match.
@forTe: Wow! :eek:
That paper looked way confusing, though my maths is somewhat lacking. The paper says that the method only works for meshes that have already been subdivided so I don’t see it replacing the decimate modifier, but if someone accidentally applies subsurf or multires to a mesh then loses their original then I’m sure they would be very glad of this script if they wanted to reconstruct their base mesh. There are probably other uses for this like retrieving the base mesh from a download etc. but just for this failsafe, the feature would be very handy.
Interesting work, nice one.
forTe,
Any news on the script?
For apricot I did a script that does something like this…
Though for unsubsurf youd want to compensate the vertex locations for applying subsurf again.
This script could be used as a basis for that, just move the verts about after supports UVs but not vcols,
I wrote it so artists could sculpt highly subdivided terrain, then select areas to ‘unsubdivide’

#!BPY
"""
Name: 'Poly Reduce Selection (Unsubsurf)'
Blender: 245
Group: 'Mesh'
Tooltip: 'pradictable mesh simplifaction maintaining face loops'
"""

from Blender import Scene, Mesh, Window, sys
import BPyMessages
import bpy

def my_mesh_util(me):
  me_verts = me.verts

  vert_faces = [ [] for v in me_verts]
  vert_faces_corner = [ [] for v in me_verts]


  # Ignore topology where there are not 2 faces connected to an edge.
  edge_count = {}
  for f in me.faces:
    for edkey in f.edge_keys:
      try:
        edge_count[edkey] += 1
      except:
        edge_count[edkey]  = 1

  for edkey, count in edge_count.iteritems():

    # Ignore verts that connect to edges with more then 2 faces.
    if count != 2:
      vert_faces[edkey[0]] = None
      vert_faces[edkey[1]] = None
  # Done


  def faces_set_verts(face_ls):
    unique_verts = set()
    for f in face_ls:
      for v in f:
        unique_verts.add(v.index)
    return unique_verts

  for f in me.faces:
    for corner, v in enumerate(f):
      i = v.index
      if vert_faces[i] != None:
        vert_faces[i].append(f)
        vert_faces_corner[i].append( corner )

  grid_data_ls = []

  for vi, face_ls in enumerate(vert_faces):
    if face_ls != None:
      if len(face_ls) == 4:
        if face_ls[0].sel and face_ls[1].sel and face_ls[2].sel and face_ls[3].sel:
          # Support triangles also
          unique_vert_count = len(faces_set_verts(face_ls))
          quads = 0
          for f in face_ls:
            if len(f) ==4:
              quads += 1
          if unique_vert_count==5+quads: # yay we have a grid
            grid_data_ls.append( (vi, face_ls) )

      elif len(face_ls) == 3:
        if face_ls[0].sel and face_ls[1].sel and face_ls[2].sel:
          unique_vert_count = len(faces_set_verts(face_ls))
          if unique_vert_count==4: # yay we have 3 triangles to make into a bigger triangle
            grid_data_ls.append( (vi, face_ls) )


  # Now sort out which grid faces to use


  # This list will be used for items we can convert, vertex is key, faces are values
  grid_data_dict = {}

  if not grid_data_ls:
    print "doing nothing"
    return

  # quick lookup for the opposing corner of a qiad
  quad_diag_mapping = 2,3,0,1

  verts_used = [0] * len(me_verts) # 0 == untouched, 1==should touch, 2==touched
  verts_used[grid_data_ls[0][0]] = 1 # start touching 1!

  # From the corner vert, get the 2 edges that are not the corner or its opposing vert, this edge will make a new face
  quad_edge_mapping = (1,3), (2,0), (1,3), (0,2) # hi-low, low-hi order is intended
  tri_edge_mapping = (1,2), (0,2), (0,1)

  done_somthing = True
  while done_somthing:
    done_somthing = False
    grid_data_ls_index = -1

    for vi, face_ls in grid_data_ls:
      grid_data_ls_index += 1
      if len(face_ls) == 3:
        grid_data_dict[vi] = face_ls
        grid_data_ls.pop( grid_data_ls_index )
        break
      elif len(face_ls) == 4:
        # print vi
        if verts_used[vi] == 1:
          verts_used[vi] = 2 # dont look at this again.
          done_somthing = True

          grid_data_dict[vi] = face_ls

          # Tag all faces verts as used

          for i, f in enumerate(face_ls):
            # i == face index on vert, needed to recall which corner were on.
            v_corner = vert_faces_corner[vi][i]
            fv =f.v

            if len(f) == 4:
              v_other = quad_diag_mapping[v_corner]
              # get the 2 other corners
              corner1, corner2 = quad_edge_mapping[v_corner]
              if verts_used[fv[v_other].index] == 0:
                verts_used[fv[v_other].index] = 1 # TAG for touching!
            else:
              corner1, corner2 = tri_edge_mapping[v_corner]

            verts_used[fv[corner1].index] = 2 # Dont use these, they are
            verts_used[fv[corner2].index] = 2


          # remove this since we have used it.
          grid_data_ls.pop( grid_data_ls_index )

          break

    if done_somthing == False:
      # See if there are any that have not even been tagged, (probably on a different island), then tag them.

      for vi, face_ls in grid_data_ls:
        if verts_used[vi] == 0:
          verts_used[vi] = 1
          done_somthing = True
          break


  # Now we have all the areas we will fill, calculate corner triangles we need to fill in.
  new_faces = []
  quad_del_vt_map = (1,2,3), (0,2,3), (0,1,3), (0,1,2)
  for vi, face_ls in grid_data_dict.iteritems():
    for i, f in enumerate(face_ls):
      if len(f) == 4:
        # i == face index on vert, needed to recall which corner were on.
        v_corner = vert_faces_corner[vi][i]
        v_other = quad_diag_mapping[v_corner]
        fv =f.v
        if 1: # THIS IS LAzY - some of these faces will be removed after adding.
          new_faces.append( (fv[quad_del_vt_map[v_corner][0]], fv[quad_del_vt_map[v_corner][1]], fv[quad_del_vt_map[v_corner][2]]) )

  del grid_data_ls


  # me.sel = 0
  def faceCombine4(vi, face_ls):
    edges = []

    for i, f in enumerate(face_ls):
      fv = f.v
      v_corner = vert_faces_corner[vi][i]
      if len(f)==4:  ed = quad_edge_mapping[v_corner]
      else:      ed = tri_edge_mapping[v_corner]

      edges.append( [fv[ed[0]].index, fv[ed[1]].index] )

    # get the face from the edges
    face = edges.pop()
    while len(face) != 4:
      # print len(edges), edges, face
      for ed_idx, ed in enumerate(edges):
        if face[-1] == ed[0] and (ed[1] != face[0]):
          face.append(ed[1])
        elif face[-1] == ed[1] and (ed[0] != face[0]):
          face.append(ed[0])
        else:
          continue

        edges.pop(ed_idx) # we used the edge alredy
        break

    return face

  for vi, face_ls in grid_data_dict.iteritems():
    if len(face_ls) == 4:
      new_faces.append( faceCombine4(vi, face_ls) )
      #pass
    if len(face_ls) == 3: # 3 triangles
      face = list(faces_set_verts(face_ls))
      face.remove(vi)
      new_faces.append( face )


  # Now remove verts surounded by 3 triangles


  # print new_edges
  # me.faces.extend(new_faces, ignoreDups=True)

  '''
  faces_remove = []
  for vi, face_ls in grid_data_dict.iteritems():
    faces_remove.extend(face_ls)
  '''

  orig_facelen = len(me.faces)

  orig_faces = list(me.faces)
  me.faces.extend(new_faces, ignoreDups=True)
  new_faces = list(me.faces)[len(orig_faces):]

  if me.faceUV:
    uvnames = me.getUVLayerNames()
    act_uvlay = me.activeUVLayer

    vert_faces_uvs =  []
    vert_faces_images =  []


    act_uvlay = me.activeUVLayer

    for uvlay in uvnames:
      me.activeUVLayer = uvlay
      vert_faces_uvs[:] = [None] * len(me.verts)
      vert_faces_images[:] = vert_faces_uvs[:]

      for i,f in enumerate(orig_faces):
        img = f.image
        fv = f.v
        uv = f.uv
        mat = f.mat
        for i,v in enumerate(fv):
          vi = v.index
          vert_faces_uvs[vi] = uv[i] # no nice averaging
          vert_faces_images[vi] = img


      # Now copy UVs across
      for f in new_faces:
        fi = [v.index for v in f.v]
        f.image = vert_faces_images[fi[0]]
        uv = f.uv
        for i,vi in enumerate(fi):
          uv[i][:] = vert_faces_uvs[vi]

    if len(me.materials) > 1:
      vert_faces_mats = [None] * len(me.verts)
      for i,f in enumerate(orig_faces):
        mat = f.mat
        for i,v in enumerate(f.v):
          vi = v.index
          vert_faces_mats[vi] = mat

      # Now copy UVs across
      for f in new_faces:
        print vert_faces_mats[f.v[0].index]
        f.mat = vert_faces_mats[f.v[0].index]


  me.verts.delete(grid_data_dict.keys())

  # me.faces.delete(1, faces_remove)

  if me.faceUV:
    me.activeUVLayer = act_uvlay

  me.calcNormals()

def main():

  # Gets the current scene, there can be many scenes in 1 blend file.
  sce = bpy.data.scenes.active

  # Get the active object, there can only ever be 1
  # and the active object is always the editmode object.
  ob_act = sce.objects.active

  if not ob_act or ob_act.type != 'Mesh':
    BPyMessages.Error_NoMeshActive()
    return

  is_editmode = Window.EditMode()
  if is_editmode: Window.EditMode(0)

  Window.WaitCursor(1)
  me = ob_act.getData(mesh=1) # old NMesh api is default
  t = sys.time()

  # Run the mesh editing function
  my_mesh_util(me)

  # Restore editmode if it was enabled
  if is_editmode: Window.EditMode(1)

  # Timing the script is a good way to be aware on any speed hits when scripting
  print 'My Script finished in %.2f seconds' % (sys.time()-t)
  Window.WaitCursor(0)


# This lets you can import the script without running it
if __name__ == '__main__':
  main()
There is already a solution for that using a script made by Brecht and a (little unknown) feature from Shrinkwrap modifier: “SS Levels” when using the option “Projection”.
Using that feature together with Brecht’s script the vertexes of the low-res (cage) model get the appropriate position to be subdivided, fitting perfectly the high-res model shape.
I made a little tutorial (list of steps) for a quick and dirty auto-remesh using Blender’s actual tools. The resulting topology is not the cleanest, but it shows how a new base cage can be obtained, ready to be subdivided and fit the high-res. Which would be useful too if a new topology is made by hand.
Here is the thread with the tutorial: http://blenderartists.org/forum/showthread.php?t=150854&highlight=remesh
(A decimation tool that outputs only quads would be a blessing for this technique)
Here is the thread where the shrinkwrap technique was discussed (a bit old and lost its images): http://blenderartists.org/forum/showthread.php?t=132054
And here is an image explaining an approach using multires (when the “SS Levels” feature wasn’t there yet to automate things a lot):
http://img5.imageshack.us/img5/5937/conceptexplained.png
I like this new attempt to do an unSubSurf script. The results may be compared to those of the Shrinkwrap + Brecht’s script, and who knows, maybe it has a better positioning of the vertexes in the base mesh.
Also the possibility to come back from a subsurfed mesh looks interesting.
Ideasman, I have your script and it is in my toplist of the greatest!
But as you said it is useful in a specific situation, when preserving the topology of the mesh is not so important.
The idea of this topic was restoring of subdivided mesh to a lower level with preserving the edgeflow. Or simlifying a mesh while still keeping it’s features at lower polygon count (if subdivided again it will have the same volume and shape of the original).
I greatly respect your work and I hope you’ll give it a try too.
Campbell’s script together with the script made by Brecht that I mentioned, do exactly that (Brecht’s script is included in that tutorial’s thread).
Eclectiel, the tutorial is very clean. And the idea behind it is great.
It is true that the retopologized mesh never fits the volume of the sculpted mesh! The modeler just might not be satisfied with the result and will adjust the volumes by hand - with such a tool that will be a time saver.
I would like to test it by myself but I can’t manage to make the script (ssfit.py) to work. There is no even an error message. What could be the reason?