Rigged human mesh surface shows cracks when moving body parts

Hi there.

Ok, finally I succeeded in creating Rigify human armature and especially parenting it with mesh, before this my attemps with parenting only caused Blender (2.79b) error with bone heating. Now everything “should” be ok, including scaling and rotation of mesh. I didn’t do any manual weight painting, etc since this is all new to me and learning curve is not too easy for total 3d-noobie.

Anyways, I parented armature and mesh with automatic weights and that worked. However, when trying to move or rotate any parts in pose mode, even a bit bigger move causes cracks with the mesh surface every here and there, usually near active body part.

My mesh has almost 400,000 faces (it’s by Paul Chen and freely downloadable) and since my purpose is just to create technical style single pose images in different positions it should be no problem to use this high-poly mesh. Not sure whether the same level of detail of muscles, etc could be achieved other way but I’m fine with this.

As said I have applied rotation, scaling as well as location properly (IMO) with mesh and then created rig from metarig, which I parented with mesh and that’s fine. But when moving body parts, following happens:

As you can see, weird shifting and distortions in surface happens and I’m not sure what to do to fix this. Does this happen because of high-poly mesh or bad weights, wrong/too many/too less vertice groups or some other reason which could be easily fixed ?

Any help would be appreciated.

I have uploaded my blend file (.rar 13MB) to address below if someone could take a look at it and tell me what’s wrong (or even better, fix if for me for small fee?). Blend file has metarig there but one needs to generate the rig and join it with mesh.

https://www.kujakatti.fi/blend.rar

I tried to find an answer for this but didn’t succeed with my poor knowledge.

OK. Here is what I would do. Your mesh is way, way too heavy to use for automatic weights. So If I wanted to do this one, I would first save my model and then duplicate it in case you want to use it for mapping UV’s back to a lower poly model. Get rid of that wireframe modifier. On your mesh, use the decimate modifier using Unsubdivide two or three times. Apply the modifier to get a lower poly model. I used 3 and it works fine. Next generate your rigify rig. Move your metarig to another layer to save it. Parent your mesh to your generated rig amature with automatic weights. You should also adjust your weights but even if you don’t want to you should be good to go. Next add a subsurf modifier and change your view and render to two or three whatever you used to decimate. This will put you back close to what you started with on a lower poly model. Now you can move your guy around and it will virtually look the same. If not, you can always map the high poly character to the low poly UV’s.

Okay. Uv mapping/unwrapping is still unfamiliar to me although I already got a clue after watching tutorial videos. But, otherwise than that I followed your instructions as following:

  1. Decimated my mesh with unsubdivide by two and applied that (faces now 48.000 instead of 400.000)
  2. Generated rig (didn’t however move metarig to another layer, just hid it from view)
  3. Parented mesh to rig with automatic weights
  4. Added subsurf modifier with level two for rendering
    (5. Would map high poly char to the low poly UV’s when I study how to do that)

I’m still having same issues when moving or rotating body parts. I just created a “superb” demonstration video of what happens. As you can see from it, moving for example lower leg creates a nice crack in upper calf as well as huge crack in lower stomach and inner thigh area. After that I move arm and there you can see the same clear border where cracking starts in main body. Shifting arm also creates cracks in bicep muscle and lower arm areas.

Is this all just because automatic weights without adjusting (which I still doubt) ?

Video here:
Moving Parts

Did you check preserve volume on armature modifier? Blend with your work done so I can see what you have? And are you using 2.79B version? Try it again using 3 instead of 2.

Here’s my blend with decimate 2, I just checked preserve volume on armature modifier but no change. If I apply the armature modifier, mesh doesn’t react in pose mode anymore, is this normal ?

https://www.kujakatti.fi/modified.blend

And yes, I’m using version 2.79B. If you solve this I’ll figure out something to refund time you’ve spent with my noobie problem. And that’s a promise!

You are going to have to weight paint your models. It’s not that hard. Here is Dan’s tutorial which is a goto reference for rigigy weight painting. Automatic weights is a guess and never have I had a model work correctly without weight painting.
Here are some examples.


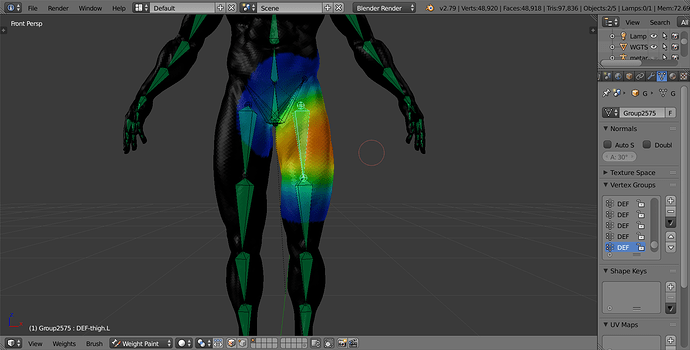
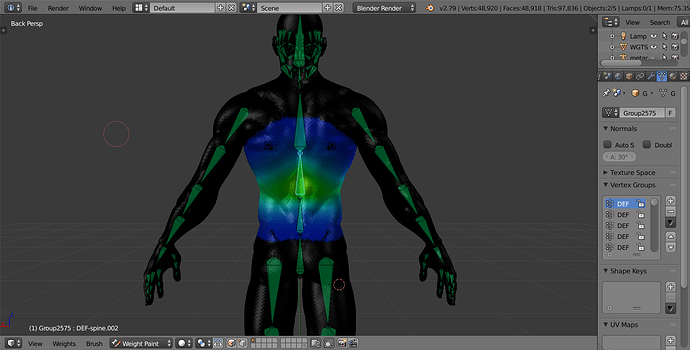
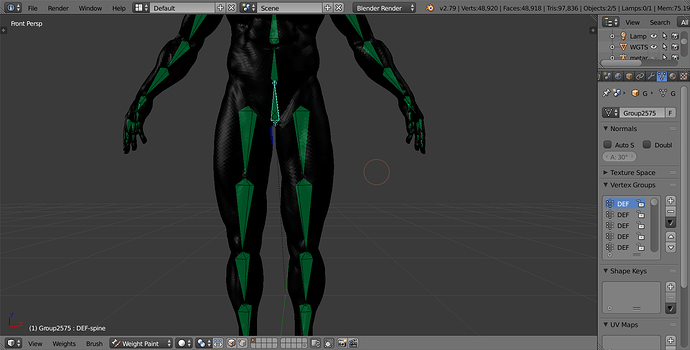
You have your left side thigh influence your right side and all the way up to your sternum which is why you movement there.

You have a lower cavity bone influencing bones way past where they need to be.

You have a bottom hip bone with no influence whatever on your front.

Go Here and weight paint. It’s not that hard. Plus you will be able to do it for any model and get it right.

It wouldn’t hurt to go through the entire series. Maybe someone has time to weight paint it for you. I don’t. But if you follow Dan’s tutorial you will have it done in a day or so and you will be able to do any weight painting on any rig and model.

Ok, will do that. Thanks once again for super informative reply. I know it’s gonna take more than a day for me to learn this stuff but at the same time I’m sure it’s worth every penny!

1 Like

Went thru weight painting tutorial and did all those things. Now I’m a lot smarter with that vertices groups, layering, rig layers, IK/FK, armature moving and weight painting. Overall very good lesson and improved my weights a lot. However it did not remove the problem with intersecting areas (learnt that just today) with crack effects in surface. BUT, inspired by your suggestion to go through the entire series I checked other Dan’s tutorial names and found one with name “Better deformations with the Corrective Smooth Modifier”. Got interested and watched it too and…
Corrective Smooth Modifier was EXACTLY what was needed besides of weight painting to fix the cracks and now my mesh is perfect for my purposes.

So, once again thanks a LOT!! Hope this topic helps some other noob too with same kind of problems :slight_smile: