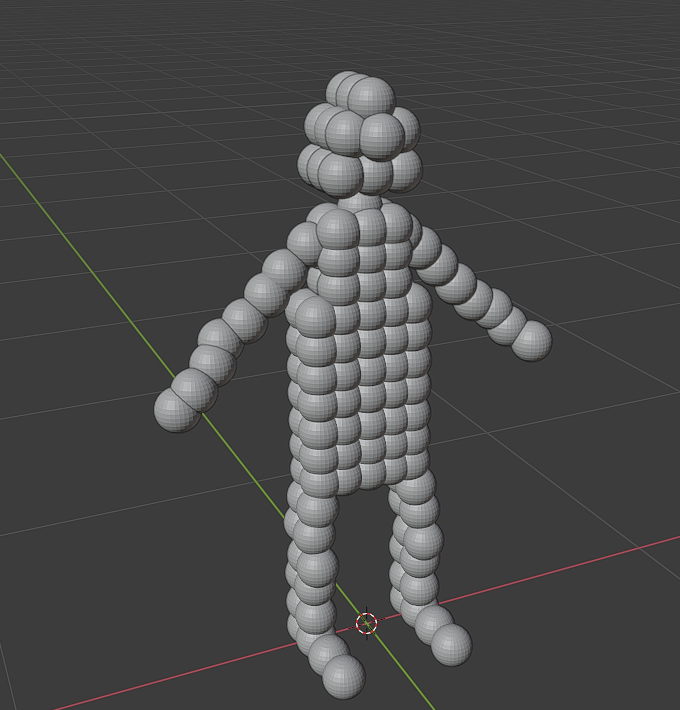
So I want a human form from little spheres and animate it like a normal character. I have watched some tutorials about rigging but they were doing this on one object which is not the case for me. I have around 150 little spheres which are independent of each other so that I can control them freely (change their sizes, colors, etc.) on Unity. So joining all these spheres to make one object and animating that is not a solution for me. What could be the way to make this human form animate like normal but in the meantime have control over the spheres? I have no idea where I should start. If you could show me the way how I can learn and make research about this topic I would appreciate it a lot!
Create the armature as usual, but instead of using skinning just parent the individual spheres to the corresponding bones. You will need to use additional “constraints” to control the influenced movements of the spheres around joints or bending areas. However, you will need to repeat the influencing in Unity given constraints and other fancy tools can’t be exported to Unity.
It is probably a good idea to just do the steps above in Unity directly instead of doing it in Blender.
There can be other methods, but I think this would give you a good start. Also, you want to be able to export this so probably some of those fancy methods won’t be applicable.
Thanks a lot for the response kkar!
Well, I have connected my bones with the corresponding spheres and it looked like this: https://streamable.com/eio56i
It’s not too bad but far from what I was hoping for and it seems that it would be very hard to get rid of the deformations around joints. For more clarification, https://www.youtube.com/watch?v=kATnEmZaatg this kind of character is what I am trying to get (1.55-2.00 for the animation part, it doesn’t seem too “unnatural”) and it seems the hard part is that I want to have control over all individual spheres. However, I have tried to import this model to the unity and this was the result:
Skelet had 100 default scale while the parent have 1 although they are all 1 in blender. Thanks again for help!
Like I mentioned you will need to add constraints (look it up) to create multi influenced spheres around the joints and the bendy areas.
You can also use physics constraints but none of this will be transferrable to Unity, that is why I recommended that your solution should be done mainly in Unity. You can still use Blender to construct the initial skeleton.
As far as your first try goes, I recommended that you just parent the individual spheres to the corresponding armature bones. You used skinning which won’t get you anywhere. It is possible to work with skinning with your spheres, but that will create a much more complicated setup.
Maybe if you merge all these spheres, there is still a way to control their properties independently from Unity. Maybe with vertex groups ? can they be read from fbx in Unity ?
If not an option, you can just make a regular rig and then instead of doing the whole skinning/weighting scenarion, you just parent each sphere to the nearest bone.
edit Didn’t see there were replies already, sorry. They didn’t load up I guess
So yeah nothing to add just use parenting you should be fine I suspect that’s supported in fbx exports (not an expert in that tbh)