Rigging Double-jointed Limbs

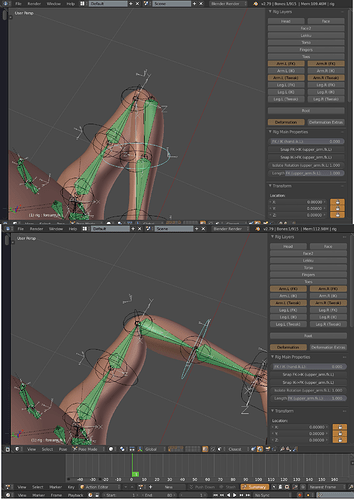
I want to use double-jointed limbs for a character with thick limbs. Instead of the elbow being a joint between the upper_arm and forearm, I want the elbow to be a short, third bone between the upper_arm and forearm. The rotation should interpolate between the other two bones. Are there any good methods to do this?

I have tried using a control forearm that sets the rotation of the elbow and real forearm. The result is a 2-bone control arm for a 3-bone deformation arm. And, due to the nature of the geometry, the end of the control forearm is different from the end of the real forearm. For FK, I can position the bone shape of the control bone at the real forearm, so the arm will point where I expect it to. However, applying IK to the control forearm has the control forearm touching the IK target. The real forearm does not touch the IK target. This behavior is very expected, and I do not see a way around it. This is unacceptable for animating.

A 3-bone IK chain does not guarantee that the elbow bone will be a 50-50 interpolation, as far as I know. So, I have not used it. Using complex drivers so that the 3-bone chain will point to the same location as the 2-bone control chain (which would be moved with either IK or FK) may be possible.

I was wondering if anyone else has already found a solution to this problem. Thank you.

I’ve experimented quite a bit, trying to design a three bone solution for thick/bulky arms legs. (More hours and days then I’d like to admit.) So far it has been an exercise in frustration. Dependency issues and all kinds of other problems seemed to beat me at every turn.

Do you need to have three bones or are you open to other options? I can give you a few tips if you are willing to go another route.

I am assuming that you are trying to fix the scissoring and mesh intersection problem that happens with thicker limbs when only using two bones.

DanPro

It is a great honor for you to reply to my question. Your tutorials are very good.

I am open to other options. The YouTube channel below has a picture of the arm that I am working with.

The appearance of a double elbow on that arm was merely a style decision that I enforced with shape keys. It only has a single elbow joint, and I used shape keys to squash the mesh as much as possible. That is the furthest that I could bend the arm without excessive squashing. Moreover, it looks… stumpy because so much of the arm length is used in the bend. A double elbow allowed me to preserve more of the length. Any other suggestions to solve these issues are welcome. Thank you.

EDIT: Here is a similar arm using the double-elbow. The style is a bit different, but the contact region is the same, apart from the modified joint. The squashing deforms the mesh less severely and makes extreme poses possible. I should add that I also tried moving the joint closer to the inside of the arm, but that stretched the outer part of the elbow excessively.


Thanks for the compliment, but I am just a regular guy who hates bad deformations. No need to feel honored, but that was a nice thing to say.

OK. Here are a few things that have helped me with the deformations on thicker limbed characters.

One thing I have tried and had success with in the past is to use an action constraints to separate the deformation bones. This is probably the easiest way to fix the scissoring problem if you are creating a rig from scratch.

In the screenshot, I have the forearm deformation bones rotating away from the upper arm to fix the scissoring. If I remember correctly, the rotation starts when the forearm control goes past 90 degree. Please keep in mind that I have not used any corrective shapes or helper bones in this image. With a bit more effort, the deformations are very good at extreme rotations.

This was done by modifying the original Rigify rig. I won’t go into all the details on how to replicate it because there is a better solution already available in Rigify.


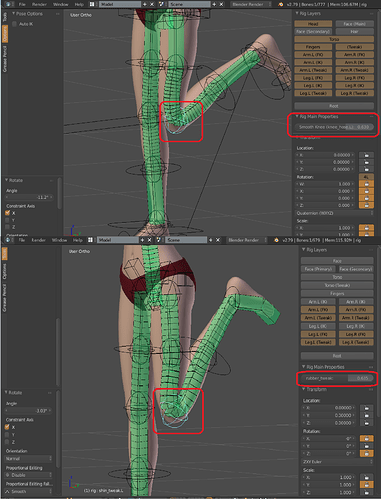
A solution that is available within Rigify is to use the Smooth Knee/Elbow parameter on the original rig, or the Rubber parameters on the pitchipoy version. (Select the tweak bones.)

I overlooked this for quite some time thinking it would only be useful if I wanted a character with bendy limbs. Now that I know better, I use this all the time to get some separation between the joints. Pick a good value that fixes the intersections on your character. You can animate the value, but I prefer to just set and forget it once I find the value that works best for my mesh. Then, add corrective shapes or use helper bones to fine tune the deformation. (Or use both.)

Here is what that looks like with Eve from my Rigify Tutorial series. (Without helper bones or corrective shapes.) Top image is the original rig, bottom is pitchipoy.


And finally, you have inspired me to take another shot at a three bone rig.

Arm rig.DanPro.blend (443 KB)

In the file I have two armatures that could help get you going in the right direction. I have not skinned a mesh to these so I am not sure either solution will be what you want. Hopefully, you can fine tune them to get the results you are looking for.

The first armature has an upper arm that is split into two deformation bones. The controls are a standard two bone setup. The central bone is set to copy the upper arm bone by 50%. Next the third bone has a damped track to point at the hand and a Stretch To to keep it from separating from the hand.

I am not sure I like this solution at all. I think the stretching will be very apparent.

The second armature is a bit more complex. The controls are again only two bones. The central deformation bone will always rotate from the central point and rotate 50% of whatever FK.002 does.

The controls are on layer one, def bones on layer two, and mechanism bones on the third layer. Hopefully it should be easy to reverse engineer.

I like the second solution a bit better because there is no stretching or separation of end points on the deformation bones. Again, I have not tested it by skinning a mesh to this rig, but it looks promising if you want to continue researching a three bone solution.

Good luck! Let me know how everything turns out.
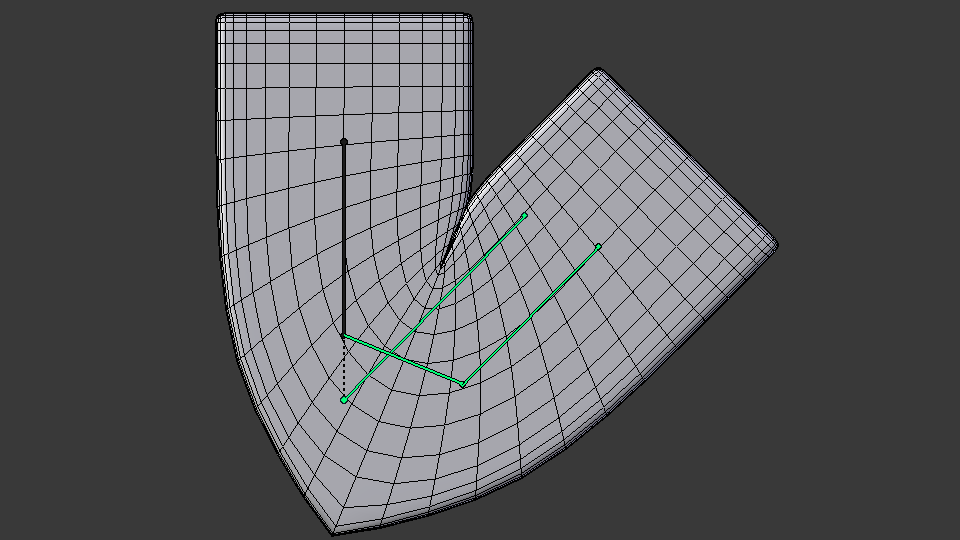
Thank you. I have tried those, but they did not work for me. The limbs on my character are just too thick. The bendy bones methods do not do anything that I haven’t already done with shape keys. Honestly, I expected the bendy bones to work, and it seems like they would have if the limbs were not so thick. The length of the bones were not enough for the bendy bones to bend out enough with respect to how thick the arm was. For simmer options, the bendy bones method seems great.

The method in your blend file was much better. However, to work with such a thick limb, I had to lengthen the elbow bone. And, with a long elbow bone, the offset between the offset bone and the forearm control increases considerably as the limb bends. So, even though the FK and IK controls would match, the actual mesh would not match either of them.

I worked out the mathematics to make a 3-bone chain point to the end of a 2-bone chain while keeping the angles at either side of the elbow bone symmetric. I used a vector approach as used in dyad synthesis, and the equations were just as complex as you’d expect. It would need a numerical solver, like what IK uses. I decided to actually try using a 3-bone IK chain for this. I simply applied the IK to your file, and it worked. The copy rotation constraints that you had made a significant difference by setting the initial rotation. The solver seems too maintain symmetric angles on the elbow. I have not actually measured this angle, but it is close enough for art.

I was planning to add a Rigify rig type to make the rig automatically, but, after thinking about how to do it, I have realized that it would have distinct challenges that the other rig types do not have. For instance, the user would have to place either the 3-bone chain or the 2-bone chain, and the script would need to generate the other chain and correctly scale and position the bones, which would need the numerical solver that I mentioned above. However, to specify the elbow bone length, the user would need to give the 3-bone chain, which would require the user to make the angles symmetrical. That would be nearly impossible. And, making the chain stretch would also be a challenge without using drivers. So, I think that I would need to make this rig manually. And, it may or may not work with squash and stretch. Those are reasonable enough compromises for me.

Thank you for your help. I should be able to make this work.

This is the modified Blend file. For this specific file, the IK system relies on this technique to work. It works because Blender calculates IK last in the modifier stack, even if it was on top. It isn’t a big deal, but I thought that I would mention this in case anyone who looks at the file is confused.

EDIT: I should point out the main issue with this method. Rotating just the forearm will cause the upper arm to rotate as well. This is expected for IK but not for FK. However, the FK method originally did not have a problem. So, using the copy rotation method for FK and the secondary IK chain for IK may work… if a method could be devised to prevent discontinuity when FK-IK snapping.

Attachments

Arm rig.DanPro_AustinC.revised.blend (446 KB)

Heya folks,

Interesting topic!

I made some examples of of ways I’d make extra joints for knees or elbows (knee in this case, but should apply to elbow aswell)

I don’t have the time right now to go in depth about them, but I take it you guys are experienced enough to see what’s going on in the examples.

One thing I do want to mention, In the Test2 arma, I just made a 3 bone chain IK. When an IK chain like that doesn’t have a pole target, the knee bones is all over the place. Meaning the angles don’t increase/decrease evenly between the knee bone and thigh or shin respectively. But when you introduce a pole target to the chain, it always shows an evenly distributed angle between the 3 bones. So maybe this is a whole lot easier than the big calculation you had going on?

Anyway, I think the tests speak for themselves. Another thing, I have no experience with IK/FK snapping scripts or all that. But when you fiddle some with extra bones and hierarchy, you get Test3, where you can move the shin independently (the IK shin is hidden btw)

Well anyway, I hope I brought some new insights to the table!

Attachments

Human model For Sharing.blend (807 KB)

here is a related experiment I worked on a while back…
Where I made an attempt to solve this problem in the topology…

https://blenderartists.org/forum/showthread.php?294113-norvman-s_-Sketchbook/page4
note post #80

A Diamond shape can be your friend…

but this won’t be a usable solution in all cases especially if you don’t have control over modifying the Mesh…

@Furik

nice work on the Knee bend solutions…
I especially like the solution in Model/Armature Test1

@norvman

Thanks!

I personally like test1 a lot too. The idea is so simple! it’d also be easy to add 2 of those bones rather than 1, to round out the shape even more. But frankly I think the test2 deformation looks the best, but that’s where the bones seem to do something that a human’s bones shouldn’t normally do. So I can’t really decide which it ‘proper’ to use haha.

Thanks for the input, Furik. Your examples are great.

Keep in mind, the problem we are trying to solve is to have three bones deforming the leg, but the controls need to built upon a two bone chain. This way, a two bone IK or a two bone FK chain can be used to to animate the rig (animators choice) but the deformations will be consistent with either.

Test one is a great example of using a “helper” bone. There are many ways to automate helper bones. Your example uses a single bone IK. A transformation constraint or an action constraint could also be used to point the knee in the correct direction. I prefer using an action constraints because I can control as many helper bones as I wish. Because the constraint works on an action, nonlinear transforms can be keyed giving much more control over the deformations and movement of the helper bones, and action constraints on bones will still allow additional transforms on those bones without extra parent bones. (You can animate over the automation.)

Test two clearly shows the results we are looking for. Three bones is just better for deformation, especially on thick limbs. The problem comes in when you try to transfer that to an FK chain. I guess the simple solution would be just create a three bone FK chain, and leave it up to the animator to control that extra bone, but what fun would that be? :slight_smile:

Anyways… good stuff. Thanks for the input.

Thank you for your kind words Danpro,

I’ve made another test rig. It’s driven by a main 2 bone IK chain (thigh and shin). And then basicly a second 2 bone IK chain (knee and shin) that has the thigh from the first chain as a parent. It took some fiddeling with the bone placement, but now it makes the correct shape when the knee is bent.

I gave the second chain a pole target aswell to make sure the IK doesn’t act all floppy-like when the leg gets overextended.

I’m not yet familiar with making IK/FK switches. But as a sort of inbetween solution I gave the shin a child bone that can be moved like an FK setup. Would you be able to show me where I can find a tutorial in making the kind of FK/IK switches that you guys use?

I’m sorry for not properly naming all the bones! Also most bones are hidden except the bones for posing when you open the file.
HumanModelForSharing2.blend (919 KB)

Humane rigging should be the first stop for anyone interested in rigging in Blender. You can get Humane Rigging from the Blender Store or find it on youtube.

There is a chapter on making an IK/FK switch.

I also have one on my youtube channel. Look for the Advanced Tentacle Rig series. Humane Rigging will give you a better overview of the process.

Good luck!