Rigging Problems!

I’m new to rigging, and i have a few problems :stuck_out_tongue:

Problem 1: The shirt
When skinning my Character, for his leg I included the lower part of his shirt so his leg doesn’t just go through it. When i rotate his leg as if he’s stepping forward, it works fine from the front, but I don’t like how it looks at the back, because it pulls the shirt down with his leg. Same for when i rotate it back, the back looks fine but the front is dragged down.

So is there a way i can make the front of his shirt only rotate when his leg is rotated forward, not backward?
And make the back of his shirt only rotate when his leg rotates backward, and not forward?

Or is there some other way to do this?

Here’s a picture for clarification

Or should the shirt not even be attached to him at all? Is there some other way to animate the clothes to move with the character? (For a game)

Problem 2: The shoulder
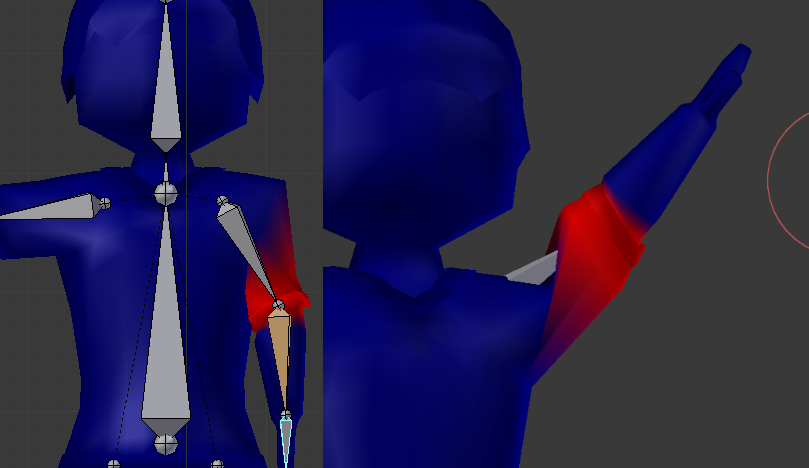
I’m having serious difficulty getting my character’s arm to work properly… If I don’t include the whole shoulder on the upper arm bone, when I bend the arm to his side, the shoulder get’s all messed up, but it’s good if his arm is being raised above his head. But if i do include the shoulder with the bone, then his arm is fine going against his side, but all messed up when being raised… How can i fix this? Should i add another bone just for his shoulder?

Here’s pictures to explain:


Here it is without the shoulder attached to the bone. It bends nicely down, but not up


Here it is with the shoulder it bends nicely up, but not down…

How can i find a happy medium?

Thanks

  • Picklechip

Two ways off the top of my head to do this, which method you use would depend upon what the game engine supports.

First way would be to just create 2 shapekeys, one for the leg bent forward, one for the leg bent backwards, and drive them off the rotation of the leg bone.

Second way would be to create 2 bones, one for the shirt tail in front of the leg, and one for the shirt tail in back of the leg. Add child-of constraints to these bones targeting the leg bone; the constraint is a bit funny to set up, hit clear inverse, then set inverse in the constraint should do it. Now add drivers to the child of constraint’s influence and use the upper leg bone’s rotation to turn the constraints off and on as needed.

See the attached file. In it, I did what I just described, but the real trick is the custom driver curves. The front shirt bone’s curve is set so at 0 degrees of rotation, the constraint influence is set to 0, at .01 degrees of rotation, the constraint is set to 1. Negative rotation of the leg bone, constraint is still off. Same thing for the back shirt bone, except it’s set to turn on at -.01 degrees of rotation.

And actually I just realized I make a technical mistake on this, it works and will do what you need. If you decide to go this route, post back and I’ll explain what I did wrong.

Randy

Attachments

example_rig.blend (414 KB)

I feel the blend file you attached would work perfectly, and is probably more practical, so i think that’s the route I’ll take. But, i hardly understand anything you described on how to do it xD
So i guess first off, what was the technical mistake?
And secondly, would you be able to elaborate on how to do it step by step or link me to a tutorial?

However maybe the shapekey route would be more suitable for my skill level. I’m planning on using Unity3D, so do you know if it would support that?

I’m thinking for the shapekey route, your game engine needs to support vertex animation, that’s the term I’ve heard for this sort of thing in game engines. Not a game engine guy, sorry.

The technical mistake is nothing major, forget about it. I can show you how to make a rig like this, but you have to get really down and dirty with the graph editor to do so. If you haven’t visited this area of blender yet, then stick with shapekeys and vertex animation, if supported. I would think they should be.

If they are, shapekeys are easy in blender…

Randy

Edit: Just saw the problem with the shoulder, can’t comment on that till I look and read, and time is short now…

100% agreement with Revolt’s comments on the hip areas…

Nice setup Revolt!

Shoulders…

I have spent some considerable time messing with getting shoulders to work for me in an easy to Rigg and animate manner in Blender… (suppose I need to do a tutorial on it…) (been so busy these past few months)

So here’s some starting suggestions to making animating shoulders easy…
#1 get the topology right…
as in this tutorial…


note this tutorial is done by an old Lighwaver… but easily applies to modeling in Blender…
(thus why I need to do a tutorial on doing it in blender…)

#2 Yes use two bones to animate that shoulder…
actually you want 3 bones to influence the shoulder deformation…
The collarbone
the shoulderbone
the UpperArmbone

When I set it up this way I can always get the shoulder to deform properly without having to use shapekeys and with minimal weightpainting after application of the Armature Modifier using AutoMajicWeights… however… when you animate the shoulder you’ve created more work for the animater, they are now required to animate an extra bone to get the shoulder to look right…
this is overcome in Blender by the use of bone constraints by creating another Controller bone that works the collar and shoulder together in unison to get smooth movement…

but how that all plays out when using a game engine I don’t know… I haven’t messed with the game engine yet… I should one of these days…

@ Revolt_randy

just took a good look at your file… nice work… I like the way you used the graphs to control that movement… I have been using the limit rotation constraints to do this… this way is much much easier… thanks for the share guy!

Hmm so the shirt thing seems a bit too complicated for me, so i think i will just deal with the leg going through the shirt a bit… But thanks Randy, I think the graphs editor might be something for me to explore now :stuck_out_tongue: And when you posted the shoulder part wasn’t there, i just added it in instead of making a new thread
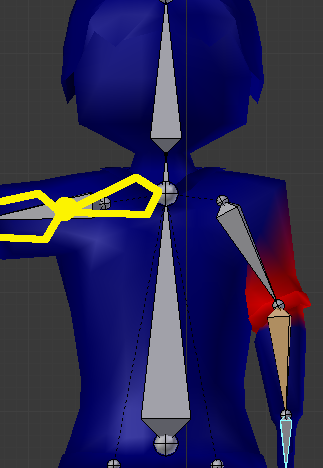
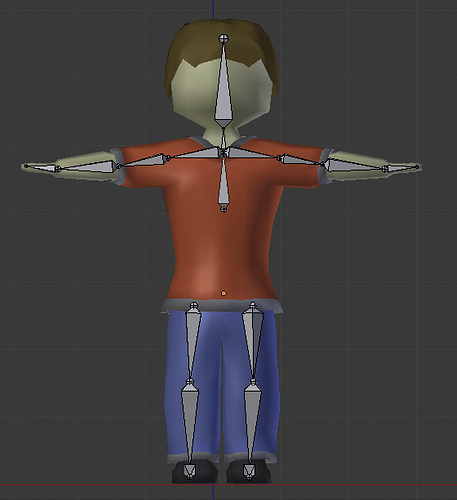
And for the shoulder, thanks a lot norvman i think that will help (I’ll watch the the whole video when i have time, but from a glimpse it looks like it should work), and I’ll probably add another bone for the shoulder.

but… I don’t know how to just add a bone there, any tips?

To just add a bone, in the armature’s edit mode, shift-A, adds a new bone at the 3d cursor. But you don’t want to do that, instead, select the top… err, well, the only spine bone you have. Just noticed you only have 1 spine bone, generally you need 3 for the spine. That’s an easy fix, if you want to do it.

Anyway, the shoulder, select the tip of the spine bone in edit mode, open up the tool shelf (t-key in edit mode) and towards the bottom, there should be an x-axis editing option, mirror x-axis editing or something like that, it’s a check box, click it. Now you should be able to in the 3d view, e-key to extrude the tip of that bone out into a new bone. If the armature was built so the x-axis runs left/right when viewing the front of the character, you should get 2 shoulder bones, left and right. Just extrude the bone so the tip is easy to select, not around anything else. Now select the tail (fat end) of the upper arm bone. Shift-s -> snap to selected, should snap the 3d cursor to the tail of the bone. Select the tip of the shoulder bone, shift-s -> snap to cursor, and the tip of your new shoulder bone should be at the tail of the upper arm bone. This is what your bone structure should look like:

Then you need to select the upper arm bone, one side at a time, and in the bone properties panel, find the parent field. Click on that field and you should be able to scroll thru a list of bone names, select the shoulder bone you just created. Also, below that field, click on the connected check box, to connect it to the new shoulder bone. BTW, are you naming your bones?

You need to move the tail of the upper arm bone over to the side of the torso more. Your shoulder doesn’t pivot where you have the tail of the bone, look at where I drew a new upper arm bone at, much further to the left, that well help you out as well.

Thru careful weight painting. Did you weight paint this yourself, or did you use auto weights?

Work on those changes, you’ve got other problems as well, but if you can accomplish what I posted, then I’ll show you how to fix up the rest of it. After making the changes above, you will need to re-weight the new armature to the mesh.

Randy

Ok so I did as you said, and things are getting better.

However i don’t know how to add in the 2 more bones to the spine… I’m thinking I’ll probably just rebuild the armature from scratch.
But anyways, this is my rig now (again, missing the two spine bones)


And yes, I weight painted it myself, although I’m extremely new to weight painting and haven’t watched any tutorials so I’m really not very good at it (Well i used automatic weights at first then just touched things up with weight painting)

And Yes, I am naming my bones

Thanks a lot Randy, I’m really learning a lot!

So what else should be fixed up?

off the top of my head, I’m thinking for the spine bone, leave it as 1 big bone as you had it before. Then in edit mode with the spine bone selected, do a w-key -> subdivide, and in the tool shelf, at the bottom you should see a field for the # of subdivisions, set it to 3 and hit enter. Your single spine bone should now become 3 spine bones.

Great that you are naming your bones as you go!!!

As to what else should be fixed, I see 2 things. The upper legs should be children of your lowest spine bone. The second thing I see is you need to take a look at bone’s roll angle. This is why your copy pose & paste flipped pose isn’t working as per this post: http://www.blenderartists.org/forum/showthread.php?294688-Pasting-x-flipped-pose-isn-t-working

The problems you are posting about in that thread is most likely a bone roll issue. It’s an easy fix, but I don’t want to throw too much at you too soon. After you fix the spine, please post the file up so I can take a look at it. I’d like to look at it and see what you have so far so I can offer you the best advice.

If you are weight painting this yourself, that’s great!!! But blender’s weight painting default set up isn’t quite the best. A couple of checkboxes and a few setting changes in weight paint mode will give you a much better weight painting environment.

I’ve said this a 1,000 times, 90% of all bad deformations can be corrected by good mesh topology and good weight painting. so we’ll look into this next. But post up your latest work and we can go from there…

Randy

ahhh okay thanks a ton Randy! I did fix the spine issue, but now I’ve kind of abandoned this character (just because i didn’t really like it :p)
You’ve taught me a lot just in this thread alone, but now i’m making a new character, and the rigging has been going very well after your advice. I’ve also become more familiar with the weight paint environment so the deformations for it have also been working good so far.

However, Blender overwrote all my actions with a different action, Here’s the thread if your interested
http://www.blenderartists.org/forum/showthread.php?295132-All-my-action-animations-were-overwritten&p=2393065#post2393065
And also feel free to download the blend and give me some more advice on the rigging/modeling if you find any.

Thanks a bunch Randy, I appreciate your help

What I do is usually take an anatomy book or some reference for the front back muscles. But in your case its a simple character, I guess you are not going for hiperreal o almost realistic. So in that case you can use a simple topology.

Just the three basic flows, upperchest pectoral conected to deltoid, and deltoid ending in the back below the big trapezoid muscle. Or more or less that should be the main topo, even if its all quads, but following this flow should do it.

Another thing, you can complicate your self with controls and stuff, but What I see as working well as you have been advised already is to use several bones.

I model semi lowpoly stuff, and what I use the most is a very simple IK setup, with some “controlling” bones for the shoulder that gets out of the IK chain (parentings inside ik chains should not be done or that will give problems).

So use simple bones, out of all the chains, and parent them to external bones for controls, or even shapekeys, but shapekeys are more work…

Thats my opinion, of course. Cheers.

edit.

This is what I have. Easy.

As you can see its an IK chain from the hand to the clavicle, stoping the ik at the clavicle, but all bones connected up to the neck. IK chains should always be isolated from parents or constraints to avoid all that.

I have a little hand controler, that is a target of the chain. And that target at the same time is parented to the clavicle (which is controlled by a damped track to a pole) so I have a pole that controls the clavicle and at the same time the hand moves with it.

If you need more bones on the back for a realistic control, just parent another bone to the clavicle, and this clavicle acts as a “fan” and when it moves, all bones move.

Cheesy easy. I dont need to overcomplicate myself, If Im going to do all the animations myself too (that is always the case).

Hope it helps, it works for me :smiley: Forgot to add, Thanks Norvman for all the help in my post about IK ;D

Thanks Norvman for all the help in my post about IK ;D

Hey I got lots of help from the online forums when I was first starting out … not just here with Blender but other software as well… this is me giving back a little bit… as we all should… :yes: