Rigify rig was working. I’ve animated about 30 seconds.
Now when I try to curl the fingers using the IK controls (lollipops), they don’t work.
I’ve tried copying the animation data to the earlier unanimated rig, but it breaks on that rig too. Also, the IK hand control no longer has rounded corners (that’s the first thing I noticed).
When I regenerate the rig the IK finger roll comes back, but I’ve lost my animation.
I can curl the fingers with the Finger Tweak (FK controls).
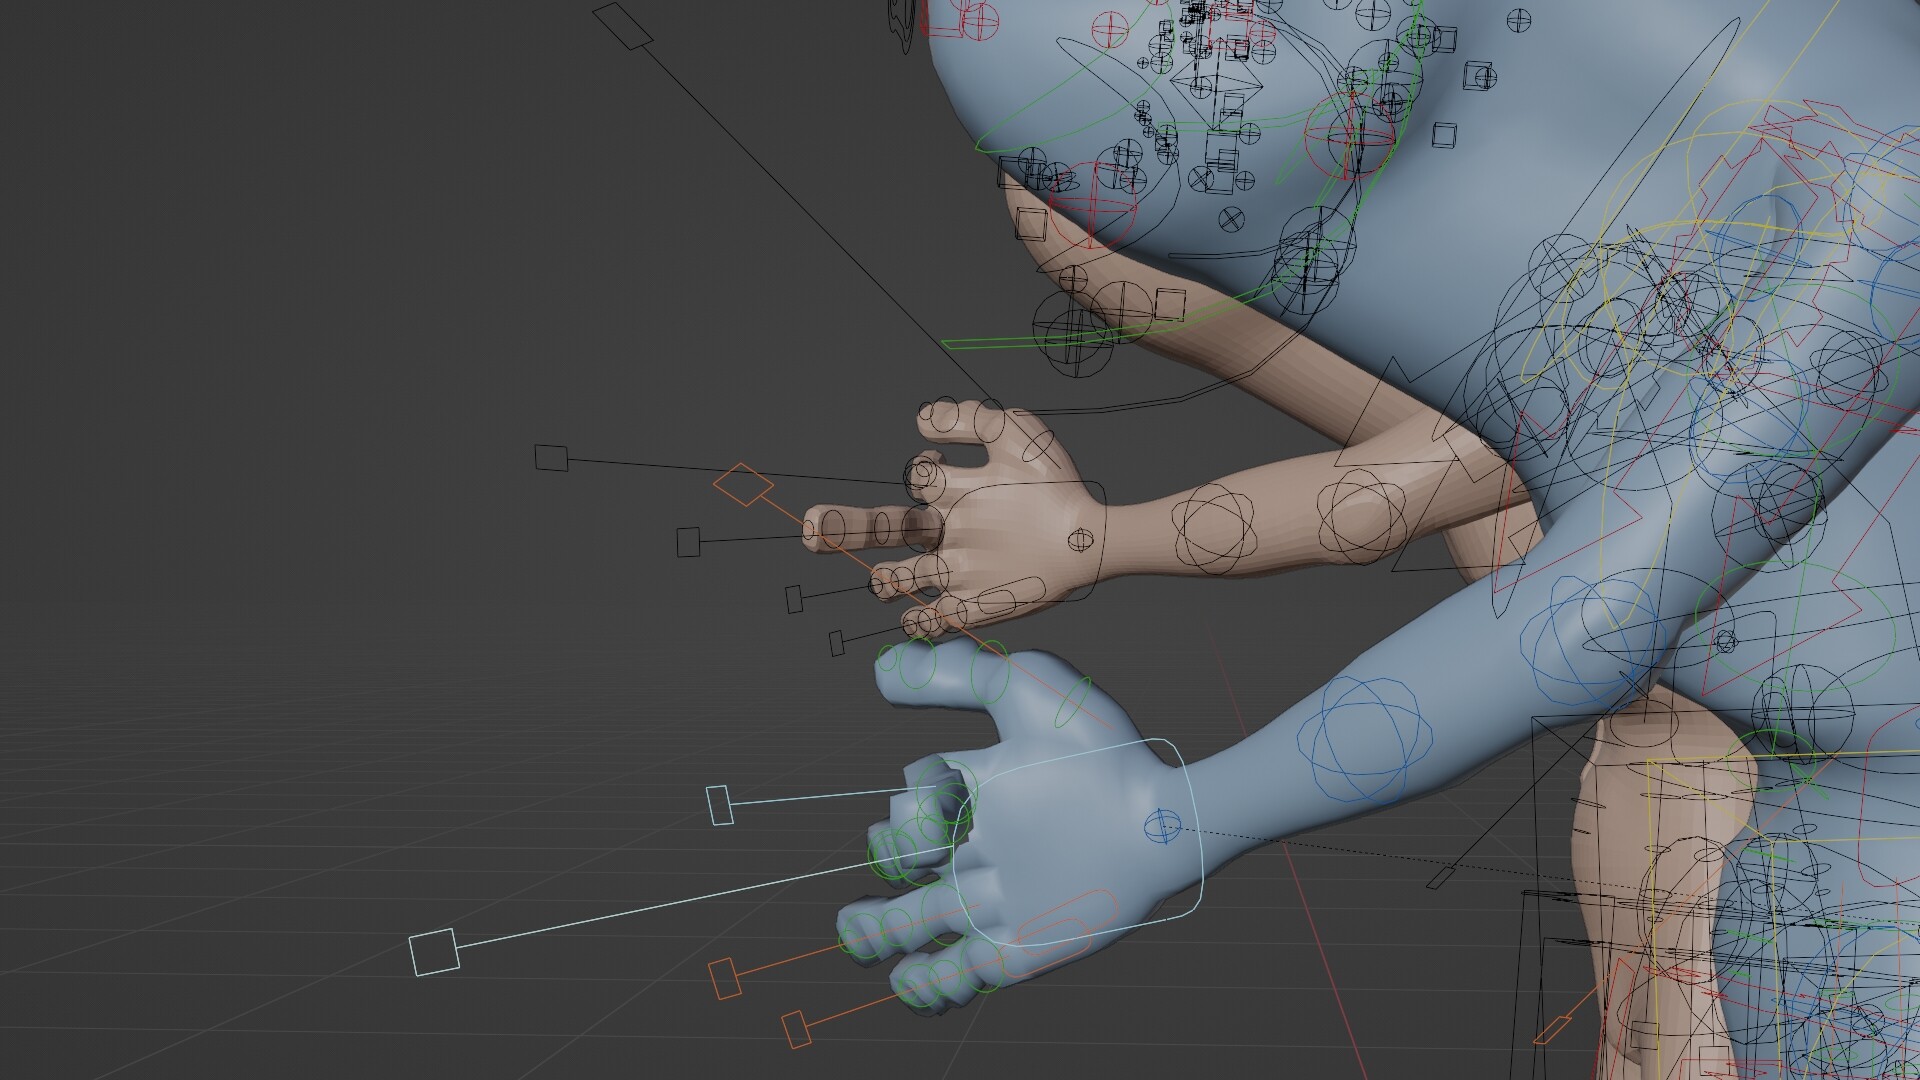
The Tan rig is the Newer one, the Blue rig is the Earlier one with the error. The IK Hand controls regained their rounded corners.
You’ll see the Tan rig’s index finger is scaled a whole bunch, so it should be curling backward. It’s not, the inward curl is due to the FK finger tweak. The same but the opposite for the middle finger as well as the Blue rig.
Hi check in the Rigify type settings from the finger bones and set them to manual axis if necessary, usually the finger is z axis down to the palmar side and x axis is for rotation…
Since you are new here, allow me to explain a few things…
The single best way to get help around here is to post up a .blend file clearly showing the problems. Also, since you are new here, you probably can’t attach that file to your post until make a few posts around here (anti-spam thing). So post to a file hosting site and post the link here.
I don’t use rigify so I probably can’t help you, but maybe someone else can help.
I can’t tell if that works. I can only access it in Pose Mode and then I have to Re-Generate the rig which I know already works, and I lose my animation data.
It doesn’t seem to fix the non-scaling IK control without losing the animation data.
But you lose me when talking about another rig. Anyway, you probably aren’t loosing your animation data, it’s just not connected to the new rig. If regenerating the rig gives you full control back, then you could try this -
Change a dopehseet editor to be an action editor. To the right of the name of the current action, you’ll see 3 icons, the first one is a shield. Click on that icon to create a Fake User of the action. Delete your rig and regenerate a new rig. Verify that the new rig is working and moving the character. Now in the action editor, there won’t be an action, but you can assign your old action to the new rig via the icon to the left of the action name field.
Now check that the animation works, and the rig still works. If the new regenerated rig doesn’t work once the action is assigned to it, then maybe the problem is in the action… IDK
“I’ve tried copying the animation data to the earlier unanimated rig,” That was my second troubleshooting attempt, paste animation to a clean rig.
So, you’re saying take the rig (that is animated) and throwing the IK finger Scaling error and in the Action Editor create a Fake User for the action “Sc rigAction.002”.
Then delete the rig (the controllers, etc., not the metarig) and re-generate the rig (should I delete the vertex groups?) and apply the old Action “Sc rigAction.002” to the new rig, assuming the new rig is working.
At first I couldn’t see where to “assign the fake user action” to the new rig. I found the action and 4 others in the Object Data Properties for the rig and that didn’t work.
Then I found the New Action button, created a New Action, and found 2 actions, “0 Action” and the new Fake User action, “F Sc rigAction.002” and it worked.
I applied this fix to my actual file and it’s working.
OUTstanding!
Okay, why did that happen? You don’t have to answer that unless you have an idea.
As with shaders, is it a good idea to make a Fake User for one’s animation? I understand Fake Users as ways to ensure that one saves one’s textures when closing a file and reopening it. Clearly, that’s not exactly the case with animation data.
Also you can copy paste keyframes through the graph editor, ofc bear in mind that copying an animation from a rig to another one they must have the same bone names and same other settings such the type of rotation (Euler/quaternion) which also can be converted into one or the other and vise versa in case you need to…
So, as you already probably know, the ‘action selection’ icon opens a dialog where you can select actions. ‘current action name’ is just that, the current action on the rig. ‘fake user’ is what we talked about (more on that in a min). The next icon to the right of the ‘fake user’ one is for creating new action. And the ‘X’ icon is for dis-connecting the action from the rig. Hovering your mouse over these icons should bring up tool tips as to what they are.
I think it’s a good idea to add a fake user to actions you want to keep. I say that because years ago you had to do that to make sure your actions were saved, just like materials. But then at one point that changed. See my reply here
So without a fake user, the actions should still be saved, pushed down to tracks in the NLA editor. IMO, this is a wonky system at best and it’s something I hope is fixed/addressed when the animation system gets a re-work development wise.
For the sake of completeness -
Vertex groups are mesh data, they belong to the mesh object. And as you now know, no you don’t want to delete them. Vertex groups are used for lots of things, but in this case, they are used to tell what parts of the mesh move with each bone.
I have no idea what happened to your file, to figure that out, someone would have to look at the corrupted armature/rig. Think of a rig as an old wind-up wrist watch: 100’s of parts/bones all working together in harmony. Now remove one gear from the watch and it will no longer work. Delete a bone/bone constraint/bone driver, or any other part of the rig, and now it won’t work. Armatures in blender are 100% rock solid, but have your cat run across the keyboard and hit the right combo of keys and delete a bone/constraint/driver and now you have a broken rig.
Lucky for you, you still had the meta rig, so you could generate a new rig. Normally, once a rig is generated from the meta rig, the meta rig is deleted as it is no longer needed.
If you aren’t in the habit of saving incremental files, you should get into that habit. Basically, as you hit a milestone in your project, you save the file with a number at the end of the name. Model the character mesh, save file as character_1.blend. Add in the meta rig and generate the real rig, get it to working with your character mesh, save file as character_2.blend. Now delete the meta rig and animate the rigify rig, save file as character_3.blend. But wait, character_3 is broken and I deleted the meta rig. Now you can back up to character_2 and work forward again.
Hope that makes sense and feel free to ask questions,
Randy
Well, that’s not true. Lol. It’s good to know that I can delete the metarig from production files, but I’m never not going to save a clean file with the rig available as a backup.
I do save incremental files, hence the two rigs you mentioned before. The thing is, in Maya I got used to saving thousands of incremental files (okay, scores). I’m getting my footing now with animated files in Blender and thus far Blender is pretty solid.
I agree with your assessment of what makes up a rig. If I had done something weird,…whatever that means, I’d be more focused on that moment in the pipeline. But all I’ve been doing is animating with Constant interpolation. The only other thing that occurred to me is that I’ve been using two workstations and therefore downloading the file from my Google Drive and then re-uploading.
Thanks again for the recap. I like to know how things work, I also like to know how/why they don’t.