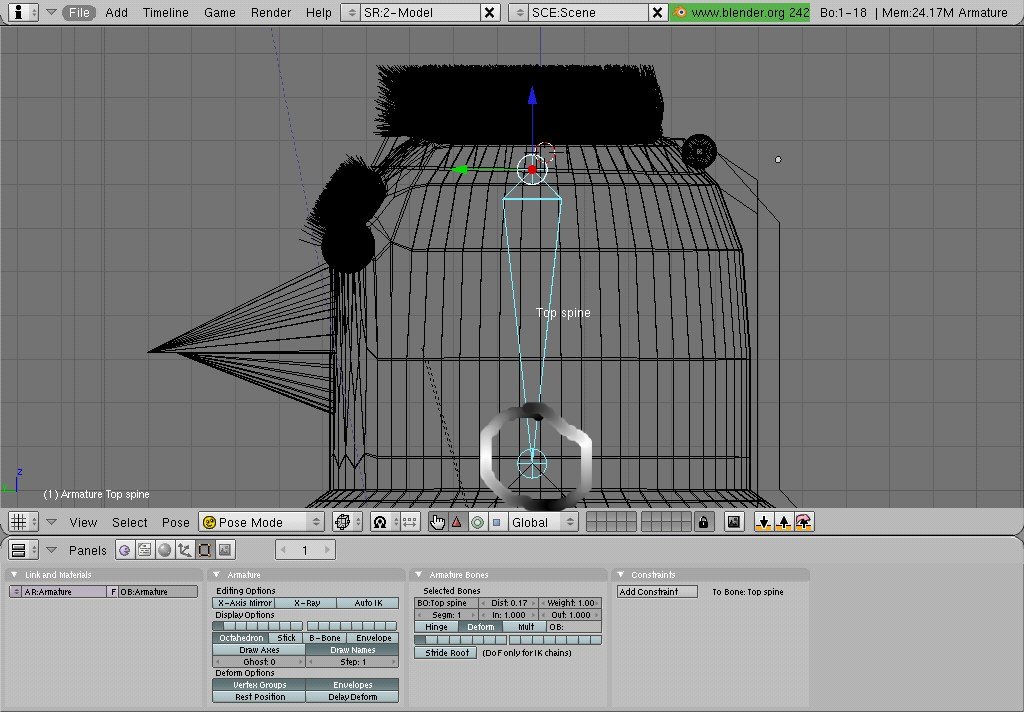
I have noticed that there are 2 circles on an armature, one on each end. And I have noticed that it rotates around the circle closer to the thicker side of the armature. Is it possible to make it rotate around the circled circle as shown in the picture?
Those circles are the ‘base’ and the ‘tip’ of the ‘bone’. An armature can have several bones. The base is the circle at the fat end of the bone. A bone will always rotate around it’s base, but you can easily edit your bone so that the base is located where you want to rotate.
With the armature selected, go into edit mode. You can select and move/grab the base and tip the same way you move other things in blender.
For more info, you might want to check out the following tutorials:
http://en.wikibooks.org/wiki/Blender_3D:Noob_to_Pro/Advanced_Tutorials/Advanced_Animation/Guided_tour/Armature/object
and
http://mediawiki.blender.org/index.php/Flying_Bird-_Building_the_Rig
and
http://mediawiki.blender.org/index.php/BSoD/Introduction_to_Character_Animation
this last one covers a lot more than just armatures - it has a lot of really good information.
I know that this may sound self-ish but, I am rather sick of looking through tutorial after tutorial, and I dont really know what you mean. I want to make the bone rotate on the other circle (in pose mode) so could you try to explain it again differently?Because I dont really see what the point of grabbing the bone in edit mode is. Thank you for your time.
For one thing, if you are just planning on having that one bone in your armature, you don’t really need an armature - you can just rotate the object.
The purpose of an armature is to set up a whole skeleton of bones to deform your object. You need to move the bones around in edit mode to get them in the proper locations so they will deform your object properly. Often times an armature resembles a real skeleton - but much simpler.
Explaining how armatures work is more complex than can really be accomplished in a forum post.
If you just want to change the location that your object rotates around…
Place the 3d cursor where you want the center to be (click the LMB)
From the Quick Menu (press space) select Transform->Center Cursor
OK, the short anwser to your question is NO .
Let me explain why . The Armature Object in Blender (or any other 3D app) is basically a parametric vector (actually a set of them with each individual one usually called a Bone)- that is it s an object/data struct that has a direction (therefore the big circle-called the ROOT- is the startingpoint- the small circle-called the TIP-is the endpoint) and editable/posable (therefore parametric) .
In Edit Mode the center of an individual Bone is like any other object - at the mid point . You select a bone (not just a tip) press “R” - the bone will rotate around its center (midpoint) .
In Pose Mode the center of an individual Bone is always at the ROOT (the bigger circle) . You select a bone, press “R” - the bone will always rotate around the Root (the bigger circle) . This is because in Pose Mode each bone has a direction with the start/stop positions indicated by the Root/Tip . The Root is the “beginning” point for all transformations/calculations for that bone in Pose Mode .
The reason why Armatures are programmed this way is to provide a way to … well let you pose and animate your mesh .
I think this might be clearer if you just made a simple 2-bone armature and played around with it . Putting an IK solver modifier on the top bone and grabbing/rotating it might show you how the relationships between the two and how the interaction is dependent on the origin (notice how the orange dotted line “links” to the Root tip of the first bone) .
Also - on looking at your screenshot - looks like you started your Armature somewhat atypically . Your first bone IS upsidedown and in the head(?) - usually most simple armatures I’ve seen start from the middle of the body and rightsideup - this is important because of parenting considerations . Because - yes - Armatures have a sort of direction too . A parent bone can have many children (a million if you want) but can not be itself be the child of one of its children (programmers apparently don’t belive in Greek Tragedies) . Because of this you should carefully think out how you begin building an armature .
You really should try to go through some of the tutorials RobCozzens linked for you - especially the middle one - it’s pretty short and gives a basic how-to .
Hope this doesn’t confuse you but I think it’s usually a good idea to understand why something works the way it does when it doesn’t do what you want it to .
Ok that answered my question. Now I have a new question…You see how the beak of the penguin isnt attathced to the armature or even joined with the object that the armature is in? Well the question is: Can I make it move with the other object if it isnt joined with it? Because I cant put it in the deform group of that bone, and when I try to join them, the hair and the eye brows disappear.
