Rotation keyframe mess it up

Hello,

I’m new to blender and so far enjoying exploring it by myself. But there’re so many things i still don’t know, here’s my problem of the week : I modeled a sphere opening on the EDIT : top. when it open up a platform lift from the inside. On this platform there’s a bunch of object that i grouped together (with the platform btw). I decided later that i wanted this group to rotate on the Z axis while lifting. So i tried to add rotating keyframes to the group but all objects from the group flew all over the grid. I’m sure it’s a commun issue that newcomer go through but i got no idea how to get out of it. Sorry i can’t upload a blend as i’m new here, i’m sure it would be easier to get my problem. Thanks anyway for reading me and thanks again for an tips :slight_smile:
cheers

Upload your file here:

19

Then post the link to it for us to look at. Without your blend file it is near impossible to suggest a fix. Always try to post a blend file showing the problem, not the whole original file, or at the least images of what’s going on.

Cheers, Clock. :beers:

I didn’t know that !! Thanks a lot :slight_smile:

http://pasteall.org/blend/index.php?id=50508

OK first observation, you have quite a complex model there, when it comes to rigging the “gongs” that will be struck by the pins on your cylinder. So I would go back a few stages and start using an Armature and some Transforms Constraints on the bones. You can have one bone per opening segment of the sphere, these can have transform constraints so that each one turns a set amount dependant on the rotation of one activating bone - all the animation is then just moving the action bone. On bone can lift and rotate the entire deck, with all the non rotating object parented to it. Then add separate bones for each of the other moving parts on your “lift”.

Give me a little time and I’ll post you an example of what I mean.

Cheers, Clock. :beers:

EDIT:

Merde! So many typos in this post first time, I must need beer…

Thank you so much for taking some time to help me. Take all the time you need, i’ll be here waiting :slight_smile:

Cheers

Ok here is your starter:

Just four keyframes animates the whole thing. Press Play for the animation, then take a real close look at it to see what I did.

TIP: When you make bones with the same constraints on them, make the first one, add the constraint, then make the copies and tweak the constraints - saves a shit load of work! Repeat for the other side of your sphere, but change the bones to rotate positively rather than negatively. Note the objects are “Bone Parented” to the bones, no Weight Painting, Vertex Groups, Armature Modifiers and other such hassle. To Bone parent: Select Mesh, SHIFT+Select appropriate bone, key CTRL+P => “Bone”.

Ask any questions you like, I am here to help.

À votre santé, Clock. :beers:

Blend file to play with: boite-A-Clock.blend (3.2 MB)

Hey Clock, i’m back !

So, what i’ve learned today:
You create one bone to rule all the others.
I had to recreate the meshes and bones mirroring yours. And i did.
And you have to know that it took me the afternoon and a part of the night (it’s 1:00am here, but you now where :wink: ) to figure out that to choose a bone to parent with a mesh you have to enter in edit mode, select the bone, switch to object mode and your bone is still selected !! then select your mesh, shift select the armatur and then control P. Good, but there’s more : it took me a little time to get that what i need to modify was the destination section (i’m slow) and a couple of hour to accept that i failed to understand why the bone’s rotation was set on the z axis instead of the y where they’re clearly rotate from… Still don’t get it.
Another thing that i don’t understand is the source area. I don’t understand where the values you put in come from ? Unless if they specify the highest and lowest point each bone can be from the “actuator”…
About the cylinder : i understand that you set it up in the graph editor and that his bone is relied to the actuator too for its z location but in the properties panel it appears to be parent with the “lift” bone… And now i’m confuse.
I managed to make it rotate once the platform stop lifting, that why i wanted, and i’m proud cause that the first time i use the graph editor AND understood what i was doing :slight_smile:
What i don’t understand is where did you specfy that you wanted it to rotate along the Y axis.
And how could i make the “lift” bone making a 360 while lifting ? I tried to specify it in the “Rotation Destination” by setting 360 in “Z max” but it just stop lifting…
Last but not least, could you figure out why everything was messed up when i wanted to rotate the platform and musicbox in my original blend. Was it because i didn’t handle the location of each mesh properly ?
Well that’s all for today :slight_smile: I couldn’t thank you enough for all this. I learned so much this afternoon that i’m exhausted but happy ! It’s one thing to follow tuto over the net, but it has nothing to do with someone taking the time to explain things. So thanks again, really.
I’ll try to add bone to the entire musicbox tomorrow and keep you update if you’re ok.
I put the blend of my pride here :slight_smile:
http://pasteall.org/blend/index.php?id=50511

Cheers (cake)

Not quite right! Leave the armature in POSE Mode, then you can select individual bones:

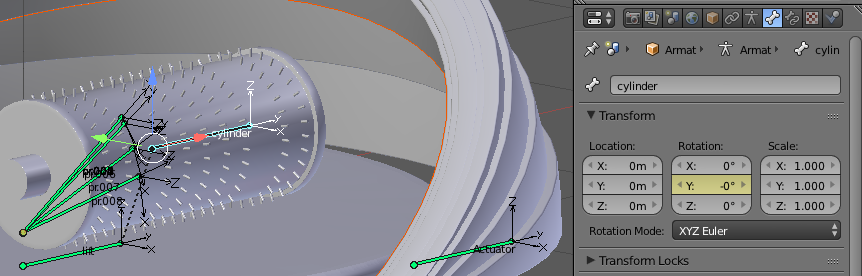
I selected the mesh, then SHIFT+Selected the cyan coloured bone.

Look at the BONE’S axes, bones always have their Y axis along their length running from head to tail, X and Z axes are normal to that - you can see the axes by turning on Axis Display in the Armature:

Here you can see the axes, the bone’s Z axis is aligned to the Global -Y axis.

The Source area is working in “Local Space” for the bone, so the bone at rest is a 0,0,0 LOCAL space:

So when it moves 90cm up in its LOCAL Z space (in the blend file that is from -1m to -10cm Global Z). You can see that the Space for Source and Destination are both LOCAL so the bone is being rotated in its LOCAL space, which is its Z axis.

If you parent a bone to another so it inherits Location, Rotation and Scale, when you move the parent bone (Lift in this case) the child bone moves, rotates and scales with it. They are effectively glued together, but the child bone can then have transforms applied to it relative the the parent bone. So, if I were to simply rotate the Lift bone about its LOCAL Z axis, the cylinder bone will also turn with the head of the Lift bone as its rotational centre. This relationship is not done in the Graph Editor BTW, it is done in EDIT mode for the Armature, select Child bone, Select Parent bone, key CTRL+P and then “Connected” if you want them connected together, or “Keep Offset” if you want them unconnected:

You can see the black dotted line between the two bones, this is a “Relationship Link” and shows that Cylinder is parented to Lift. You can only set a bone’s parenting to another bone in EDIT mode, but you can adjust the Inherited Properties in POSE Mode.

All I did was to keyframe the rotation of the Cylinder bone and I did that in the Transform boxes, more on this later.

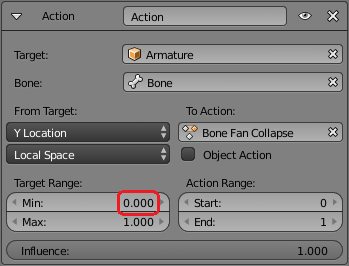
Add a new Transformation Constraint to make this action, you can have many constraints on one bone, I have collapsed the first one for clarity. So here is a Transformation constraint that will rotate the Lift bone about its Z axis as the Actuator is raised:

You see I added a new Transformation Constraint - this one rotates the Lift bone 360 degrees as the Actuator is raised 90cm - all done in LOCAL space again. Source is set to “Loc” and Destination is set to “Rot”, so locational movement of Target causes Destination (the bone the Transformation is on) to Rotate.

You can read this useful information.

If you want it just to rotate a bone over a set number of frames, this is the procedure:

  1. At the start frame of the rotation, hold your mouse over the Z rotation box and key i

  2. At the end frame of the rotation, key in the new value, press Return then hold your mouse over the box again and key i - job done!

See above, but use the Y rotation Transform Box, BTW I always change the Rotation Type to “XYZ Euler” when doing this:

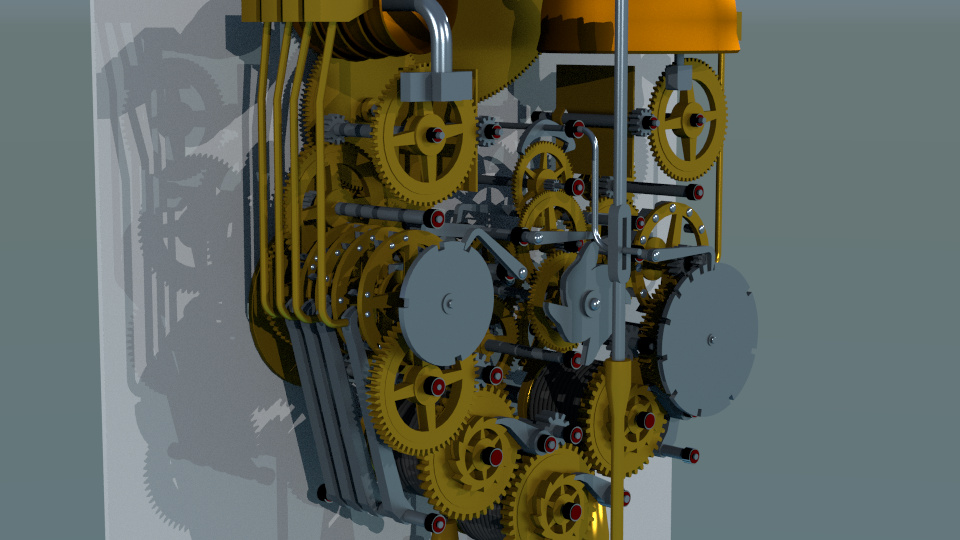
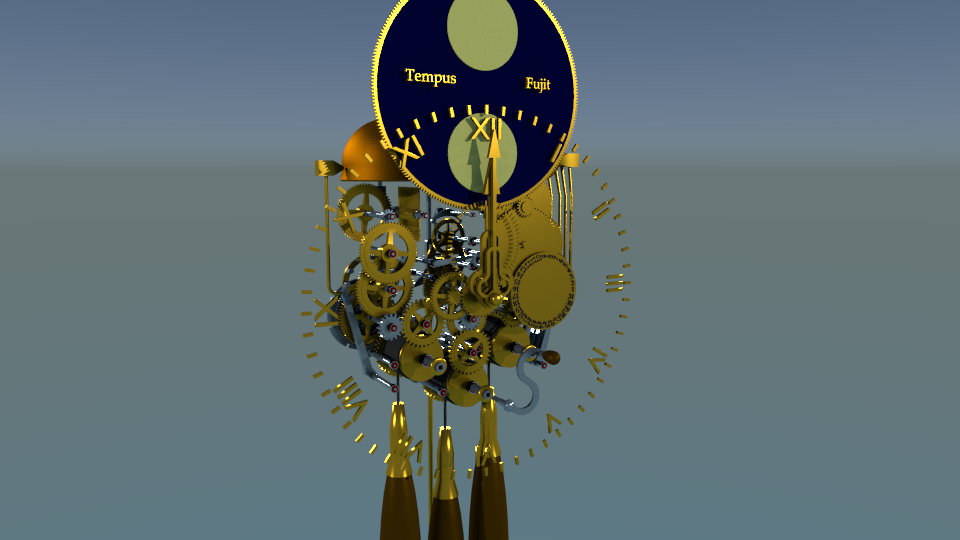
Basically, yes, but you did not need a group at all, just a rotation centre and parent everything to it. BUT and it’s a bit but, this is not the way to animate hard surface objects in my humble opinion, always use an Armature and Bone parenting, Blender has Armatures purely to animate objects, so I always use them and only them. The more complex your model gets (we haven’t talked about getting the gongs to vibrate when hit by the pins yet) the more you need a structured armature. See this example, I tried rigging this with constraints, got totally messed with it, so rebuilt it with an armature, everything works as it should, gears, ratchets, ticking, pendulum, weights, gongs the lot:

The materials and lighting are shit, but I was not so good at that when I did this model.

I will take a look at your file later on today, but well done for putting the time and effort into understanding this, Blender is not easy for new users, there is a lot to learn before you can achieve very much, but keep going and we will help you along the way.

À votre santé, Clock. :beers:

PS it was your blend file’s name that gave your location away, that and the times you posted…

PPS. Expect a few typos, its a long post :rofl:

Wow, now that’s a post :sweat_smile:
Ok so please don’t look at my “pride blend”, it was just a “lookt i did it !!” thing.
I really prefer taking the time to understand everything you just wrote and send you something more consisting. I’m trying since this morning to rig all by myself. So far i failed. Got to go now but i will be back on it this evening, so hopfully i can post something tonight.

Pointing potentials typos would just be rude (even if i was fluent enough to do so). I’m not an english teacher and you did nothing but helping me so thanks again :hugs:

Cheers

PS: i knew when i uploaded the file that the name will sell me out :rofl:

Too late mate, I have already looked at it… :rofl:

Seriously you made a good job of the other side, I see you don’t want the last segment to rotate downwards, that’s fine, so I would change things a little, I will explain after you have had another go at this.

À votre santé, Clock. :beers:

PS. You need to look a the manual for Transformation Constraints, so you really understand them, I know you haven’t clicked the link yet… Maybe you have read the French version instead? We will be using these quite a lot in your project, so the more you understand them the better it will be for you.

You’re right i didn’t open it (just did) but that’s because i knew it was something i already read before and to be honest i didn’t undertand anything…
Maybe is it too specific language, maybe is it too technical but i’m totally lost. i don’t understand how bones interact with each other i don’t understand what all the “min-max” for each axis mean i don’t understand what “destination” mean…
Even their video presenting this feature is uncomprehensible . I mean, i look at your animation and everything is obvious. then i try to do it by myself and i don’t even know where to begin… You get me, i’m a bit discouraged tonight :slight_smile: I’m gonna sleep on it. Maybe things will be clearer tomorrow !! Don’t get me wrong, i’m not gonna quit. I started it and i’m gonna finish it. but what i learn in my job is that when you’re stuck on something, look something else, then come back… So i’m gonna do that tonight :slight_smile: And i’ll post you something tomorrow, for sure :slight_smile:)

Cheers

Sleep on it and do something else for a while. I will try to explain things a little easier tomorrow. Don’t stress over it, its not a matter of life and death!

Take care, Clock. :smile:

I also prefer using the Transformation constr. for this, but just for academic interest there’s also the Action constraint that can be used for this same object-fan-stepped-collapsing thing:

collapsingBoneFan

All bones of the fan were animated rotating down to floor level between frame 0 and 1, with keys set to linear interpolation. This generated an action, which I named “Bone Fan Collapse”.
This action was then removed from the armature using the Dope Sheet > Action Editor mode so it wouldn’t be used while playing.

Then each bone of the fan was added an Action constraint. This is the constr. on the first bone, the one pointing up:

collapsingBoneFanConstraint

The others have the same setup, what changes is that Target Range > Min value, that goes up by 0.25 on each bone, since their rest pose has them offset 1/4 from rotating all the way down. When the controller bone travels up (local Y location), it triggers each Action constraint in steps: 0.0, 0.25, 0.50, 0.75.

Thanks a lot RNavega for this alternative solution to my “pull my hair off and eat them” problem :slight_smile:

So, it turns out i couldn’t sleep, so i dug :slight_smile: And here’s what i did so far and what i (hope i) understood :

1- when you switch to pose mode for the 1st time, wherever a mesh is located in your scene, its location indications are 0 for all axis.
2- Which means that the value i have to set in the source and destination area of the transform constraints are where i allow the mesh to move/rotate/scale from 0 to infinite.
3-The target can be a mesh or a bone. In the second case, you select first the armatur and then the bone you want as a source.
4- The “source” is the bone giving “the order” by moving, rotating or scaling, and the destination is the bone executing the move i want it to perform. I assume that the smaller the range of action of the source, the quicker the animation of the destination (?).
5- As bones have their own axis direction depending on how you place them on a scene it might be easier (or mandatory) to switch to local space and make them move on their respective alignement. So i did it. Which mean that sometimes, the usual Z axis become the Y for your bone, thing that you have to set in “source to destination mapping” area.
6- One transformation at the time so if you want two or more different actions, you need to add constrains each time.
7- none of this is visibe in object mode. you have to be in pose mode.

So i made my platform lift and turn. I set the object on the platform parents of it. And now, before i go back to my fanes, i need to put a bone in the cylinder and make it rotate when the lift is over.

Well, if i’m right with all that, i made a huge step tonight :slight_smile:
Here’s the “my eyes are bleeding” blend :

http://pasteall.org/blend/index.php?id=50515

And i have to say, even if you tell me i did all wrong tomorrow, i’m going to sleep smiling. It lifts and turns !!!

Cheers !!

I have had a quick look at your file.

Well done Sir!, I am off flying my glider today, so I will comment in full later, well done, you must be pleased.

Cheers Clock. :beers:

PS Thanks to @RNavega for your input, I have not used your setup yet, but will also be looking at that later. Thanks Man!

Have a good day flying :slight_smile:

I certainly did!!!

So how is progress going, your file is looking like you have got your head around what the Target, Source, Destination and Destination Mapping does, is it making sense yet?

Cheers, Clock. :beers:

Actually it is :slight_smile: And you open a door i didn’t know it even existed ! So i came up with a new idea. Something simple but maybe a little more interesting which can make me practice this bones thing. I’m on it and will post it as soon as it is done. I still have millions of questions but i give you some rest with my newbistery ^^

Cheers :slight_smile:

Dear Clock,

Here’s what i did with all i’ve learned from you this week.

http://pasteall.org/blend/index.php?id=50528

Working with bones combine to keyframes seemed to be the way to go, but maybe there are some shortcuts i missed… There’s still a long way to go, but at least, i’m moving forward :hugs:

Cheers

You certainly are! There are some things we need to talk about however…

  1. Bevel and Sub-Surf Modifiers; Try to keep the number of bevel segments to an even number, 2,4,6,8, etc. This is not so important on your turntable, but will became so if you have an angled bracket for example. Odd numbers result in Tris (three sided polygons), which do not work well with Sub-Surf Modifiers. On the Sun-Surf Mod, check the Optimal Display Checkbox so you see a readable form when in wireframe mode:

Object Naming Convention, try to give your objects meaningful names, like “Turntable” rather than “Circle.000”, it makes it easier to organise large blend files.

Bone Naming Convention; same applies, give bones meaningful names so you know what each bone does, “Bone.017” will not tell you what it does… If you have a set of bones on the left of an armature and a similar set for the right side of your model (this applies more to character modelling) use the “.L” and “.R” extensions for the bones, e.g. “upper-arm.L”, etc. so you can mirror copy poses from one side to the other. I know you are not doing that yet, but it is good practice to get into.

Otherwise, really well done!!

Cheers, Clock. :beers: