I have many things from daily practice to ideas that come up from reading other Blender Support Questions… So now I want to get them collected so they can be shared with all of you.
I’ll start off with this statement made by @piranha4D
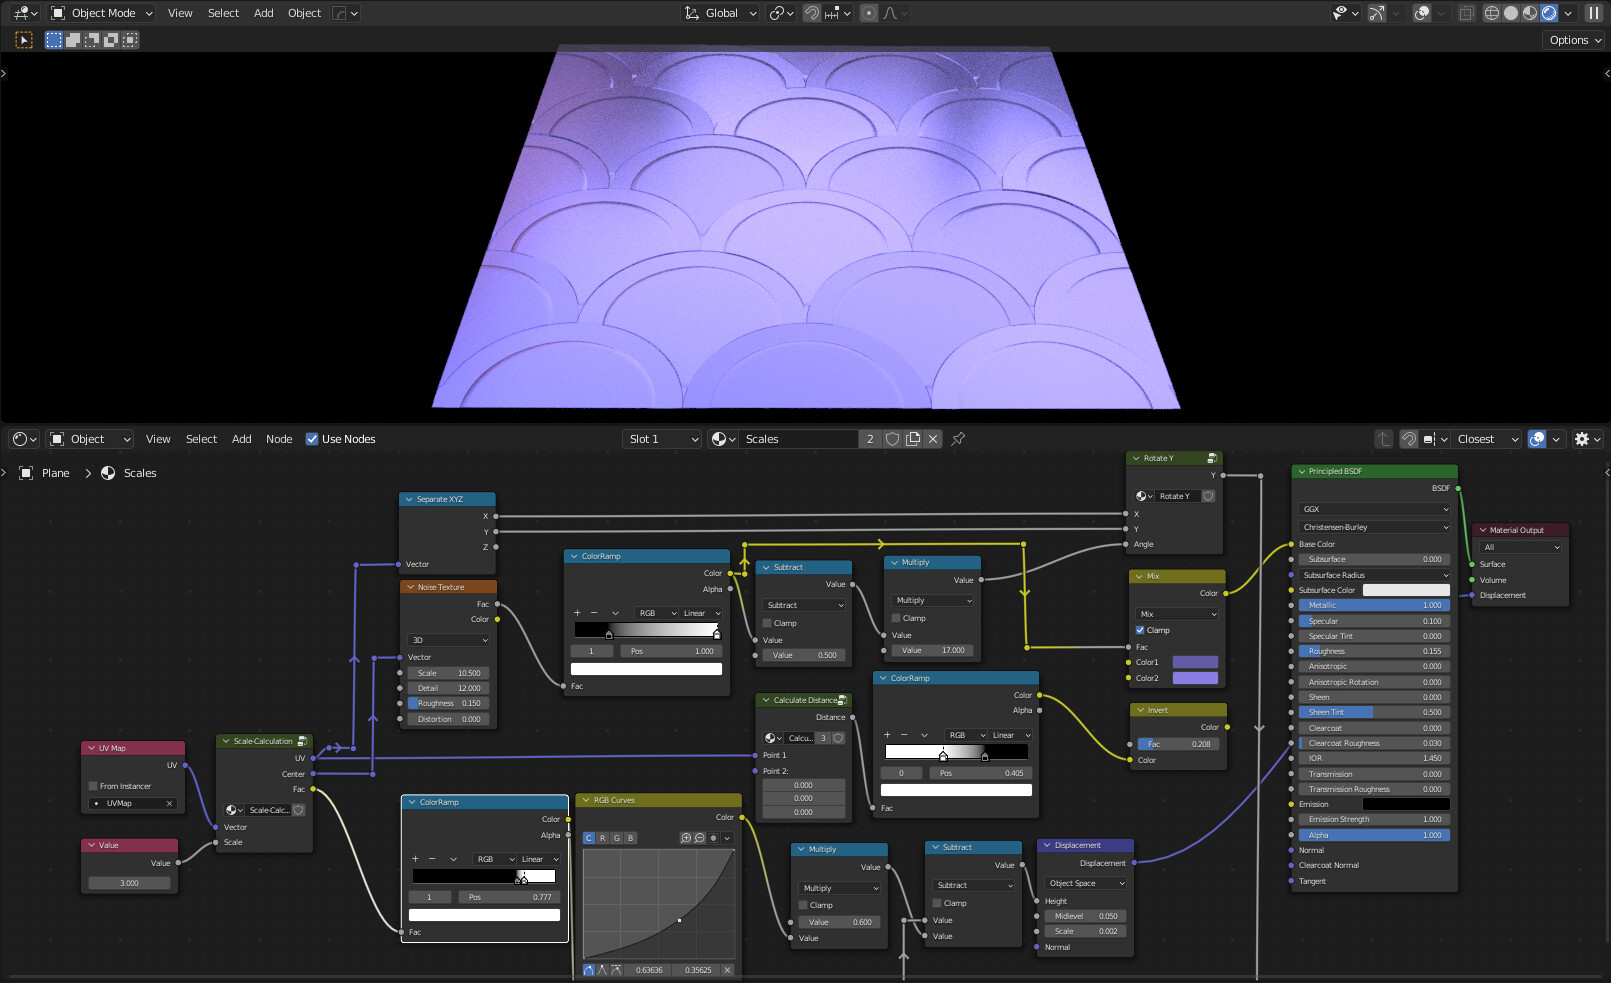
and especially the word “Seigaiha”
and yes I had to look it up, and follow the link…
It is one of my favorite patterns…so I got a start on it, with my own spin on things…
I used this technique, back around when Blender 2.8 just came out…but I forgot all about it and how to do it as well…it was a really fun little project, and of course, I had to add my own spin ( AMOS ).
I do use whatever I can to help speed up things and Grungit is one of those add-ons that really come in handy… Noise Maker is a node group I made up from a video tutorial…
:Bounce:, yay, new Sketchbook! I’m looking forward to all your bits and bobs. Seigaiha is one of my favourite patterns as well, yours looks good (and your node graph is impressively organized)!
I have a NoiseMaker group that looks very similar too, so maybe we used the same tutorial, but I didn’t save that information with the group, darn. I can’t remember where it came from – I’d normally bet on Sam Bowman, but a quick look didn’t find it.
This morning I Noodled up another texture ( converted to a node group) to add to my Asset Library of Node Groups.
I have been re-creating materials used in Substance Painter so I have them available in Blender.
This one came from the tutorial by Sanctus - Blender Procedural for Rust and Blister with Nodes. I highly recommend that you check out his tutorials!
Well for the past few days I have been intrigued with different ways to generate the “Seigaiha” patterns as procedural.
It seems simple at first but once into it, I found it isn’t as simple as I thought…
I started with using a Procedural SCALE material I worked on a year or so ago.
But then I thought…
It’s easy to map wave a node, set to rings, and using vector math, reset the UV … a Gradient map is and I was off to another direction…
But I somewhat reached my limit ( For the time being ) in Blender Nodes…and started playing in Substance Designer…
This is what it takes in SD ( I hate to say it, I feel like I’m dissing Blender ) but Cold hard facts it is this simple…
Continuing to delve into the more traditional patterns that come up when researching “Seigaiha”…
Recently the “Cloud Pattern-Kumo” was seen on Netflix, Arcane. My favorite character sports the Cloud Pattern as tattoos…
So I worked up a simple Kumo with variations of motifs clouds and flowers among others, for a cloth material. I will continue to add new motifs as I discover them…
Using the same technique, made up a cloth variation to set any colors you want to add…and when done the ability to change assets inside for the patterns.
Just made up a newer cracked plaster material ( not procedural) but baked texture maps)
still can be adjusted as I made it in an .sbar file, so with the substance plugin I can adjust as needed…
Here is another one…a bit , No a lot over the top and gaudy as all get out!
But it does allow me to append 5 different shaders to a new file…
The gold shader could also be inverted by just a small amount and used for a head cloth or Saree.
Still working, still answering questions has taken a large chunk of my early mornings, but I still like to dabble with things that I need for my work…
Dirt and Grunge are one of the things that I have studied and as yet still don’t have a comprehensive set of tools to get the total effects I am looking for…
Following some of the videos step by step on the subject… I found this one by Kaizen Tutorials…on Professional Material Creation…
and an Orange crate…
Very good tutorial and easy to follow if you follow step by step…but still does not have the effect I need, as well as it doesn’t adapt to other model types like cylindrical models…
That and a “CRATE” is really boring…I have tons of them laying around…
another example by DanielGrovePhoto on Procedural Worn edges and Damage…is a very nice effect if you get it just right and hide those areas where the shaders don’t work as well as they could…
Some of the best results are from using the Substance add-on and opening created files out of Substance Designer that I published for Substance Painter…
so adding everything together I have created a series of over-the-top GRUNGE on a set of assets called Industrial Units 9-20…My imaginary Units were weathered and damaged after 100 years of misuse…
Lost connection…I didn’t get the chance to add that the Units are not Mine I only add the new materials…they are from a pack by Armen Manukyan on Artstation who has some really great assets at really reasonable prices…check them out!
A few days ago a link to tutorial popped up for adding Gradient to cracked ceramic, and I liked the result…but I never made it through the tutorial, got sidtracked while switching screen and added my own nodes to the project…might have to go back and try to make it through one more time…
Every once in awhile I like to just play with just shape and forms, and I saw an older tutorial on “How I Created the Universe in 10 Minutes” and it was the first one I had seen that used the Simon Thommes, procedural noise pack
It is just so fun to spend 10 minutes and then play for the next hour, getting compleatly different images by just changing a few values and moving around the camera…
Lost the proper colors ( way darker) as was exported as an EXR file ( I forgot to change it over after some work from this A.M.) That and get the file size down from 96meg…
since you mentioned tesselation, did you go with Tissue? or Geometry Nodes?
neat in either case … i like how you changed elevation even with the roundy squares (bottom most in image, for instance) on the ‘back’ side, causing a shift in angles.