In this post I will work on the weathering effects of the color texture, while in the next one I will add scratches and some other remaining details.
The weathering effects that you can observe on the aircraft from WWII era are quite “dramatic”. The paints used in mid-20[SUP]th[/SUP] century were not as chemically “stable” as the contemporary coats, thus they could change their hues in few months of intense service. The archival color photos below show an extreme case of this effect:

These photos were taken by Frank Sherschel on 14[SUP]th[/SUP] November 1942, for the “Life” magazine. The SBD-3s depicted on the pictures belonged to VMSB-241 squadron, stationed at Midway in that time. Marines received these aircraft in July 1942, but all of them were already used before - most probably on the U.S. Navy carriers. I think that in November 1942 these SBDs had accumulated about 10-11 months of the war service. I will use them as an extreme case of the weathering. (It is always good idea to recreate such an ultimate case in the texture, because you can always make your model “newer” by decreasing intensities of the weathering layers. On the other hand, you cannot use more than the 100% of their intensities, thus you cannot make your model “older” than you initially painted).
Having historical color photos of several airplanes used by the same squadron, you can easily determine the general pattern of the stains, smudges and scratches. This pattern repeats with some random variations on every aircraft. It seems that such a radial engine like R-1820 emitted a lot of oil – in their exhaust fumes and in the air flowing from the NACA cowling. (Because of the high “oil consumption” of the R-1820 the oil tank in the SBD was quite large). The non-specular paint of the two-color Navy camouflage absorbed this oil mixed with the soot from exhaust fumes, creating characteristic dark traces along the fuselage and the center wing. The crew most often walked on the center wing, thus you can see on its upper surface the lighter traces along dome rivets seams and darker, “trodden” spaces in between. There are also some scratches in the paint. Some of them exposed the yellow primer, while the others reached the bare metal of the aircraft skin. (Thus I assume that the first layer of the Douglas primer had a yellow/orange color).
You can also notice some white splashes on the outer wings (traces of the coral sand from the atoll?), as well as the repainted areas around the tactical numbers. (On a black-and-white photo, it would be extremely difficult to distinguish these repainted areas from the oil/fumes traces).
What is interesting – in spite of the non-specular camouflage of these aircraft, you still can see a specular highlight at the wing root (as in figure “b”, above).
The key elements of the weathering effect still depend on the technical details of the aircraft skin: rivets and panel seams, bolt heads, inspection doors. However, their pattern is so random, that I cannot recreate them in the SVG image, as I did in the case of the reflectivity map. Thus we need a reference picture of the skin details for painting the color (diffuse) texture. It has to be mapped in the same UV layout (UVMap) as the color texture. To do this, I composed from the key layers of the SVG drawing an auxiliary image, mapped in the UVTech layout. Then I quickly transformed it into UVMap layout using the Bake feature:
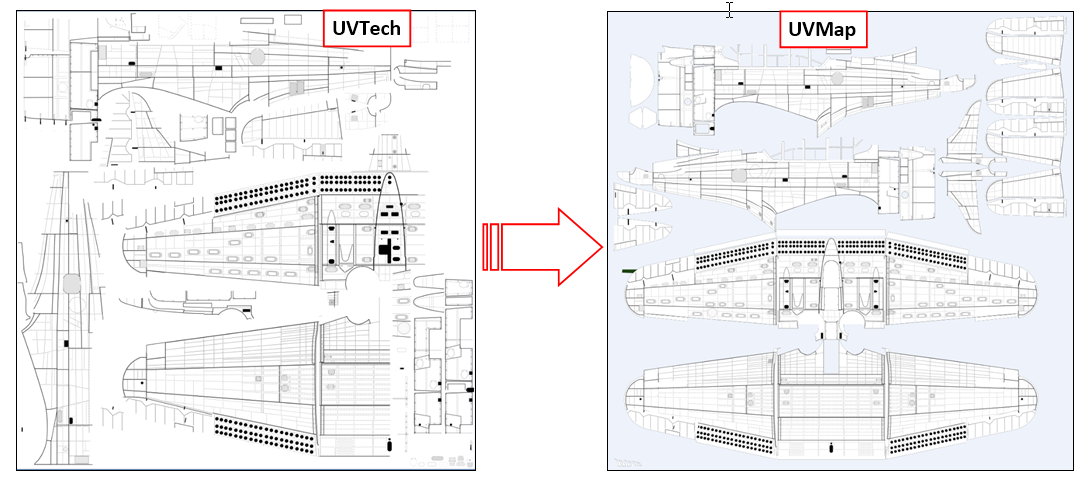
The old Blender Renderer engine is a better tool for such a direct transformation of a single texture than the Cycles Renderer. In the Blender file that accompanies this article, I created a dedicated screen layout for this purpose. It is named Texture Baking. You can find there a simple script that I used to switch the UV layout of all model meshes between UVTech and UVMap. To bake a texture from UVTech to UVMap layout, you have to switch the current rendering engine to Blender Renderer and disable nodes in the B.Skin.Camouflage material. Then assign the image (mapped in the UVTech coordinates) to its single Blender Render texture assigned to B.Skin.Camouflage material, named Image for Baking. When you click the Render:Bake button, it will generate the resulting texture (in the UVMap coordinates) in the Test image, which you can see in the UV/Image Editor. You can use Image:Save As command to save it to an external raster file.
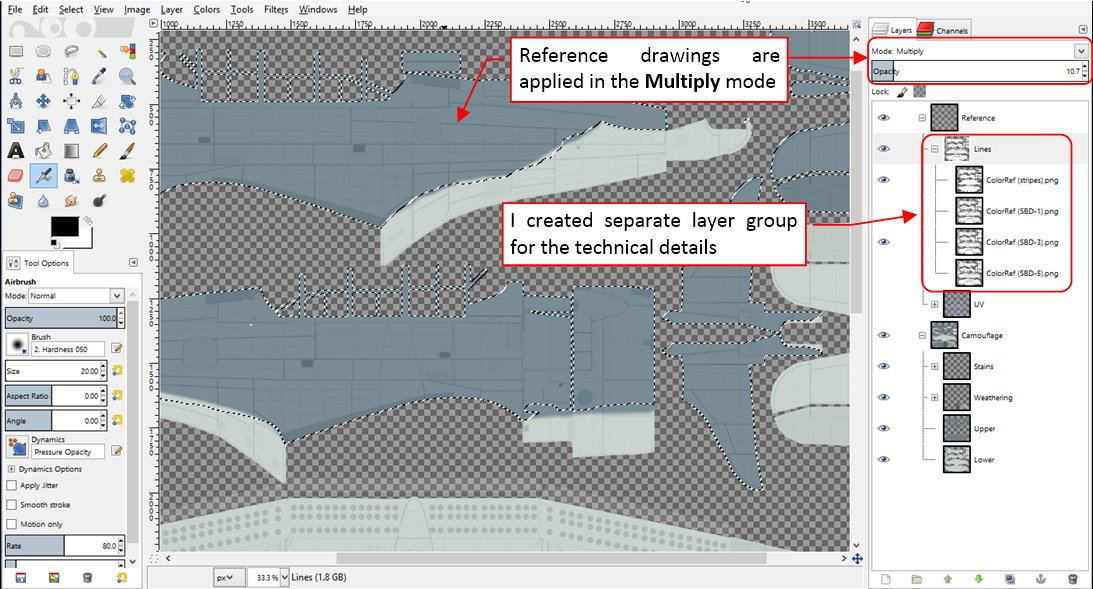
I created such a reference image for each SBD version I have modeled (SBD-1, SBD-3, and SBD-5), and placed all of them in GIMP:
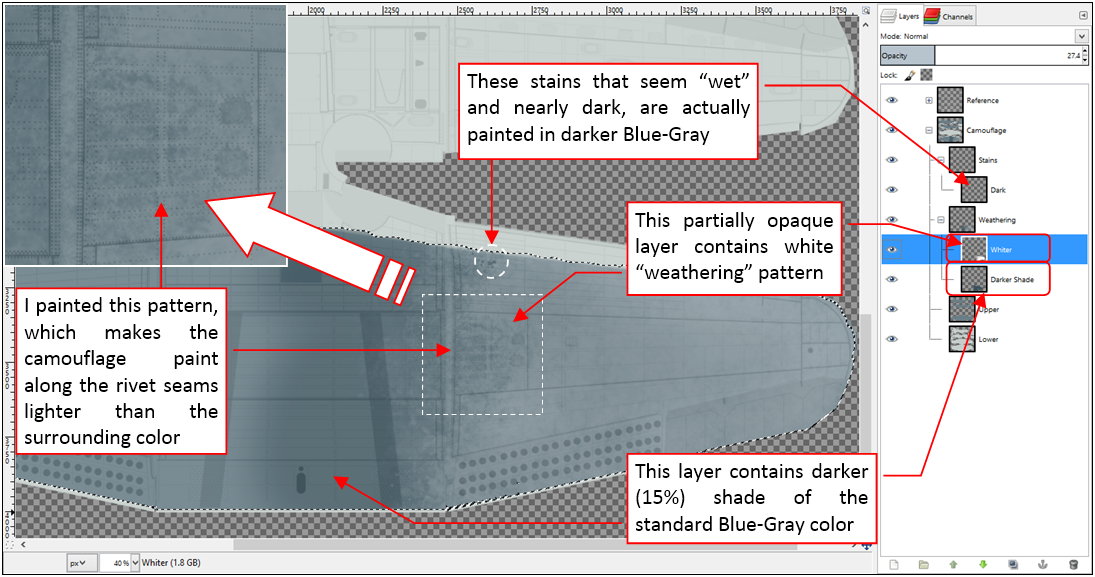
The darker areas in this weathering appear between the rivets seams. I decided that it will be easier to recreate them using one layer of darker camouflage color, overlaid by partially opaque layer that contains the weathering pattern (in white). First I painted in this way the right outer wing:
I used this “sample” for testing if such a pattern looks good in the final image:

I think that it looks acceptable. Thus I started to paint in this way the weathering of the whole upper surface.
I create the basic pattern of the lighter traces along rivet seams in four steps:

First I painted the “overall noise” with an “acrylic brush” tool (figure “a”, above). Then I changed the tool shape to “pencil” and draw thin lines along rivet seams (figure “b”, above). In the next step I used Eraser to make this pattern more random (figure “c”, above). Finally, I filled it again with light touches of an irregular brush, to lighten the overall effect (figure “d”, above). (This last step is optional, depends how this fragment looks like on the reference picture).
Figure below shows the resulting weathering pattern on the fuselage:
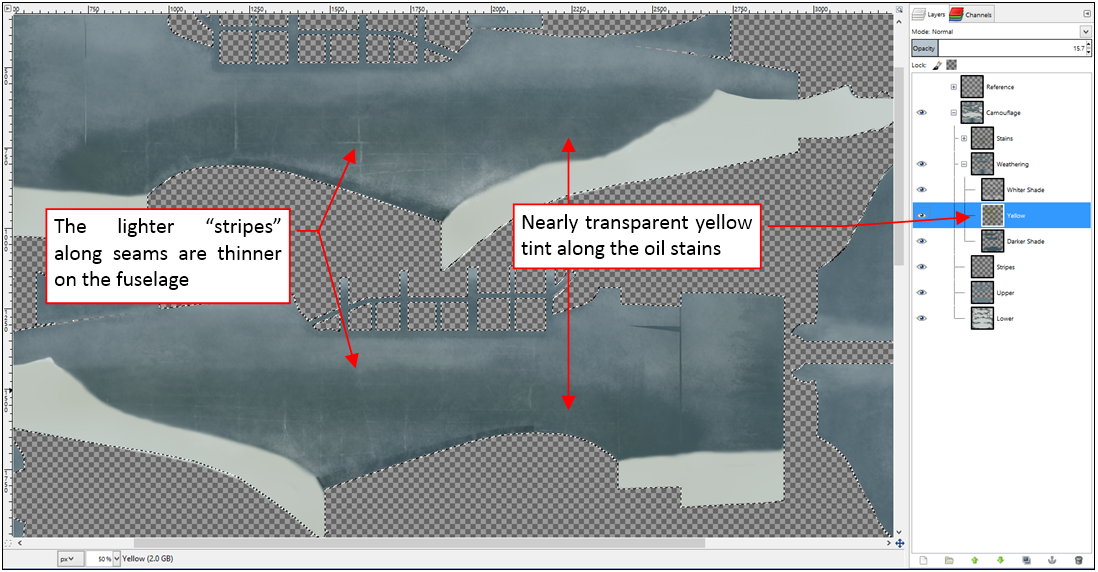
As you can see, it differs from the pattern on the center wing. The lighter traces along rivet seams are thinner, the color is more uniform. Using a separate layer, I added a yellow tint to the darker areas.
Continued in the next post (this article exceeded the 10 000 chars/per post limit)